
January
4
September
25
Howto make a GAMEBOY PI
Tutorial Time 🙂
For awhile I have been trying to make a GAMEBOY and Raspberry Pi Mod.
My last post showing some real progress and installation of the software.
Today I will write a better guide for myself and others so they can learn from my mistakes.
If you follow this guide for setting up your SD cart this progress will take about 1,5 h to complete.
(guide is below show and tell 🙂 )
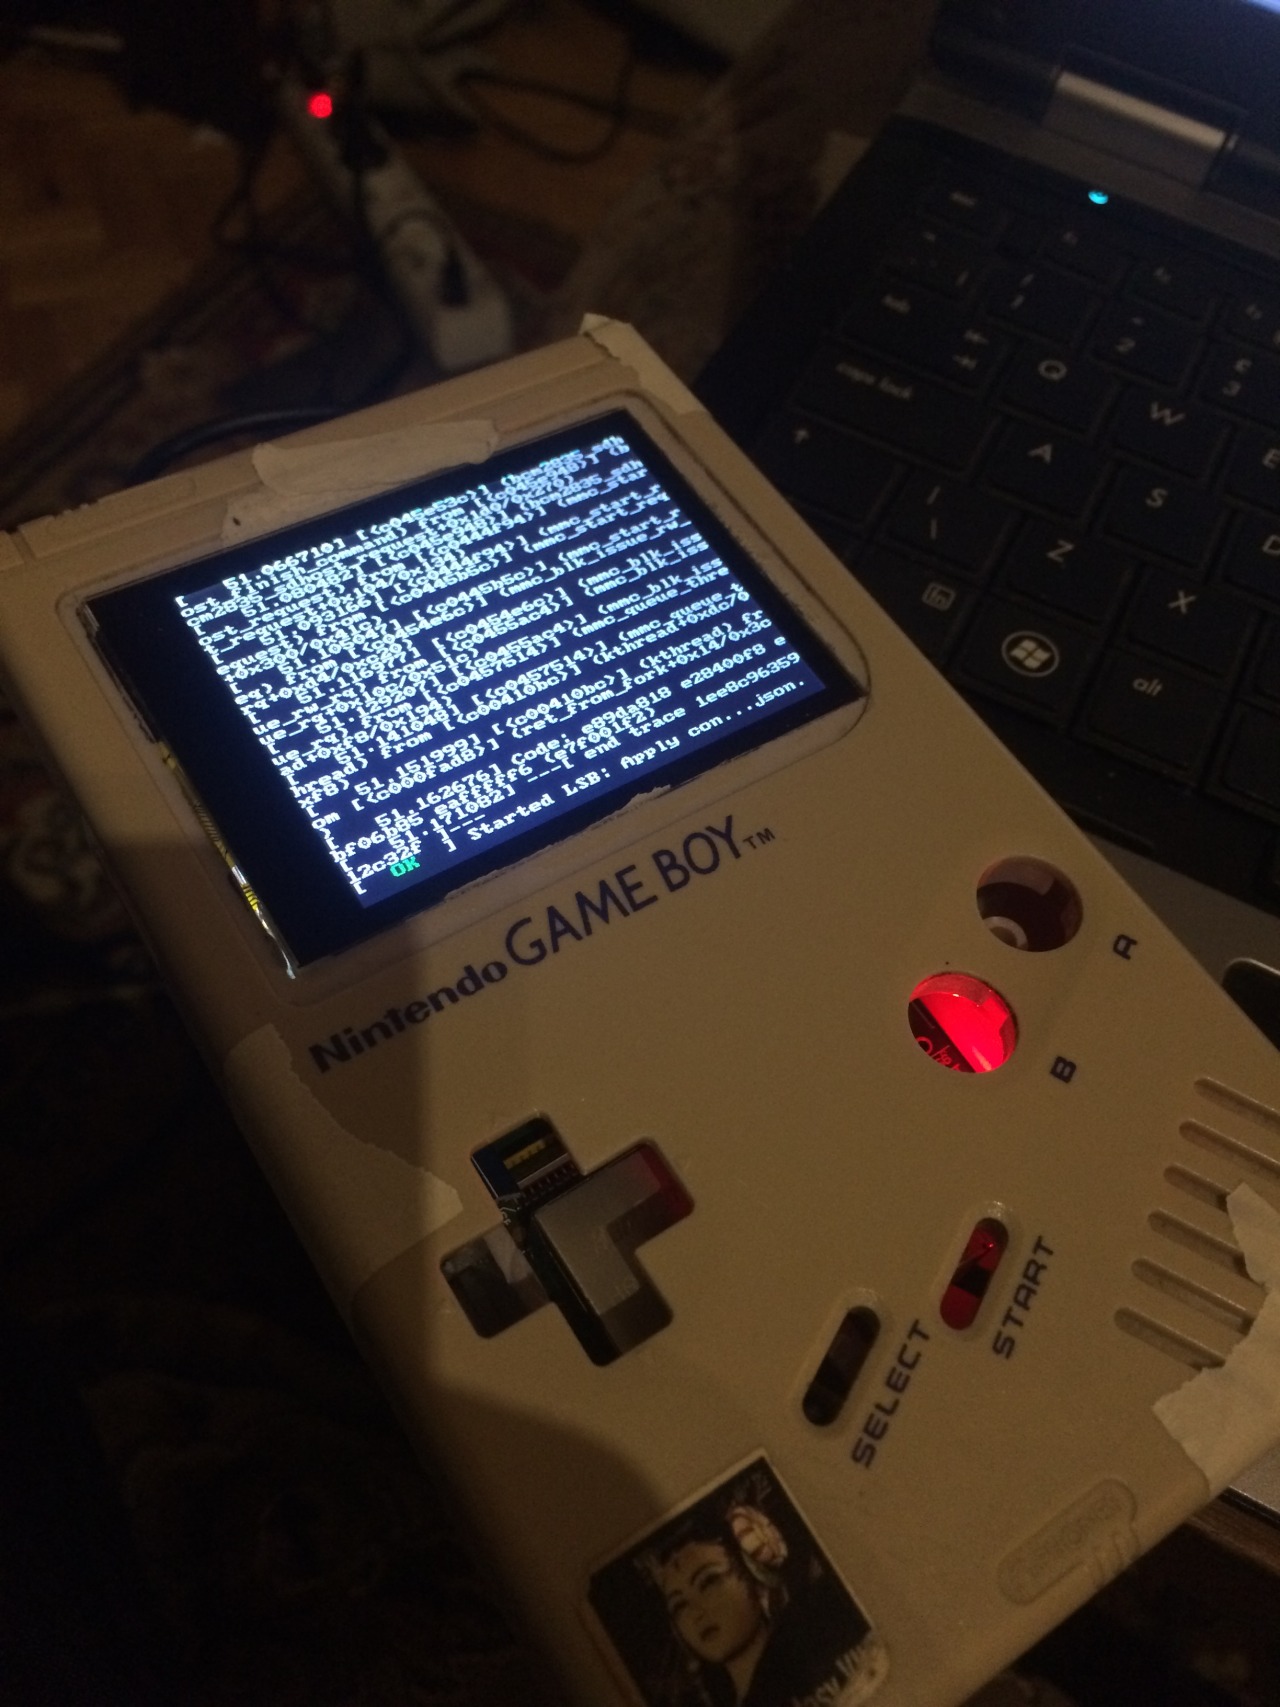
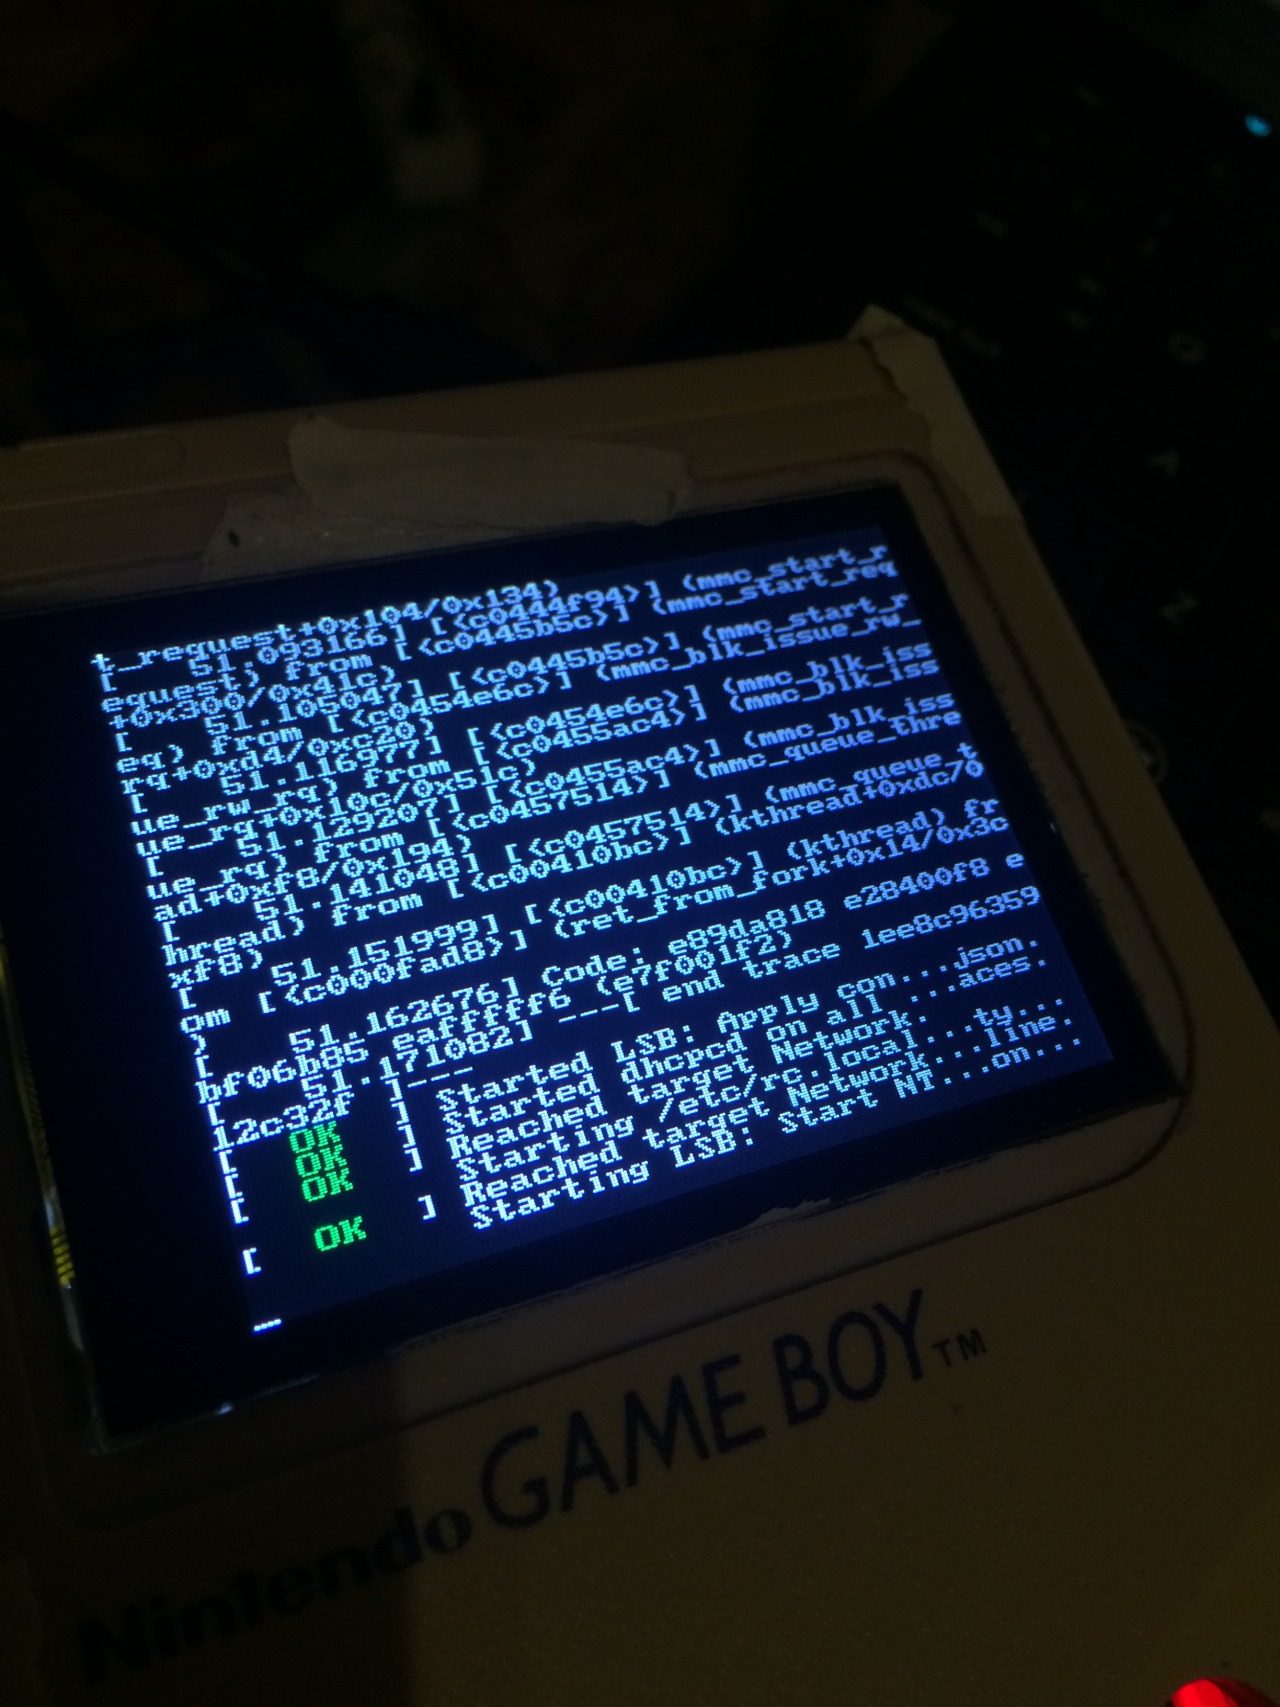
Warning: I still have to remove a error that i getting but i din’t find a solution for this atm:
”At random times i get: alsa lib pcm.c 7843: (snd_pcm_recover) underrun occurred”
not when playing a game only if i am in the front end and during boot….
Lets start with show and tell:
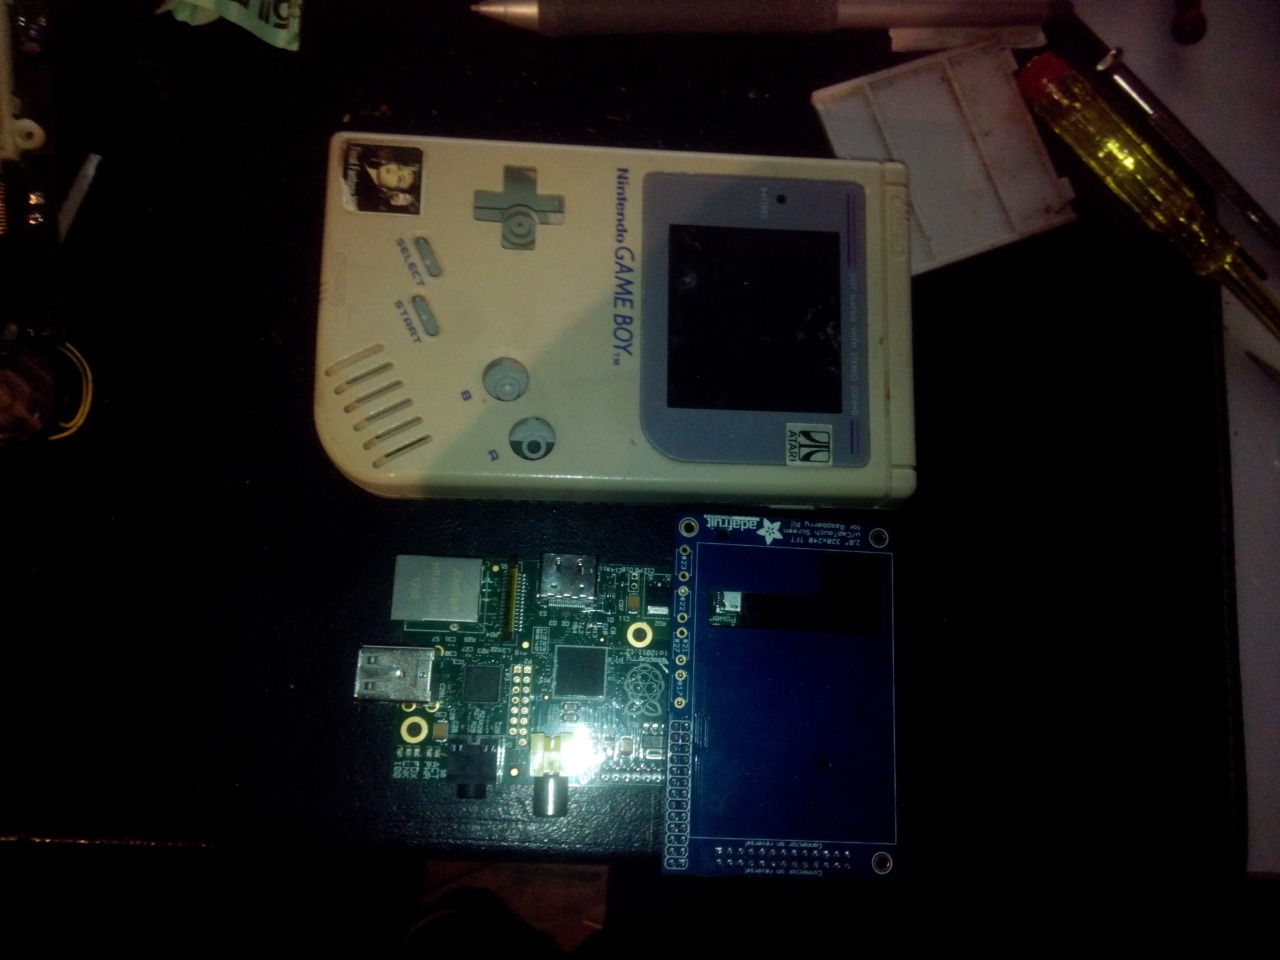
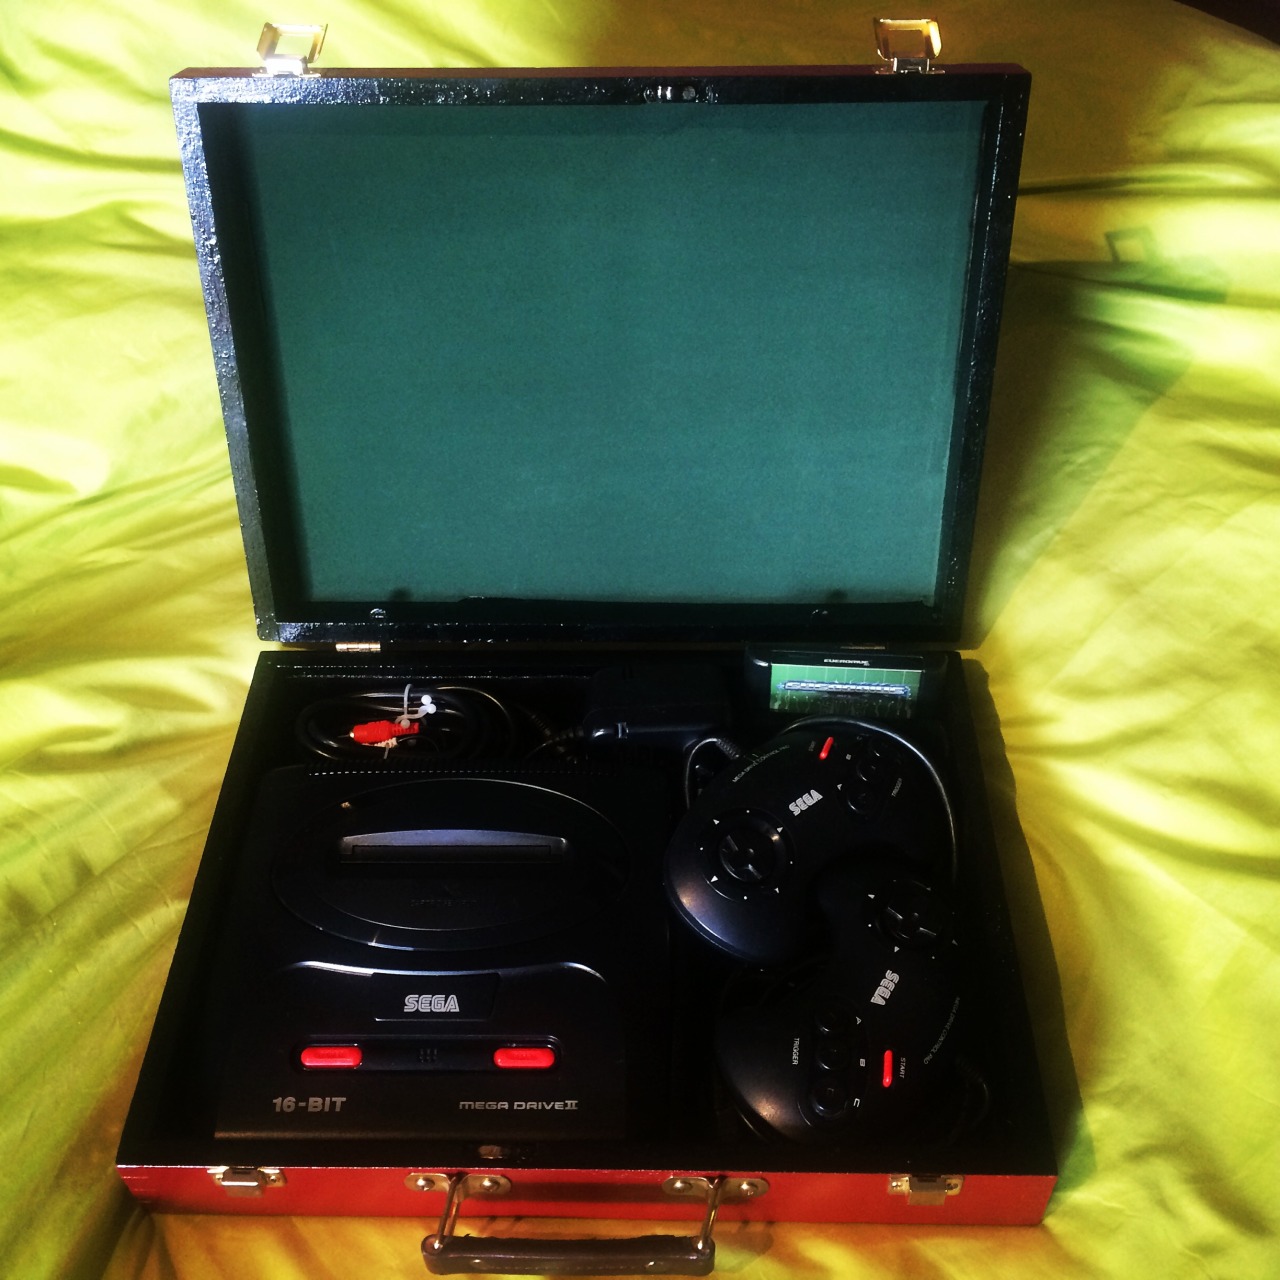
Hardware used:
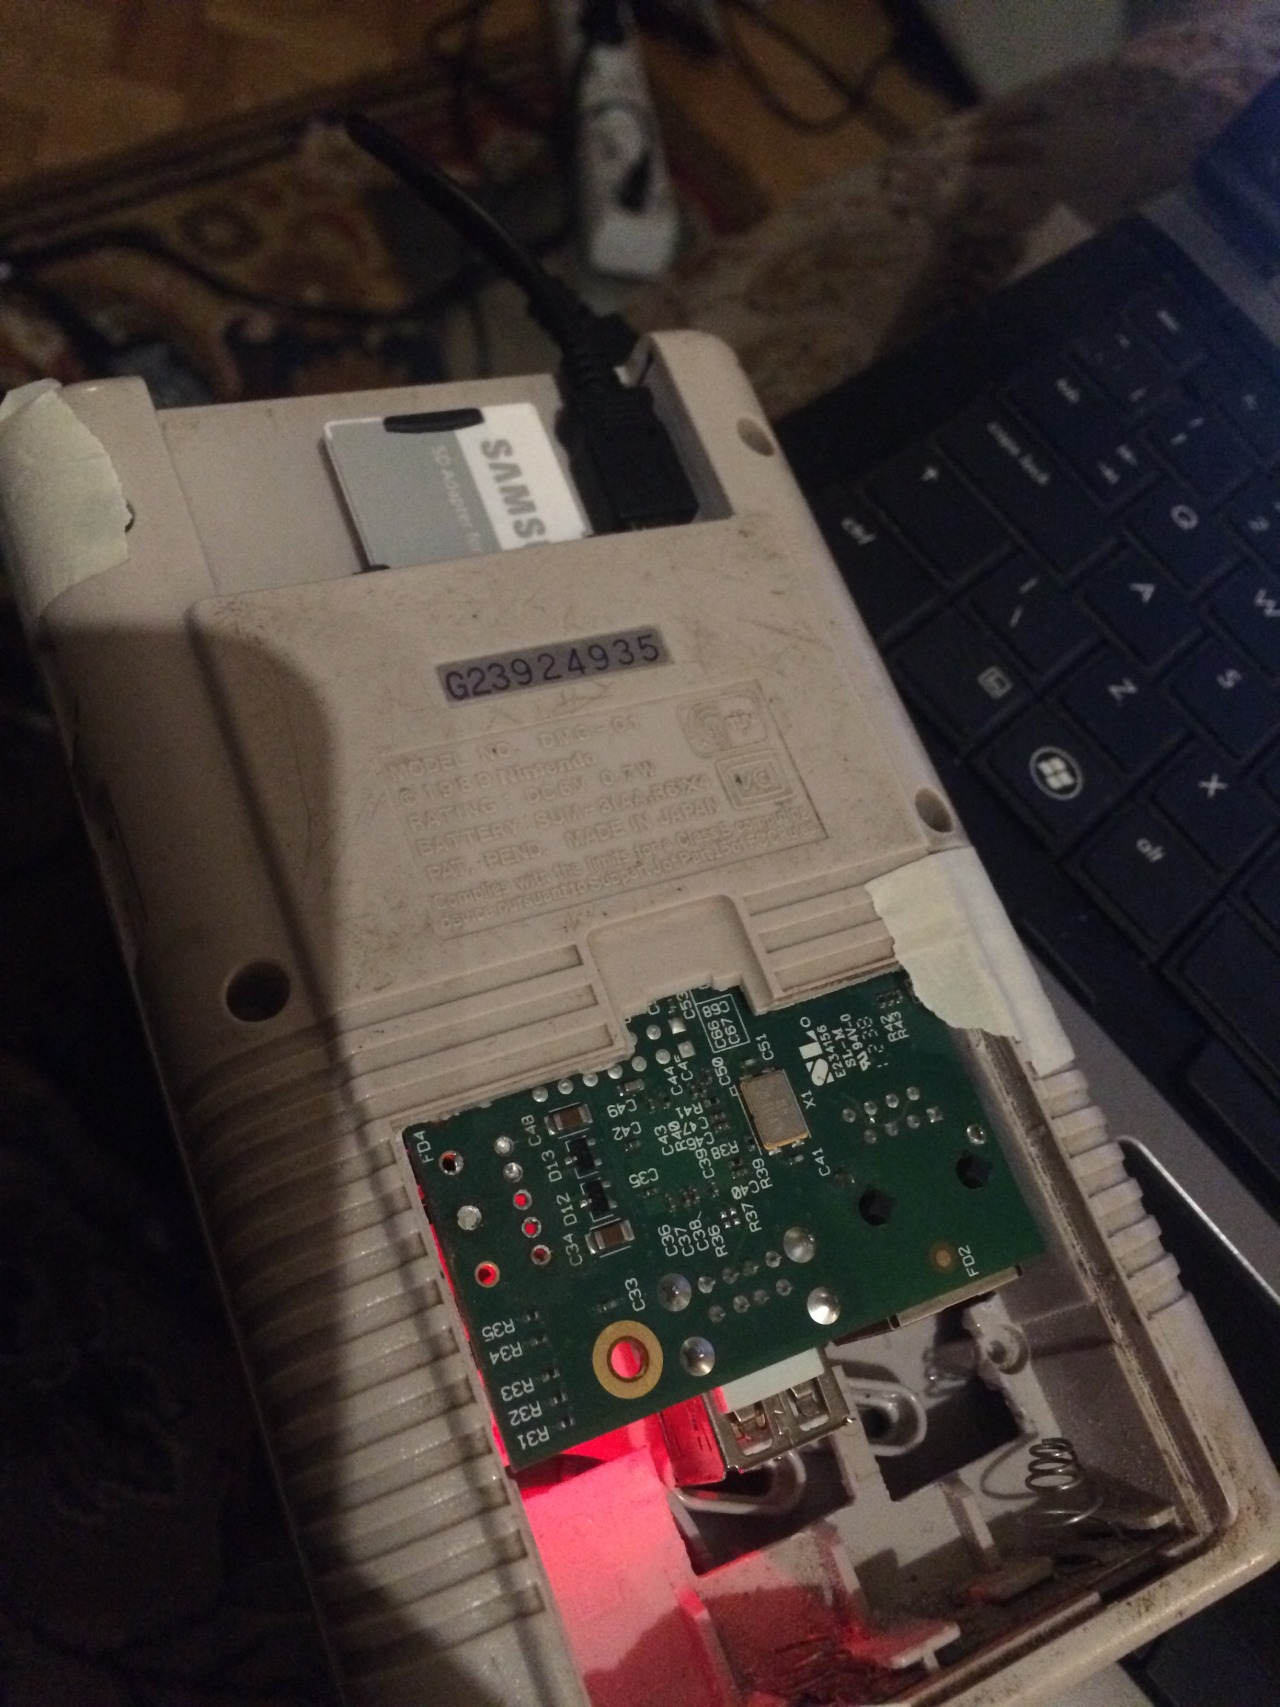
Gameboy case, wires, tact switches, empty PCB, power bar, cheap speakers and a Dremel
And of course a
Raspberry 1b:

| 000f | Q4 2012 | B | 2.0 | 512 MB | (Mfg by Qisda) |
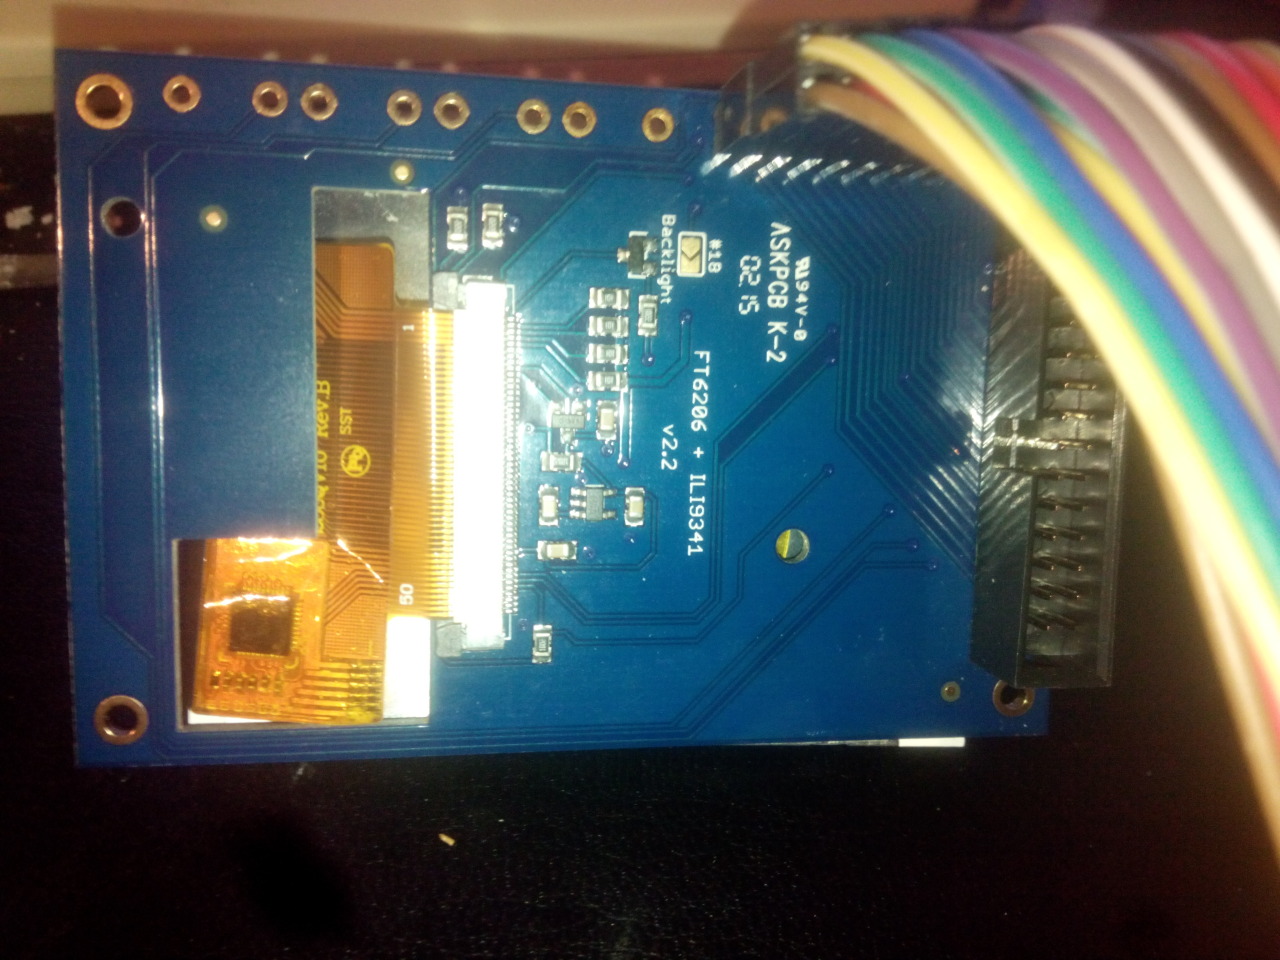
And a Adafruit 2-8 pitft capacitive touch:
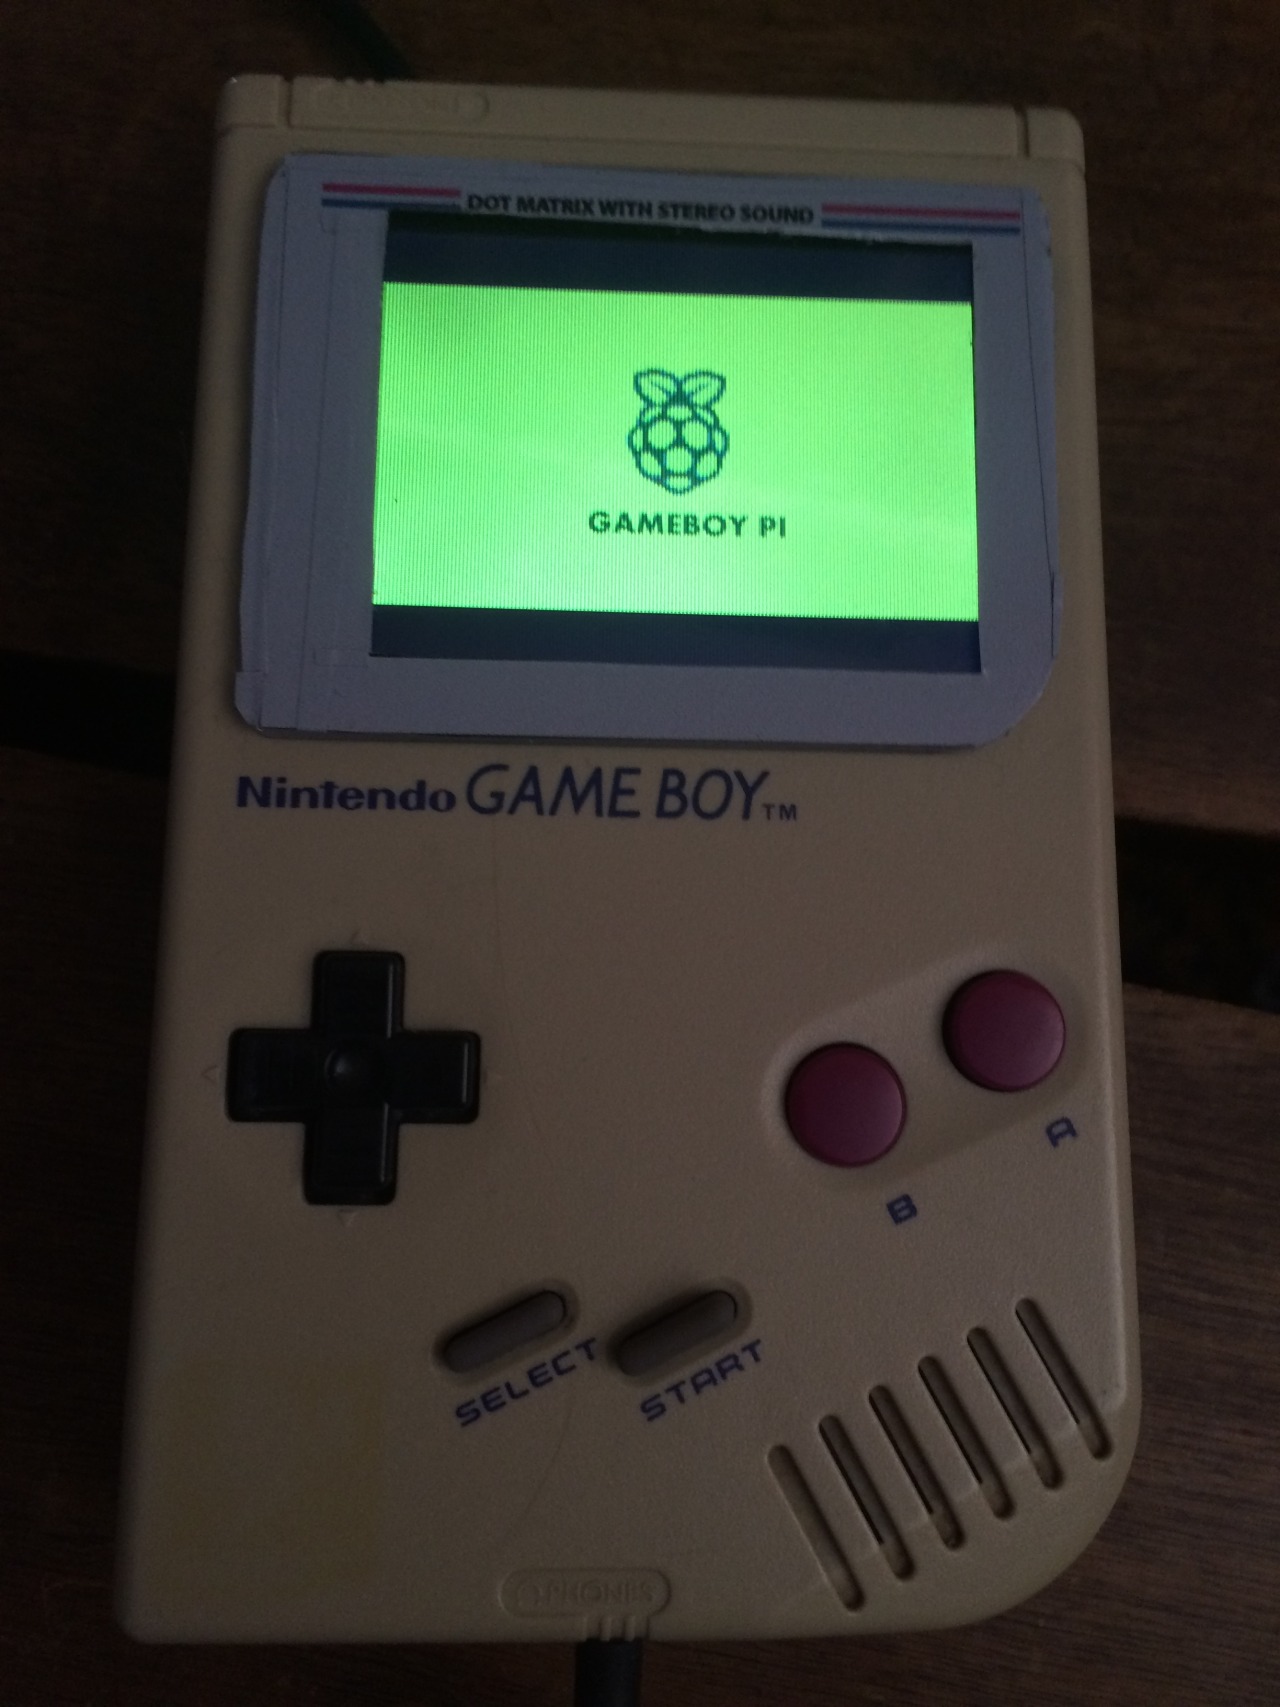
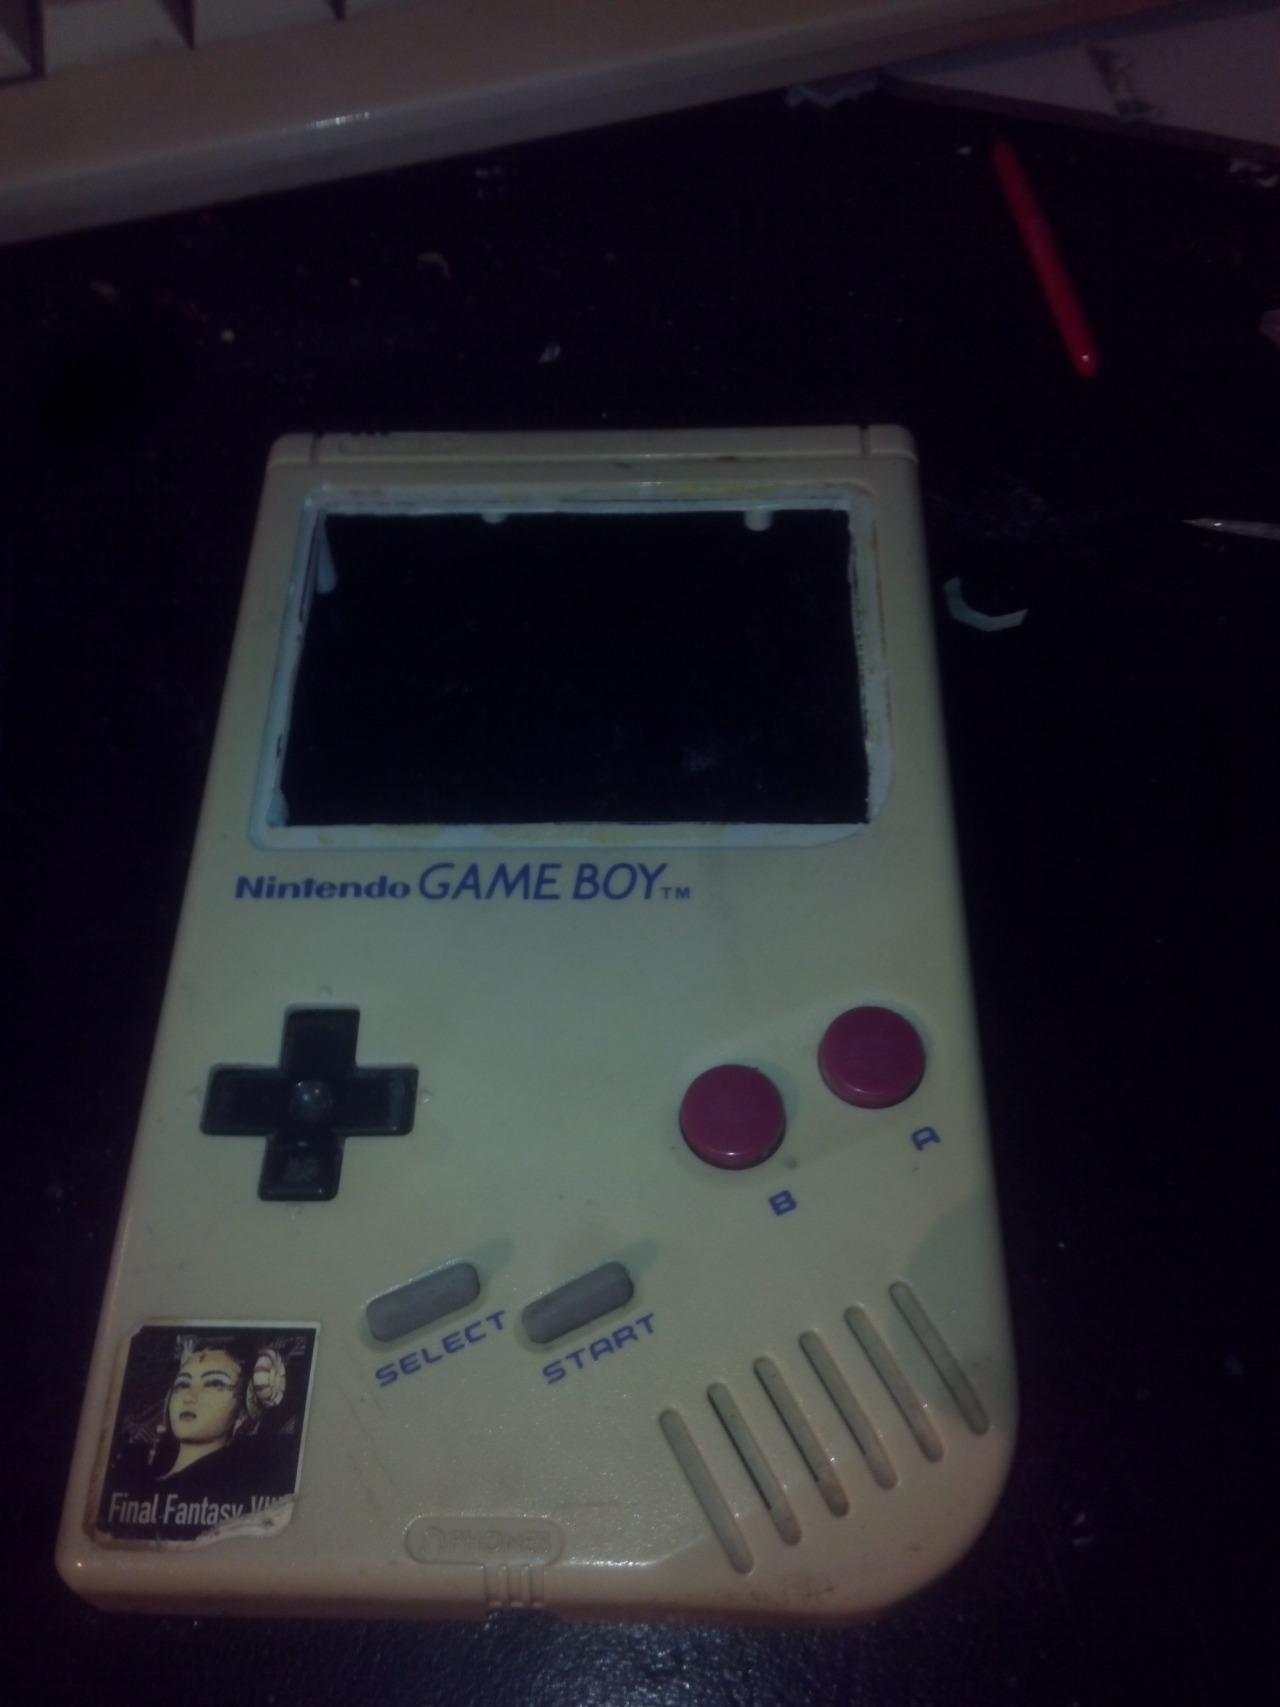
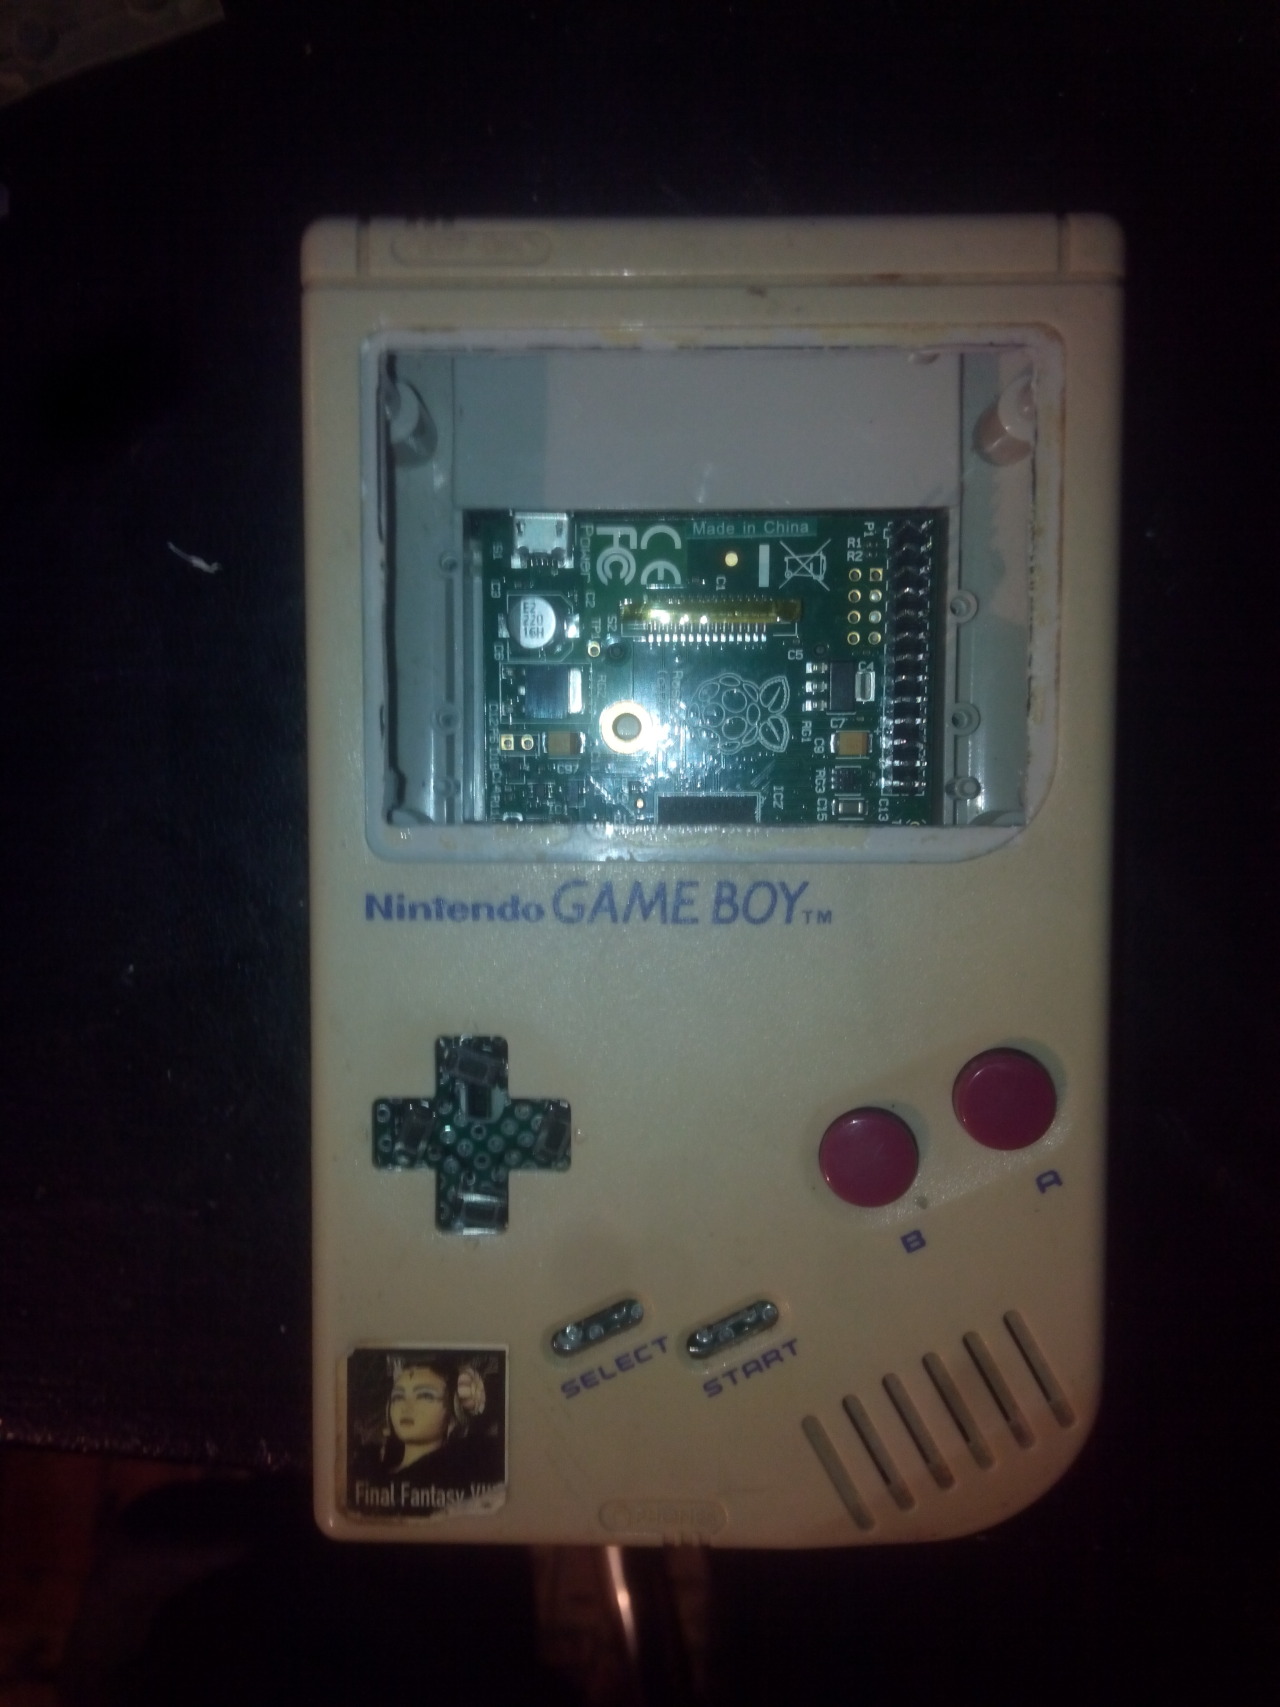
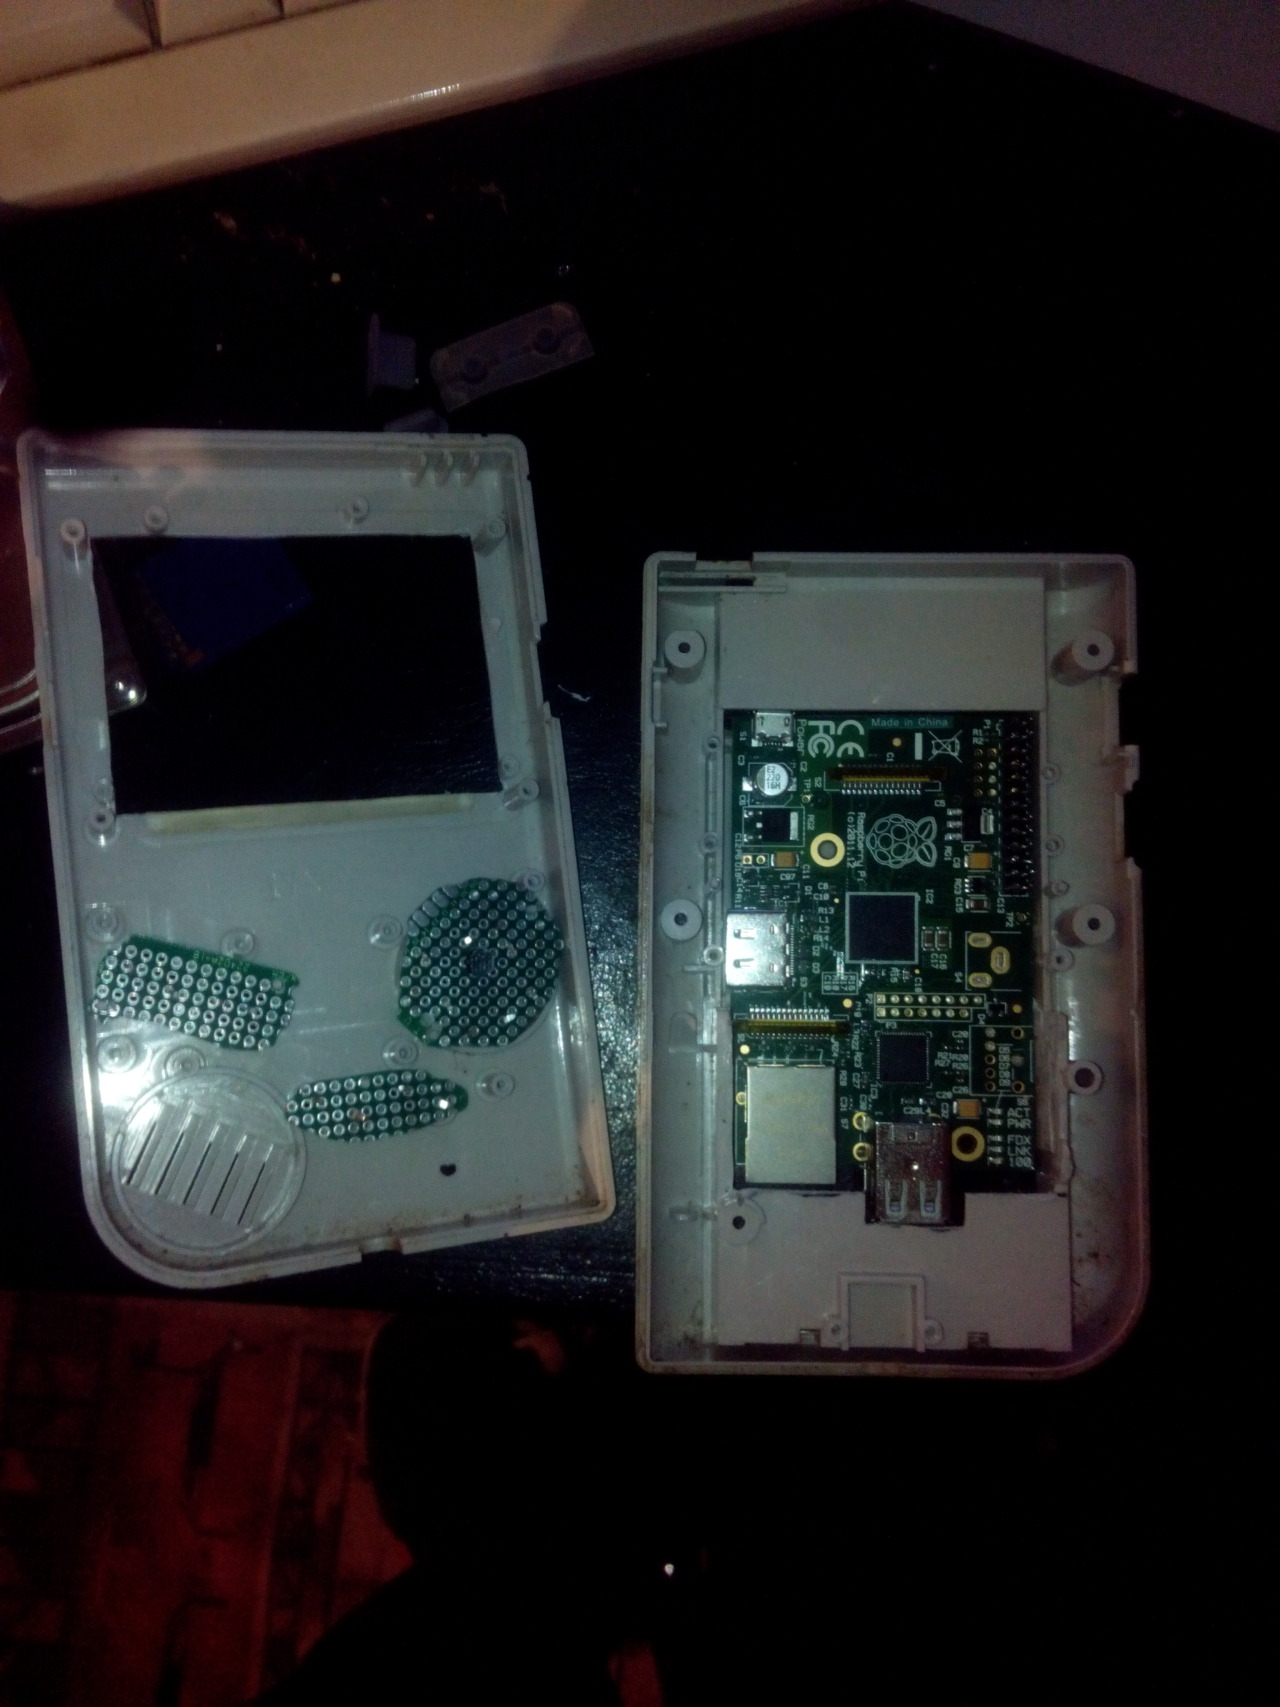
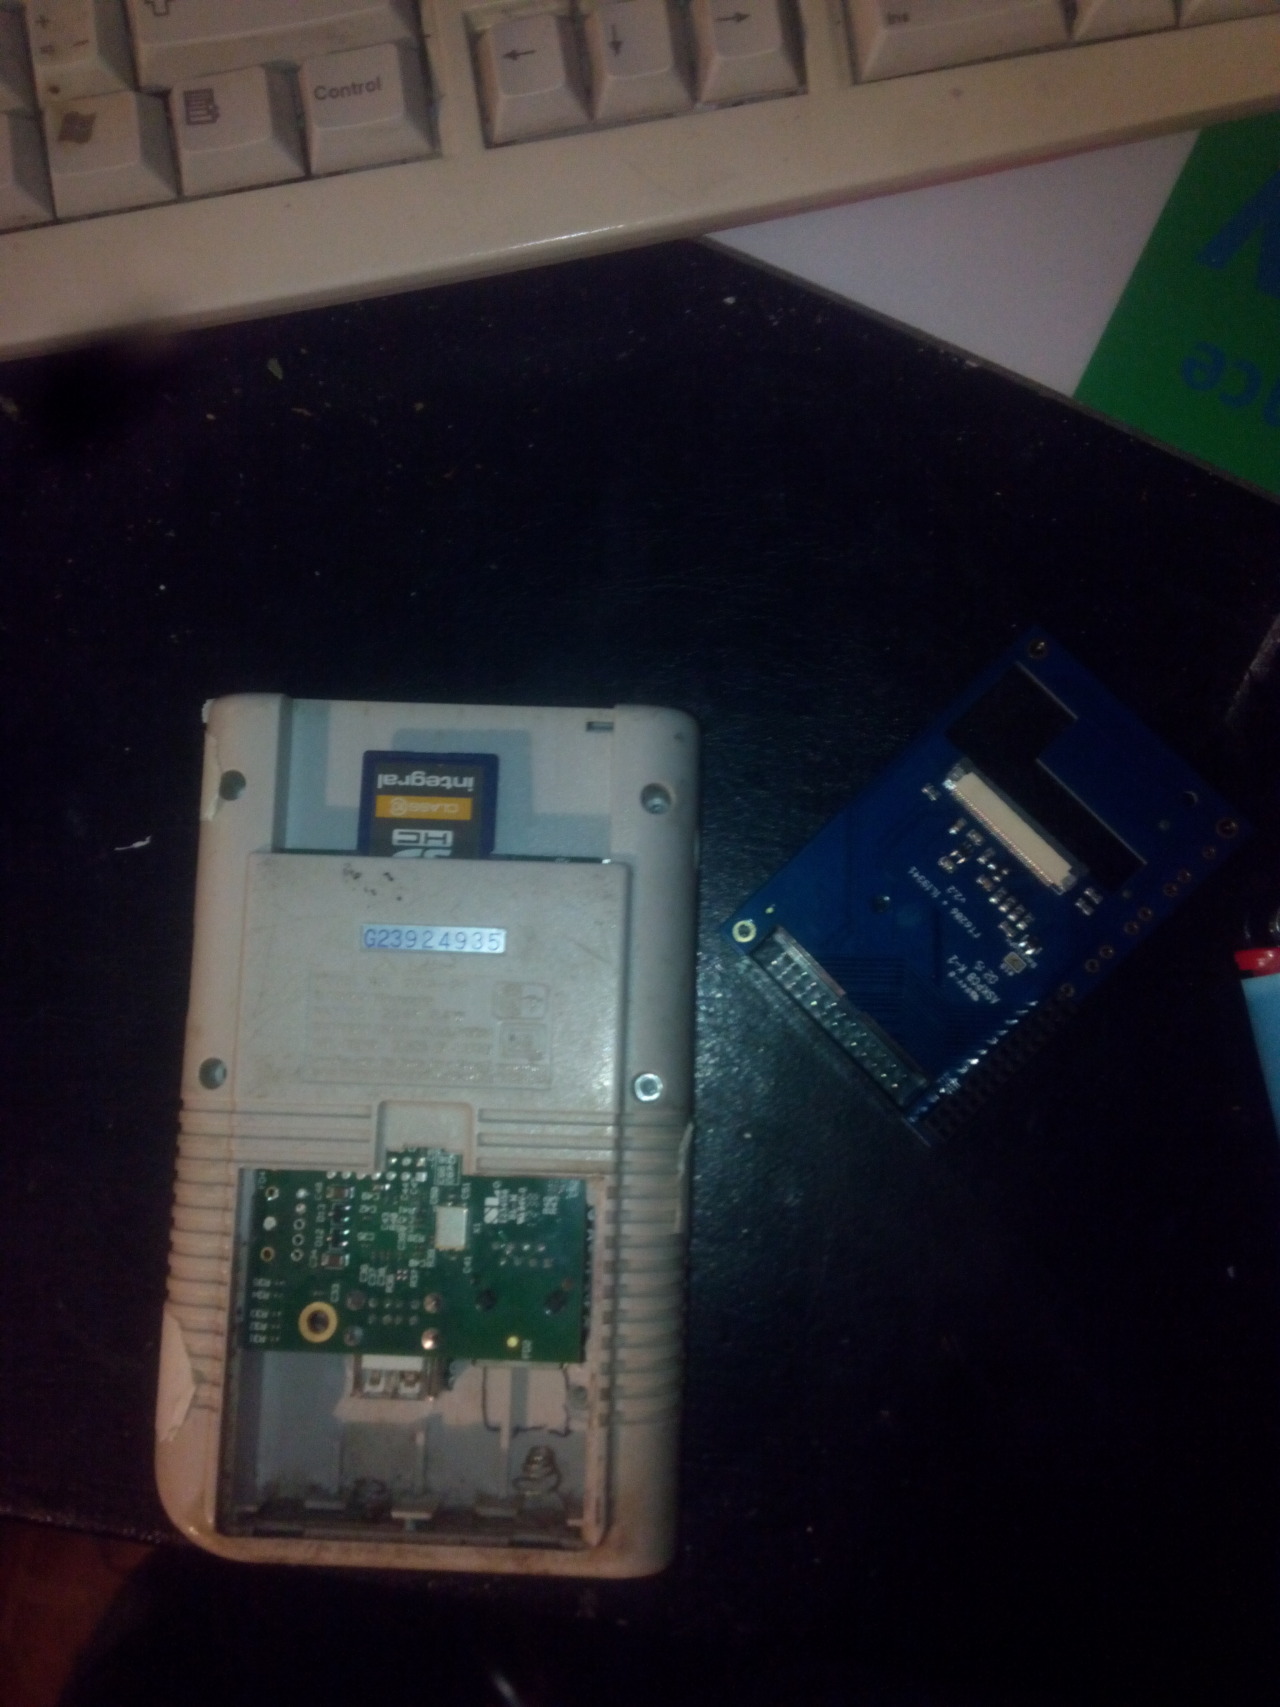
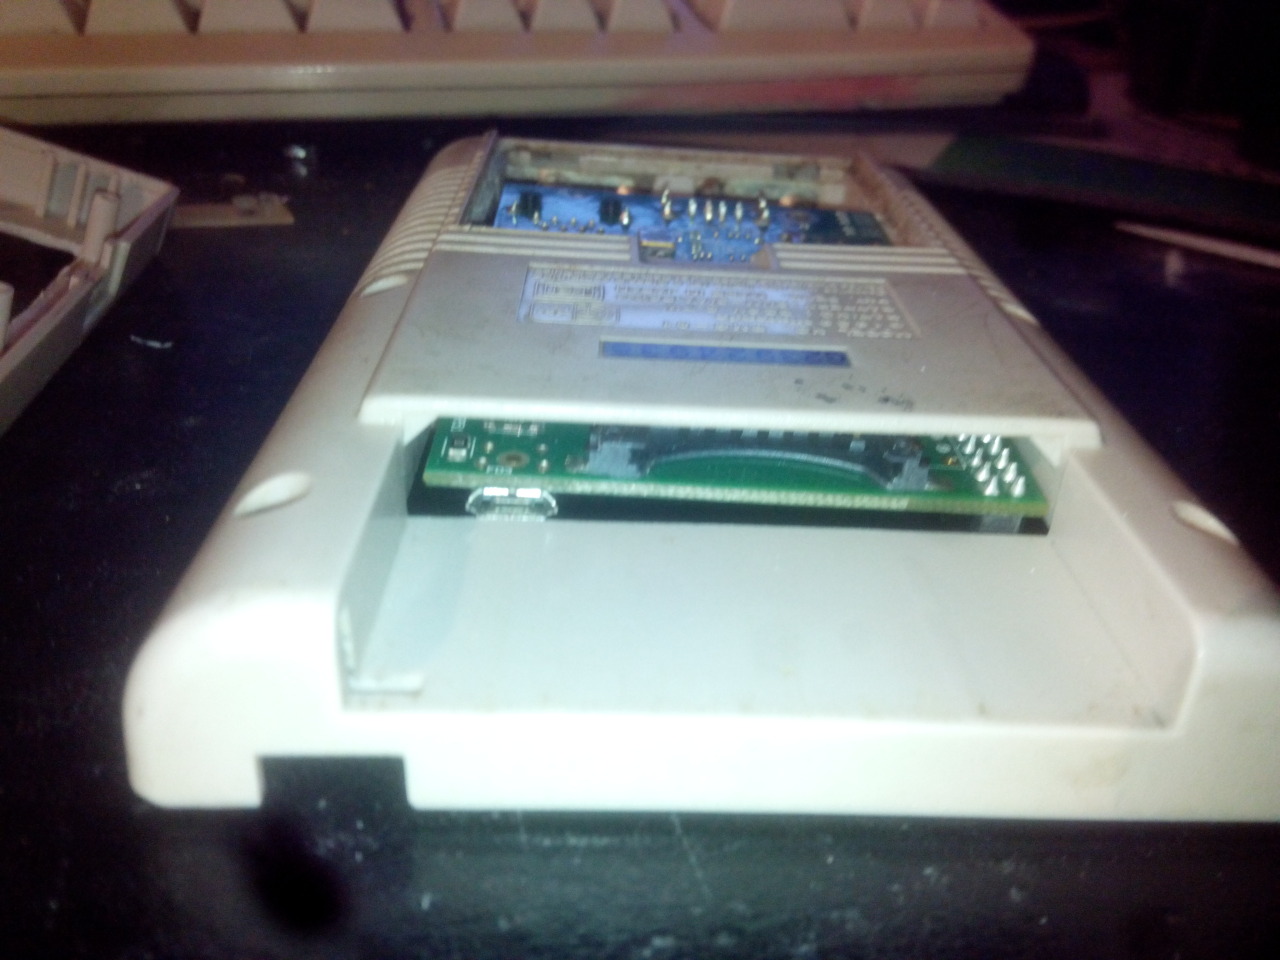
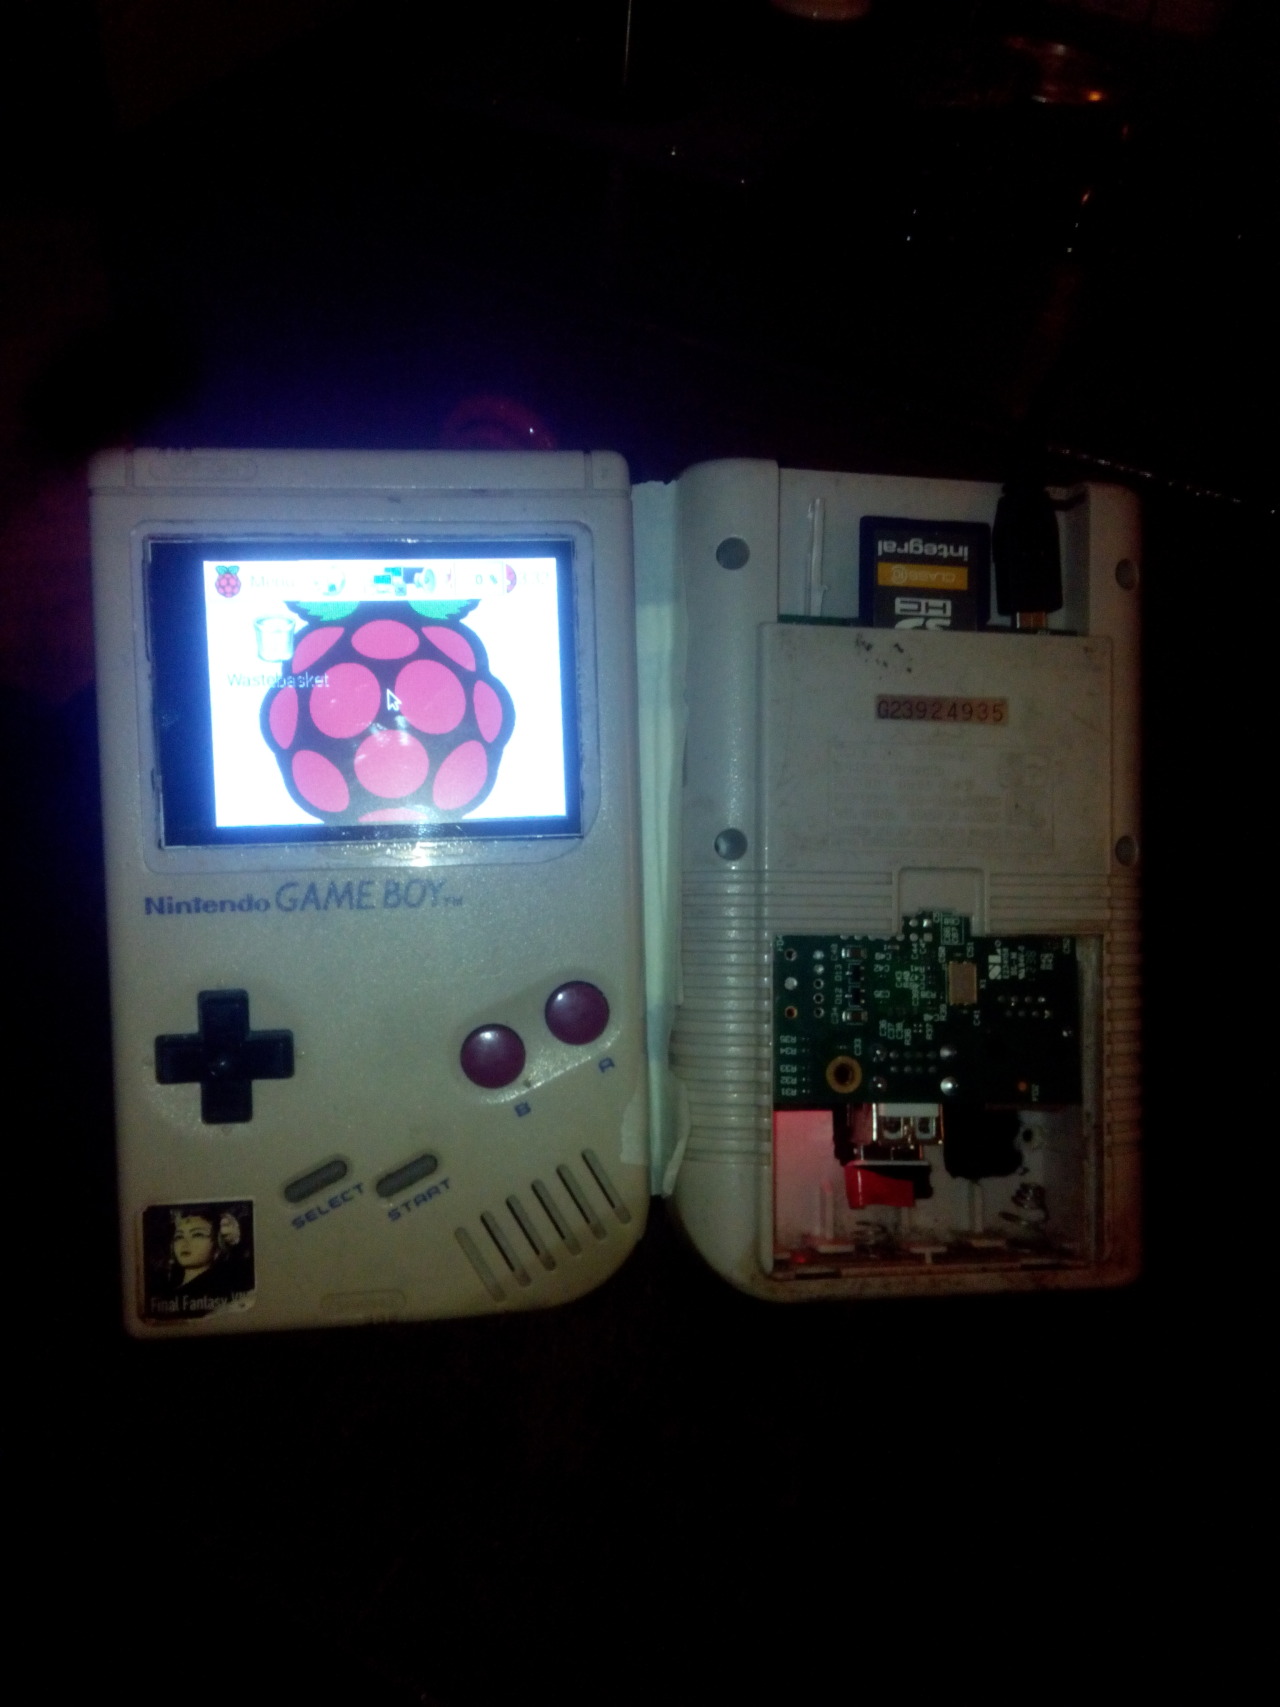
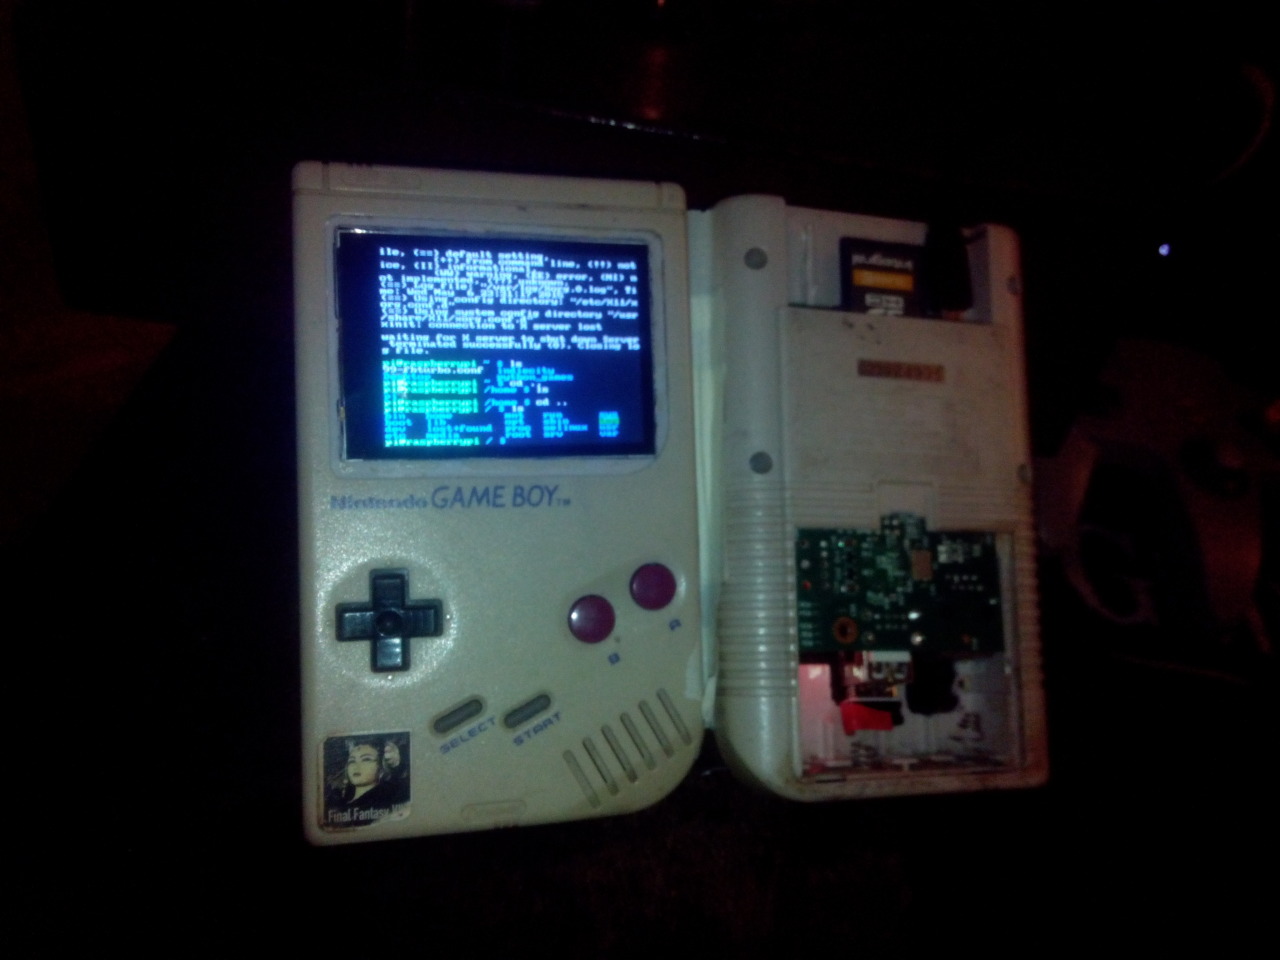
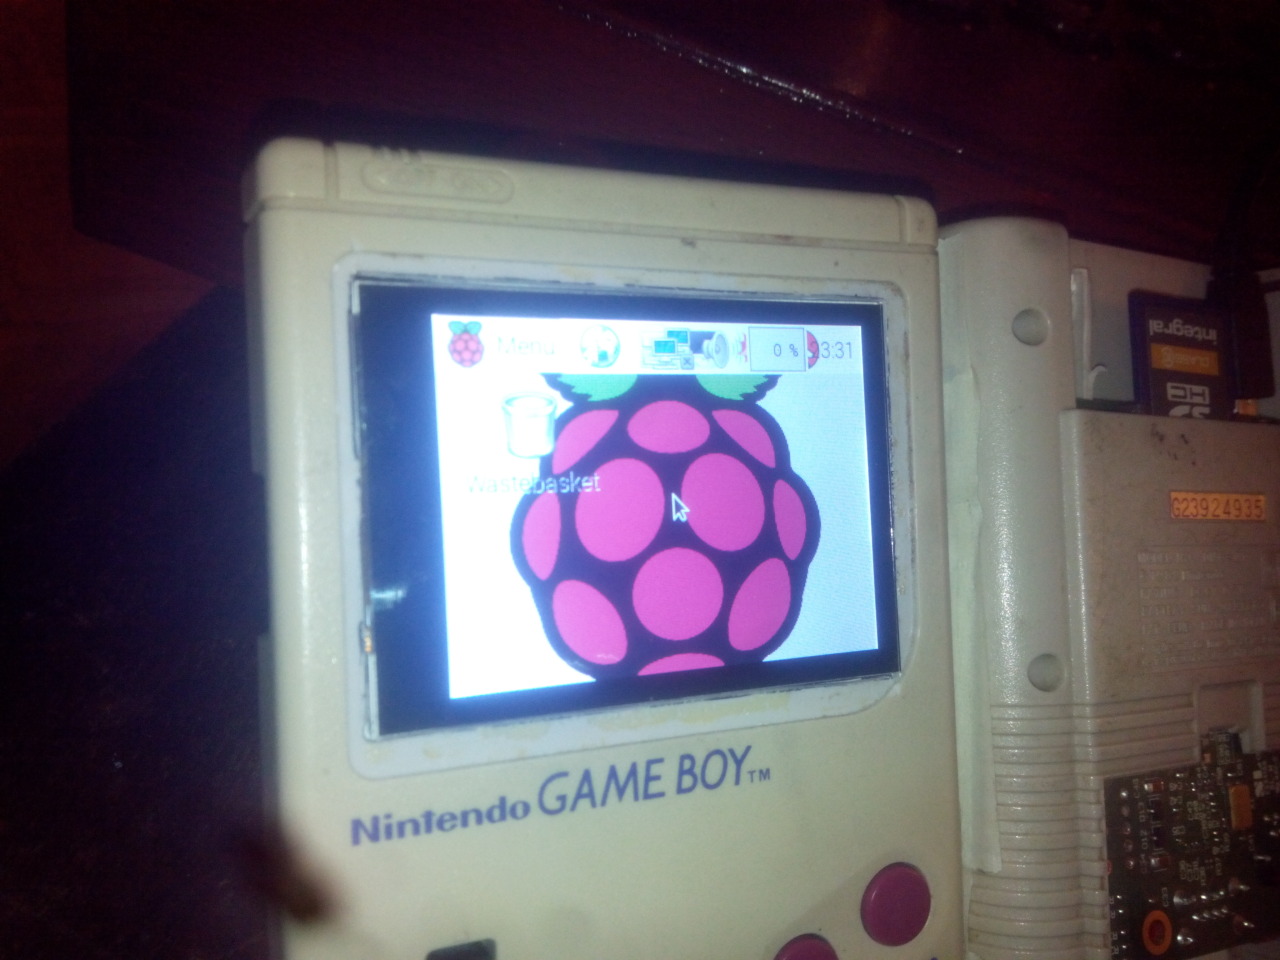
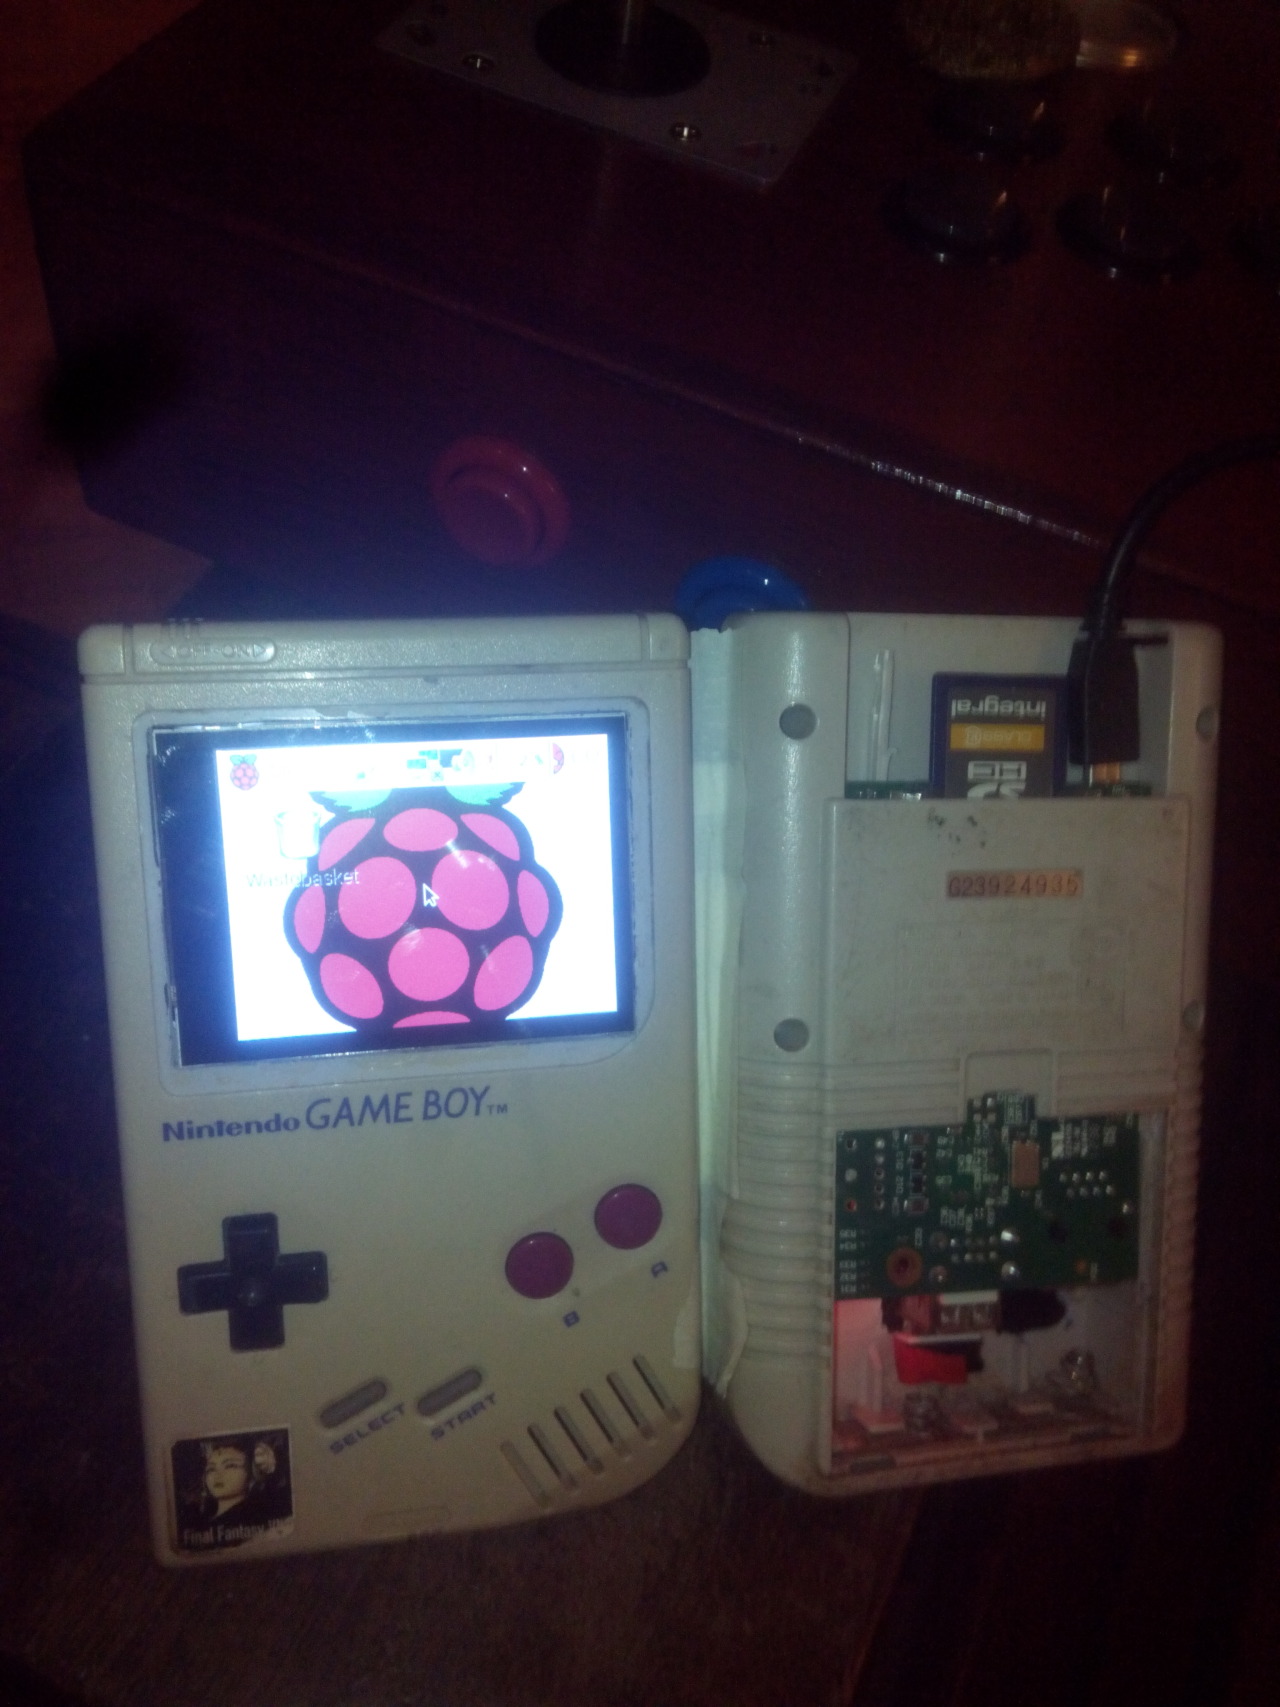
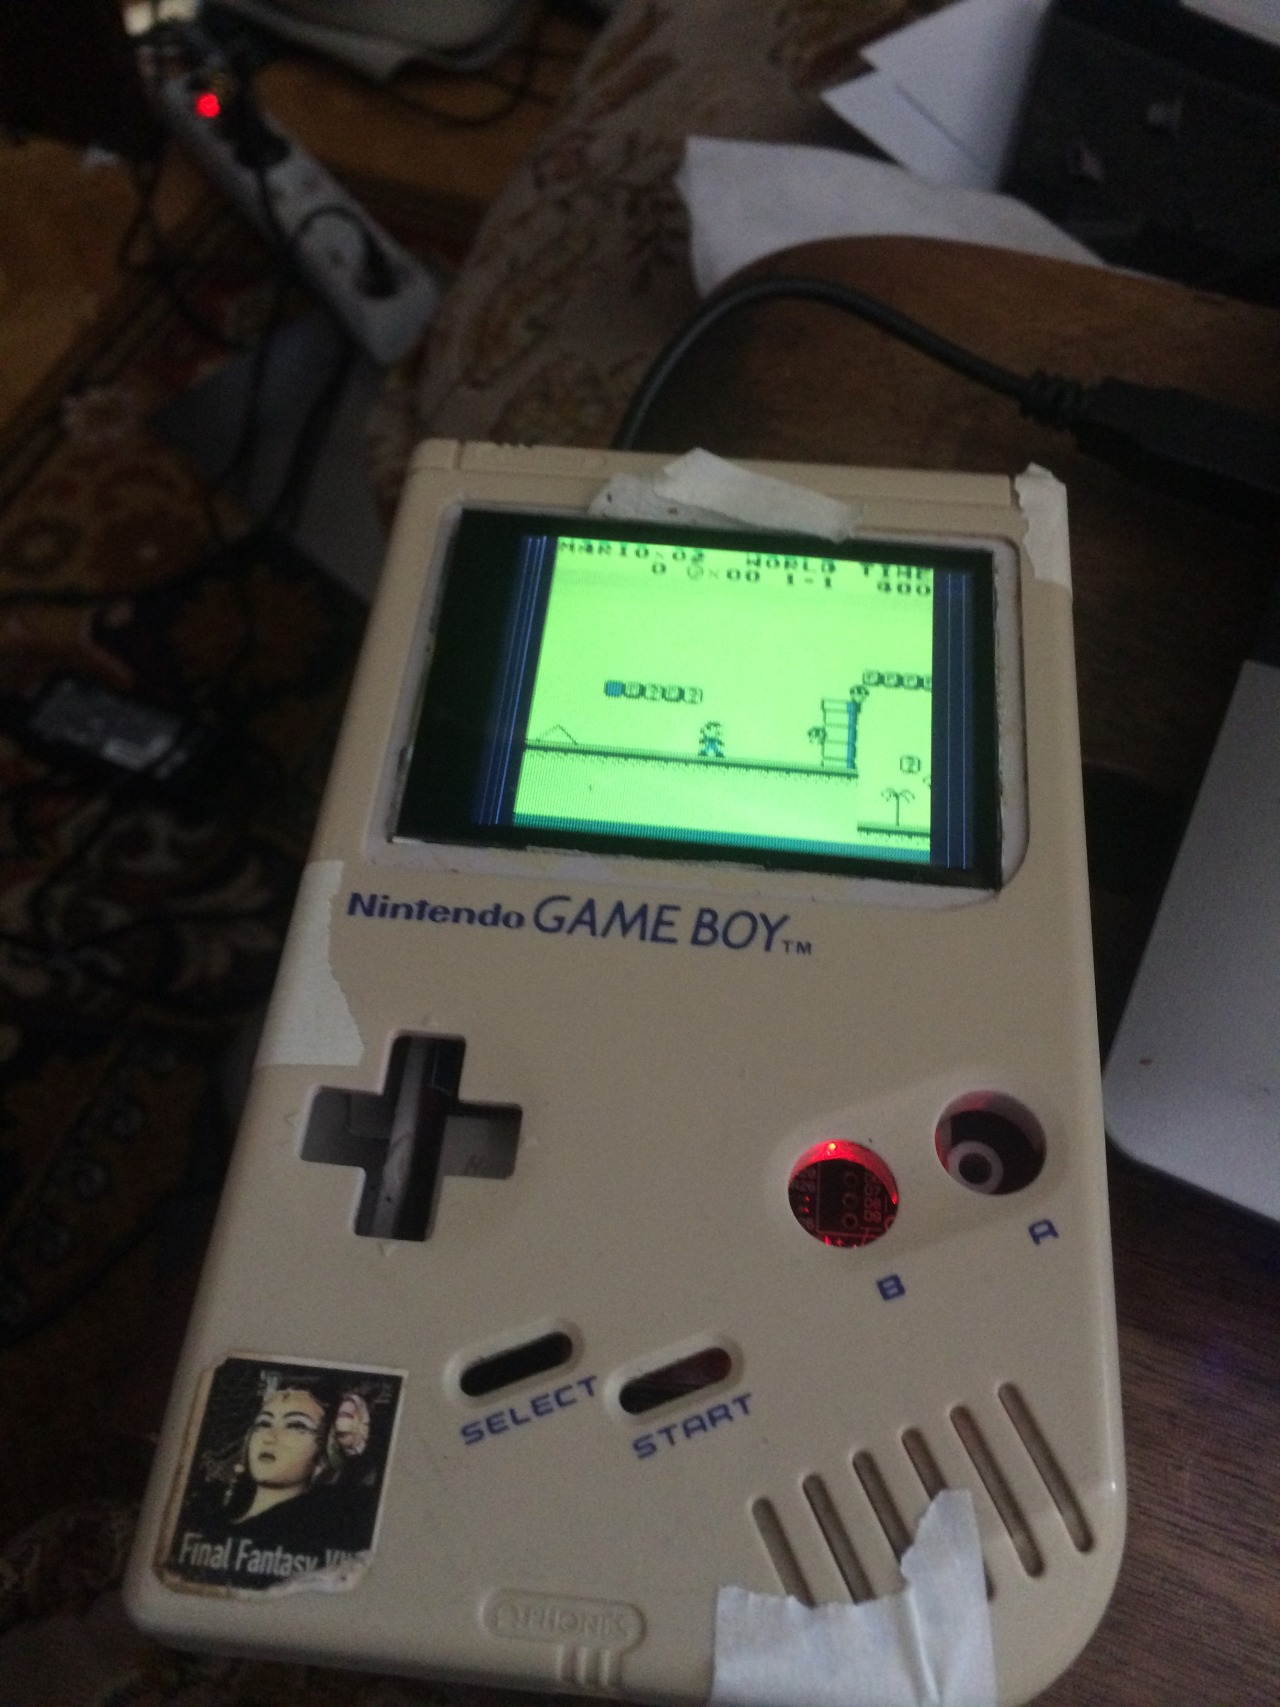
Below are some pictures of my GAMEBOY Pi that is mostly finished.
Things todo build in the speaker and power bar remove some plastic form d-pad because its fits to well…
But thinking of making a custom cartridge to slide in to the slot of the Gameboy.


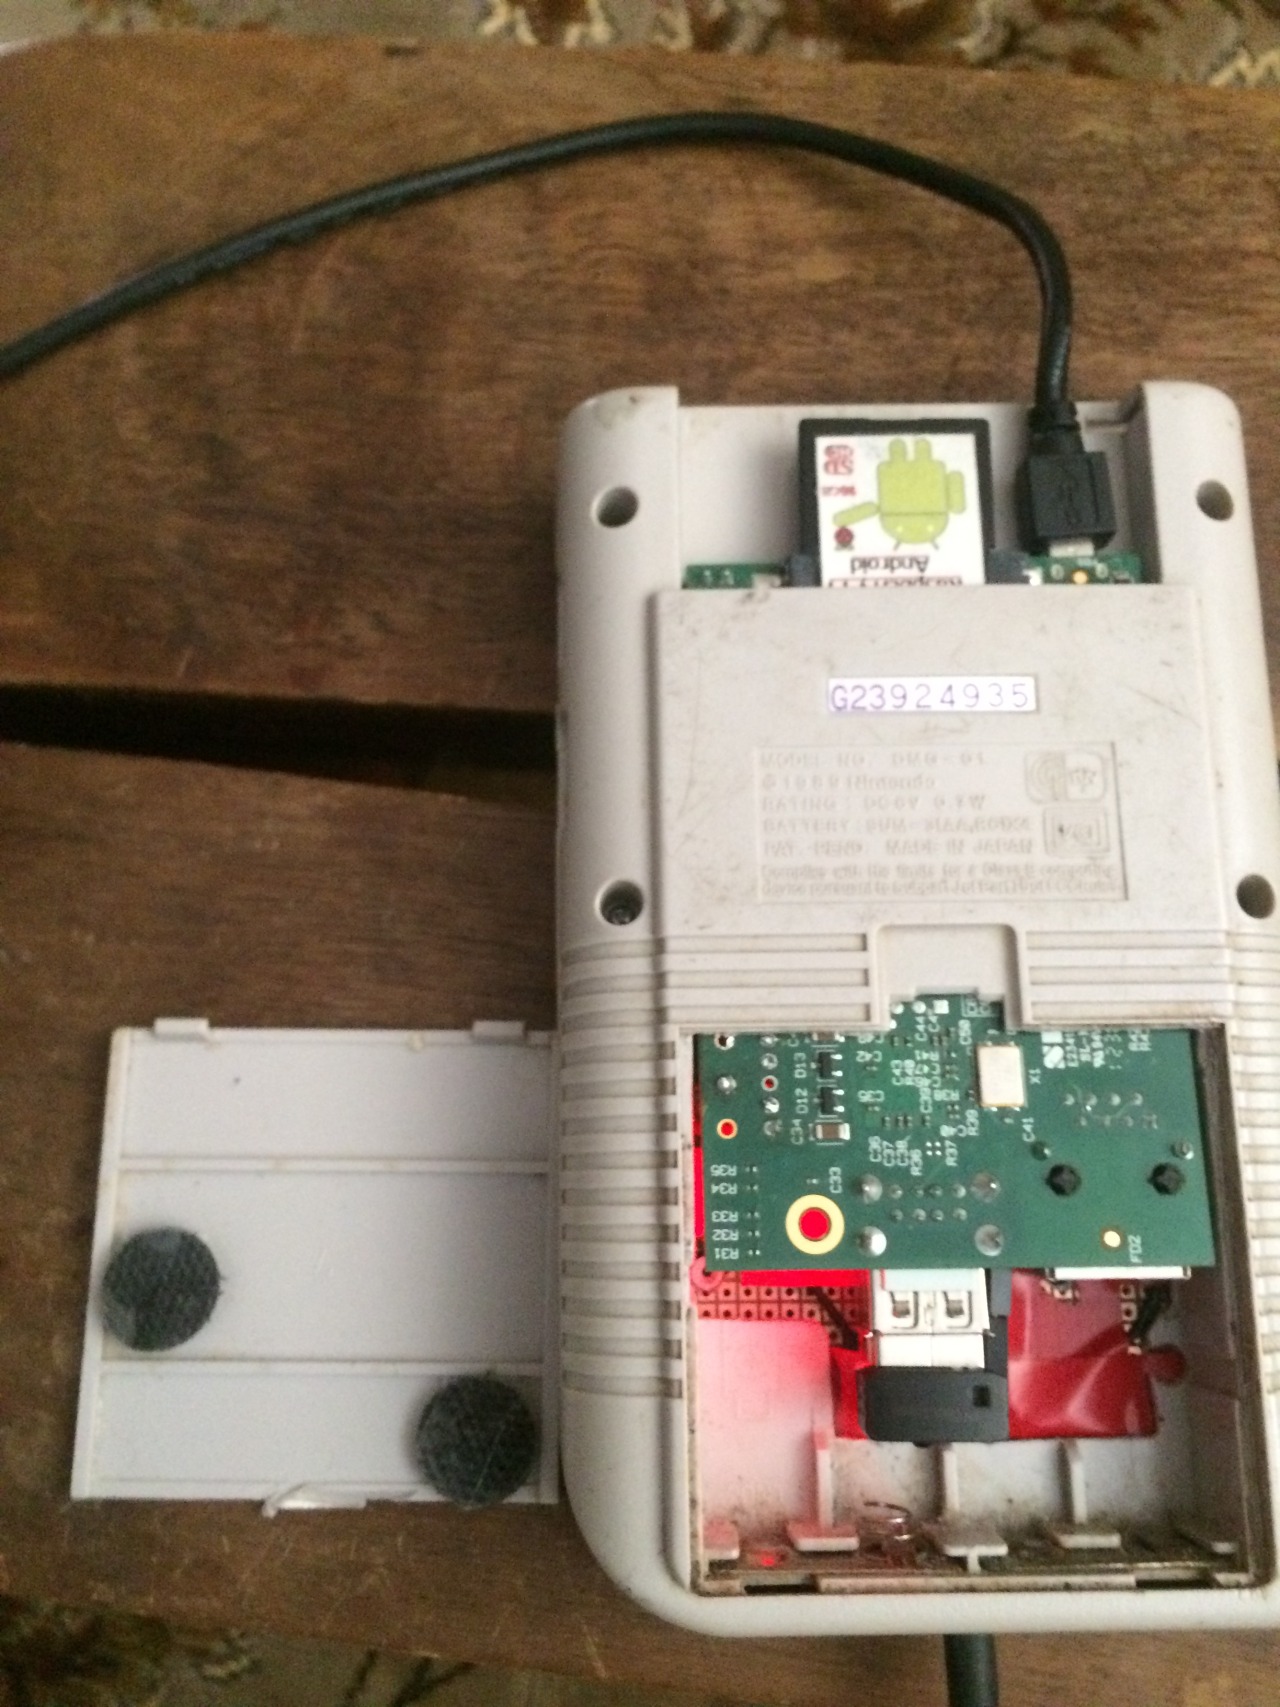
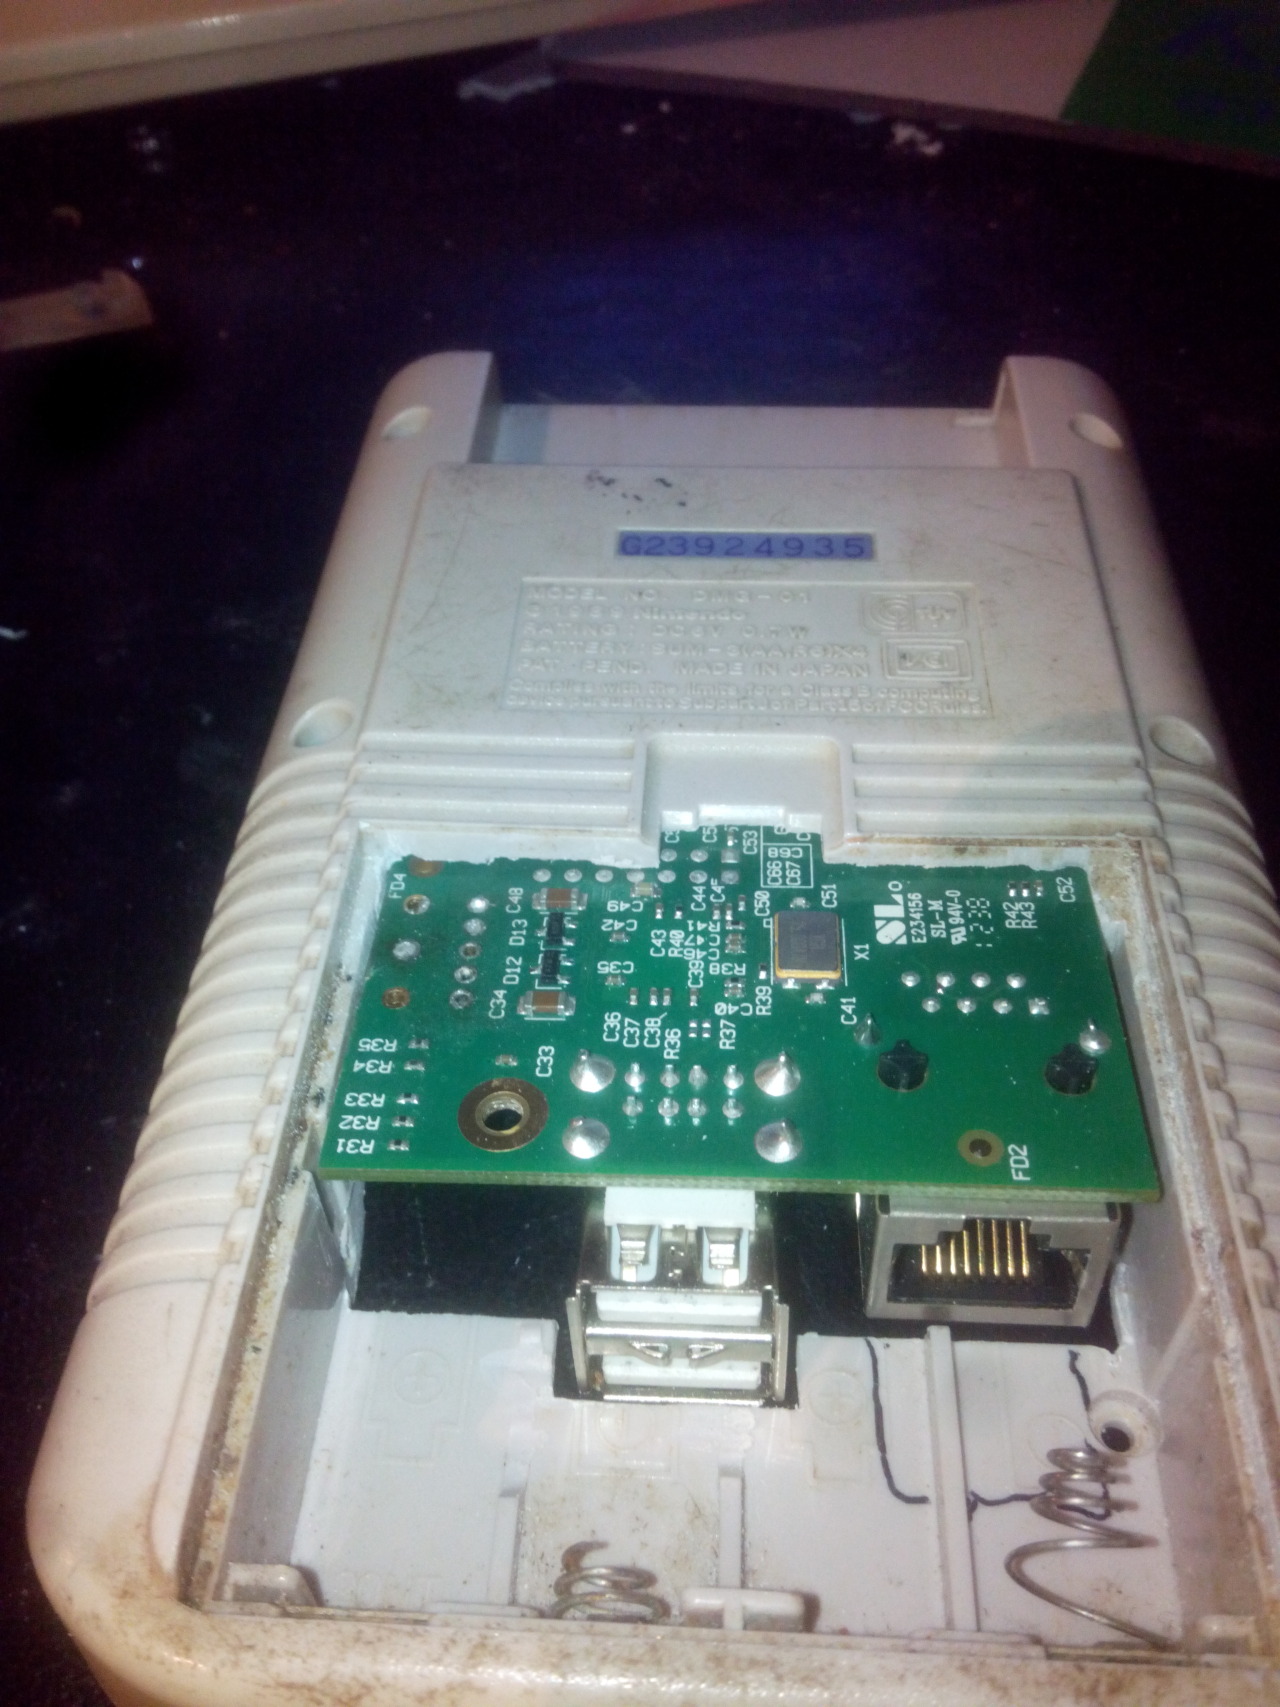
Build in Wifi and dongle for keyboard for now, in the future I gone extend one port to the side.
Ethernet is still available but don’t use a High-end cables, my own made utp cable works perfect 🙂
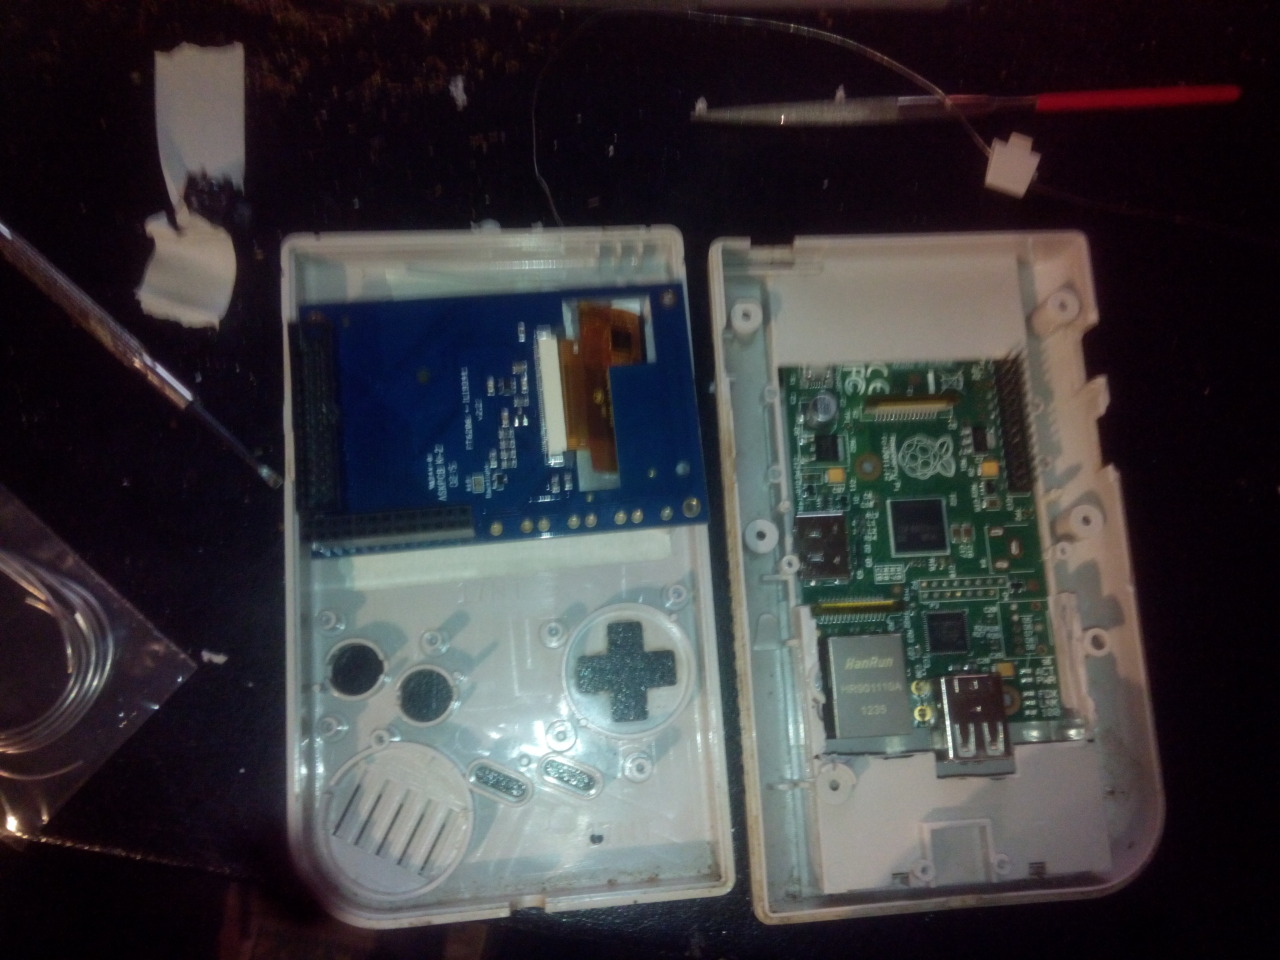
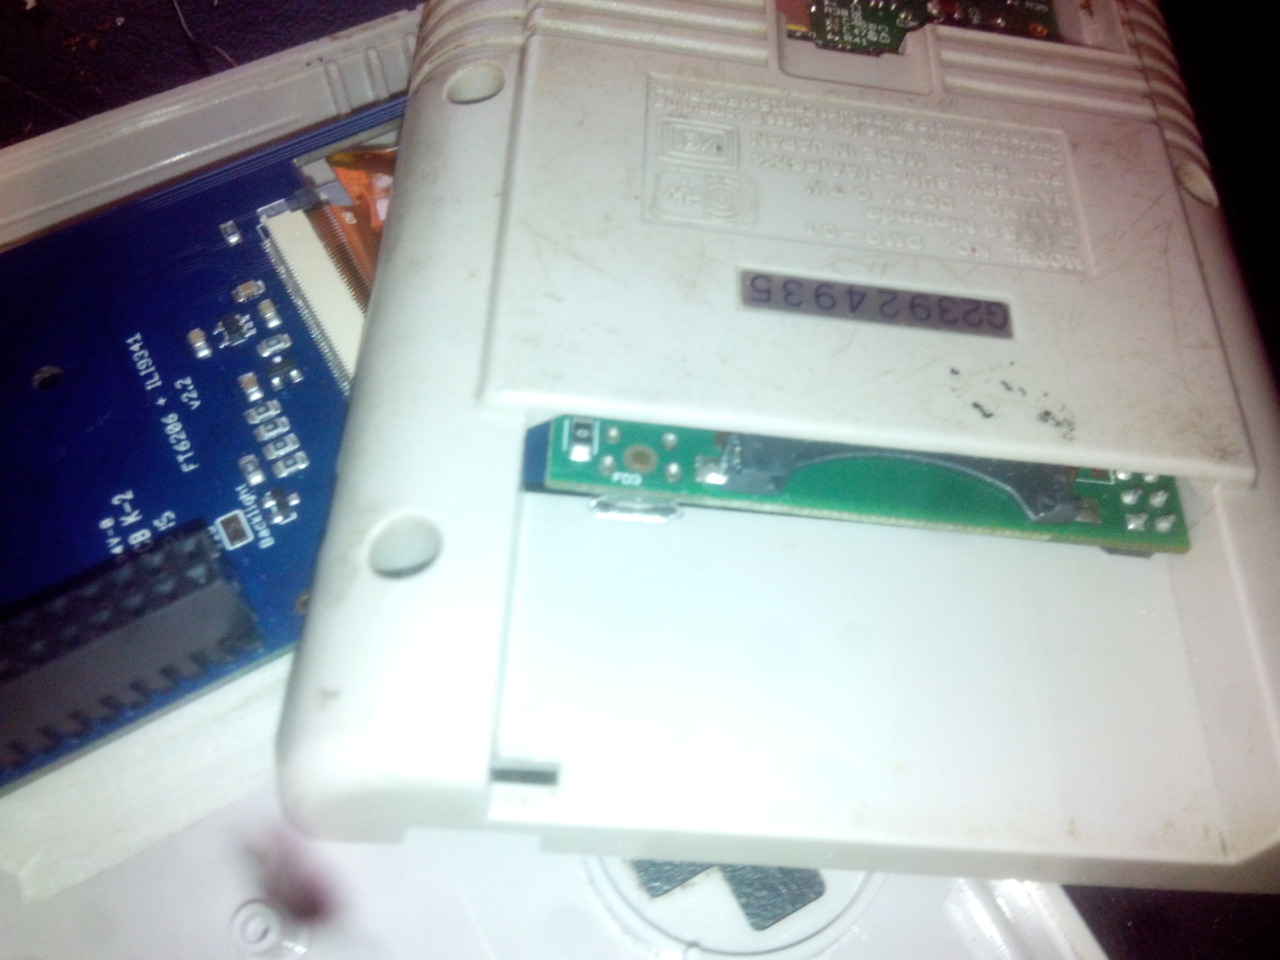
The mod of the case….
conversion:
The Layout
Fitting the LayoutBezel of Gameboy on top of screen (will lose touchscreen function so will be a sticker)
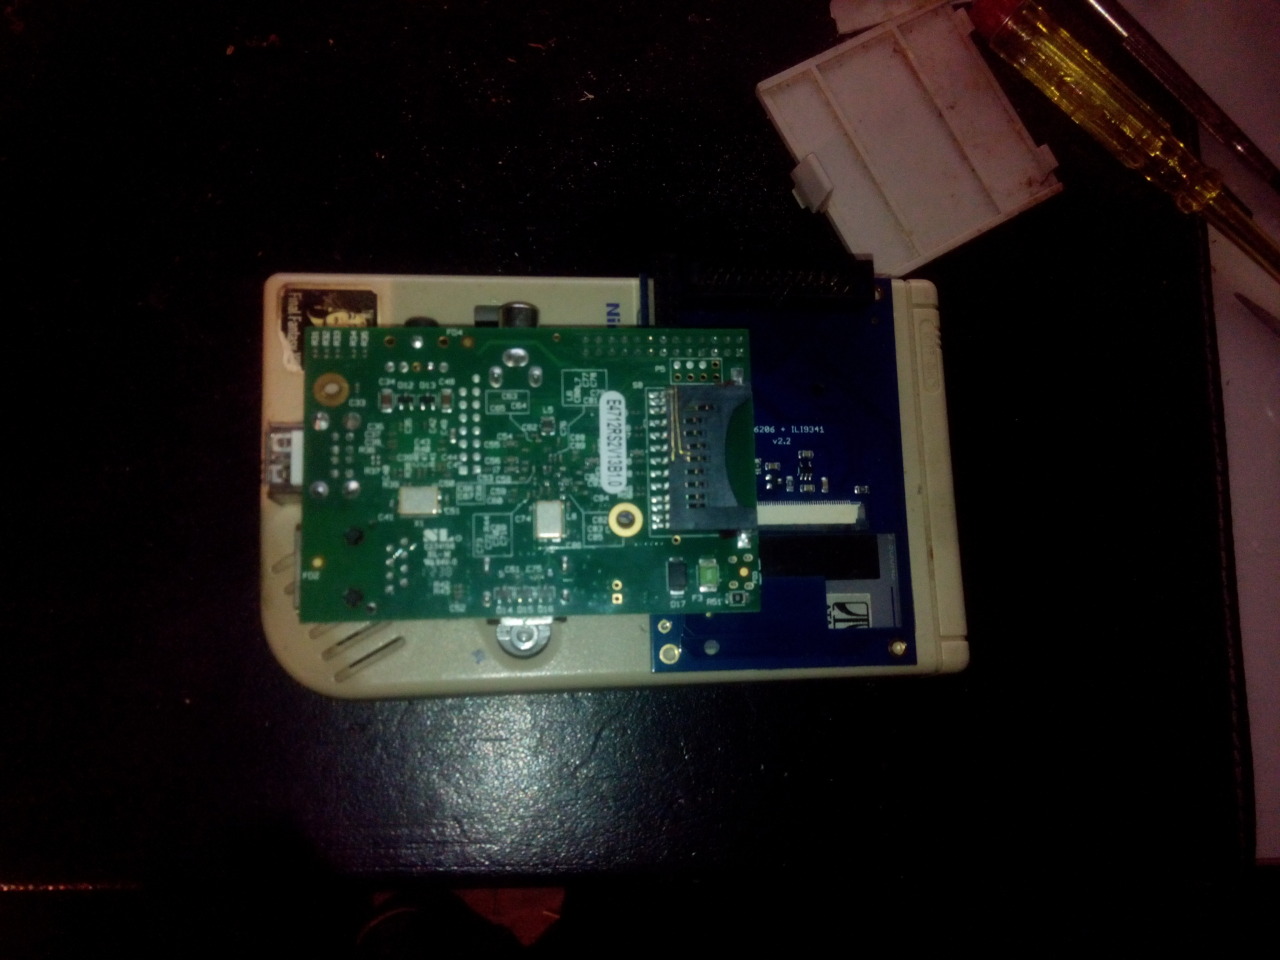
 Problem Video out and speaker jack are on the wrong side. Need to de-solder them.
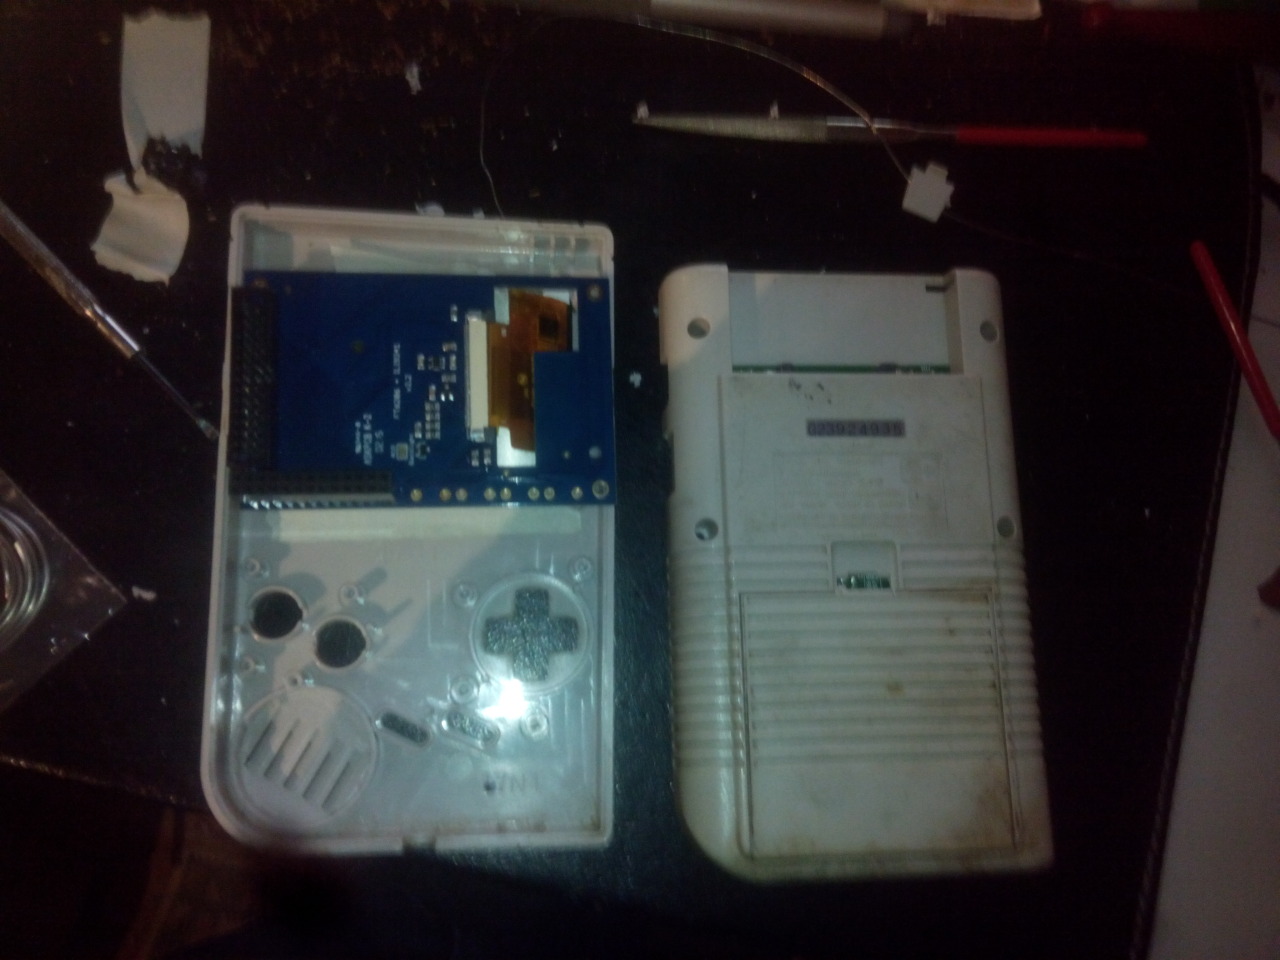

 PiTFT pcb is to big for the Gameboy case need to chip it down.
Removed the hole left side (seen from picture above) until the FFC connector.
Lost the tact solder position but then again i would use them anyway.
First idea for custom joystick control but scraped this in the end.
(Do little things at the time don’t do everything at once grrr……. 🙂 )

The Screen fits the case

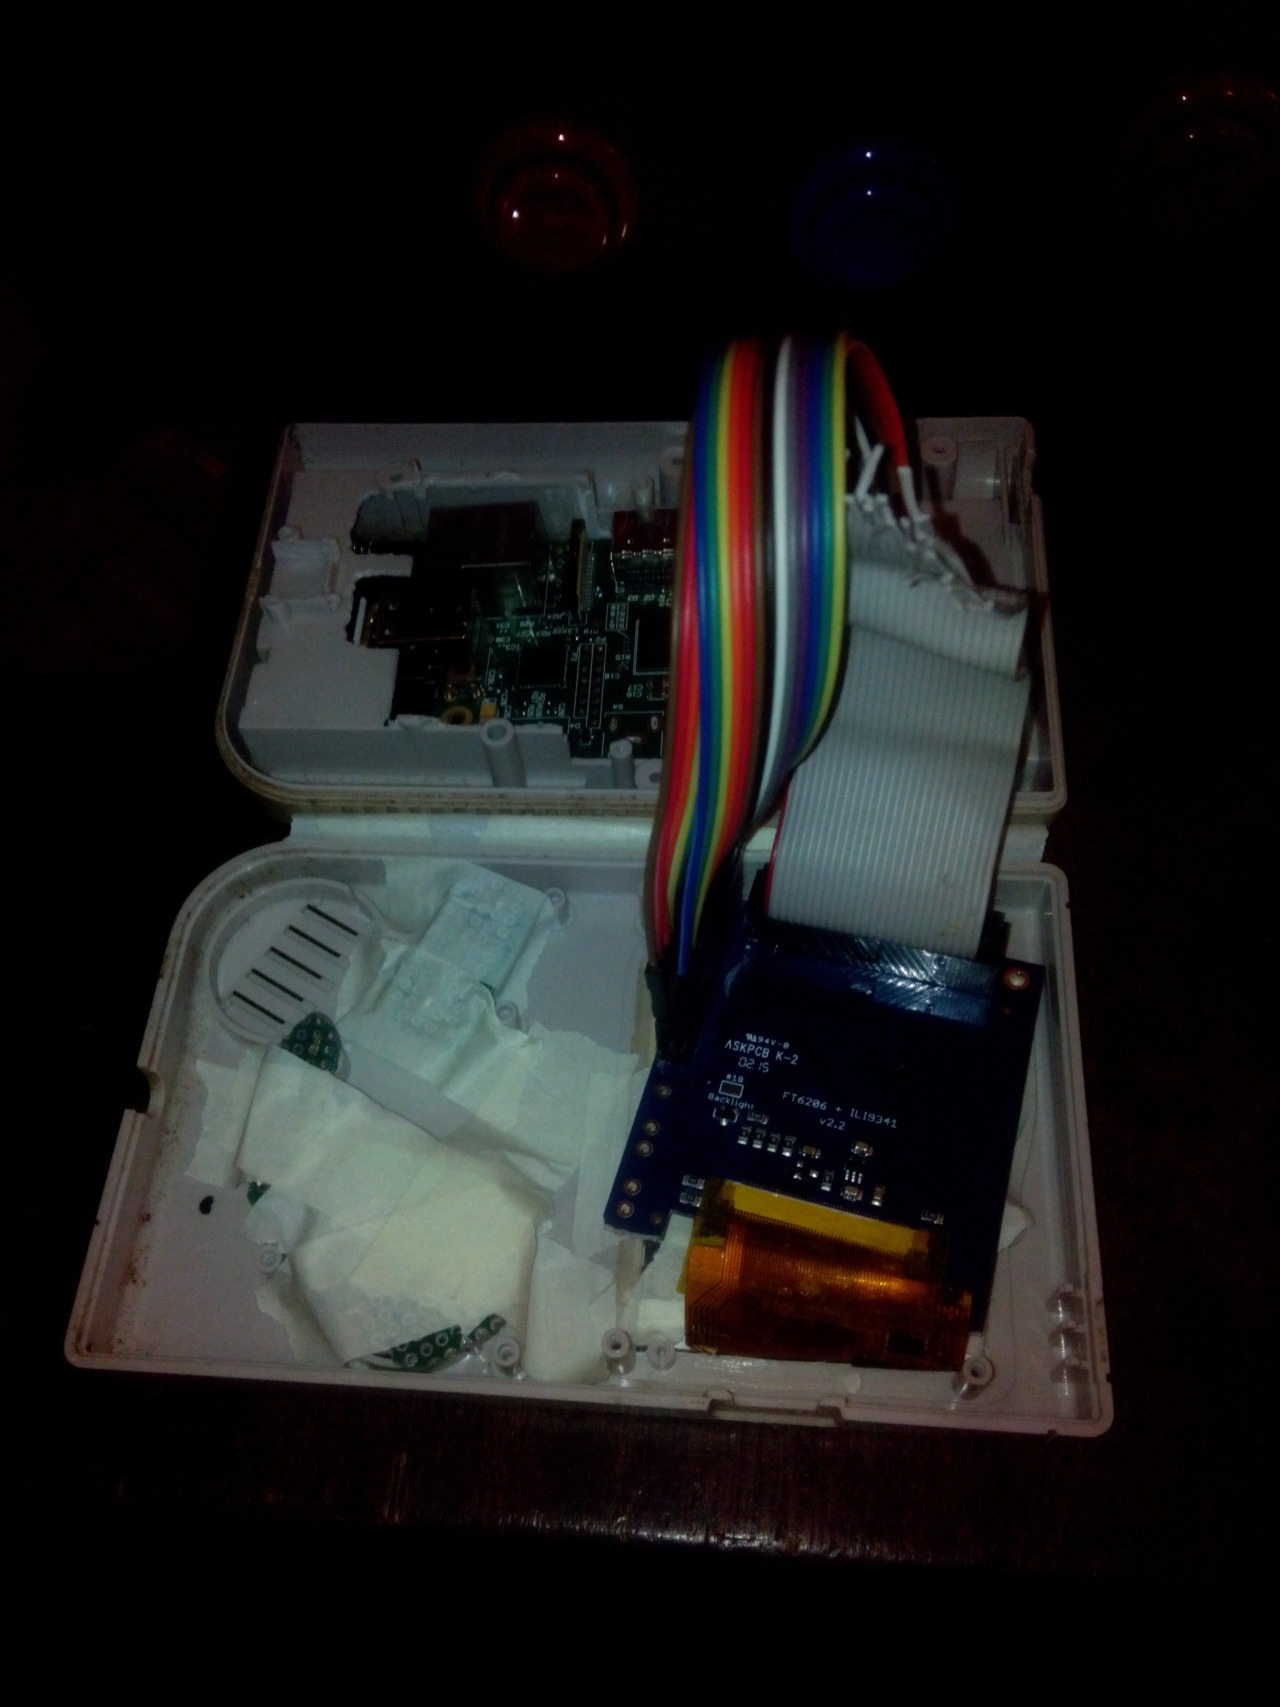
At first i wanted to solder all 26 pins to the pcb’s but then i ordered a FFC extender
This saved my so much time and cost 6 Euro 😛
These pictures showing the concept of the build.
I started this project awhile back so if you want to do this. Do little things, one thing at the time.
Don’t start doing lots of things at once because in the end you will need to change or rework it again…
(Tip from Ben Heck and now from me 😀 )
The Arivale of the FFC extender and extra Cable
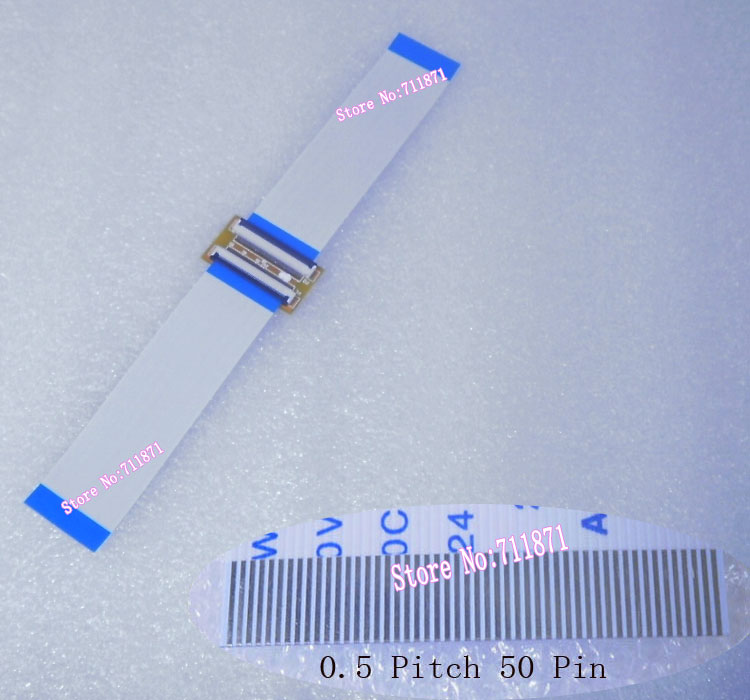
After i got the ffc-cable to extend my PiTFT 2.8 inch from ada fruit.
Here are some progress pictures:


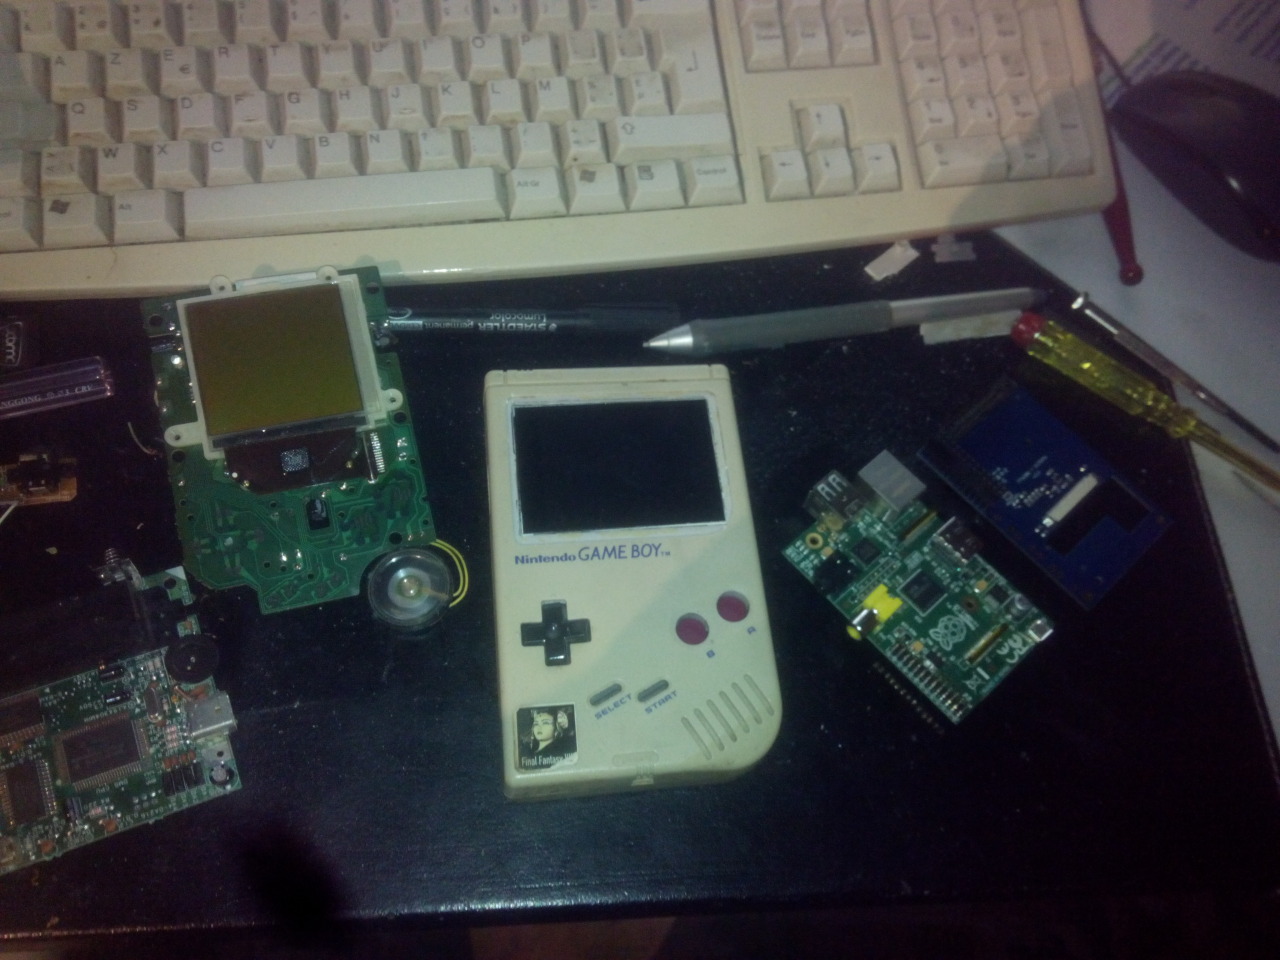
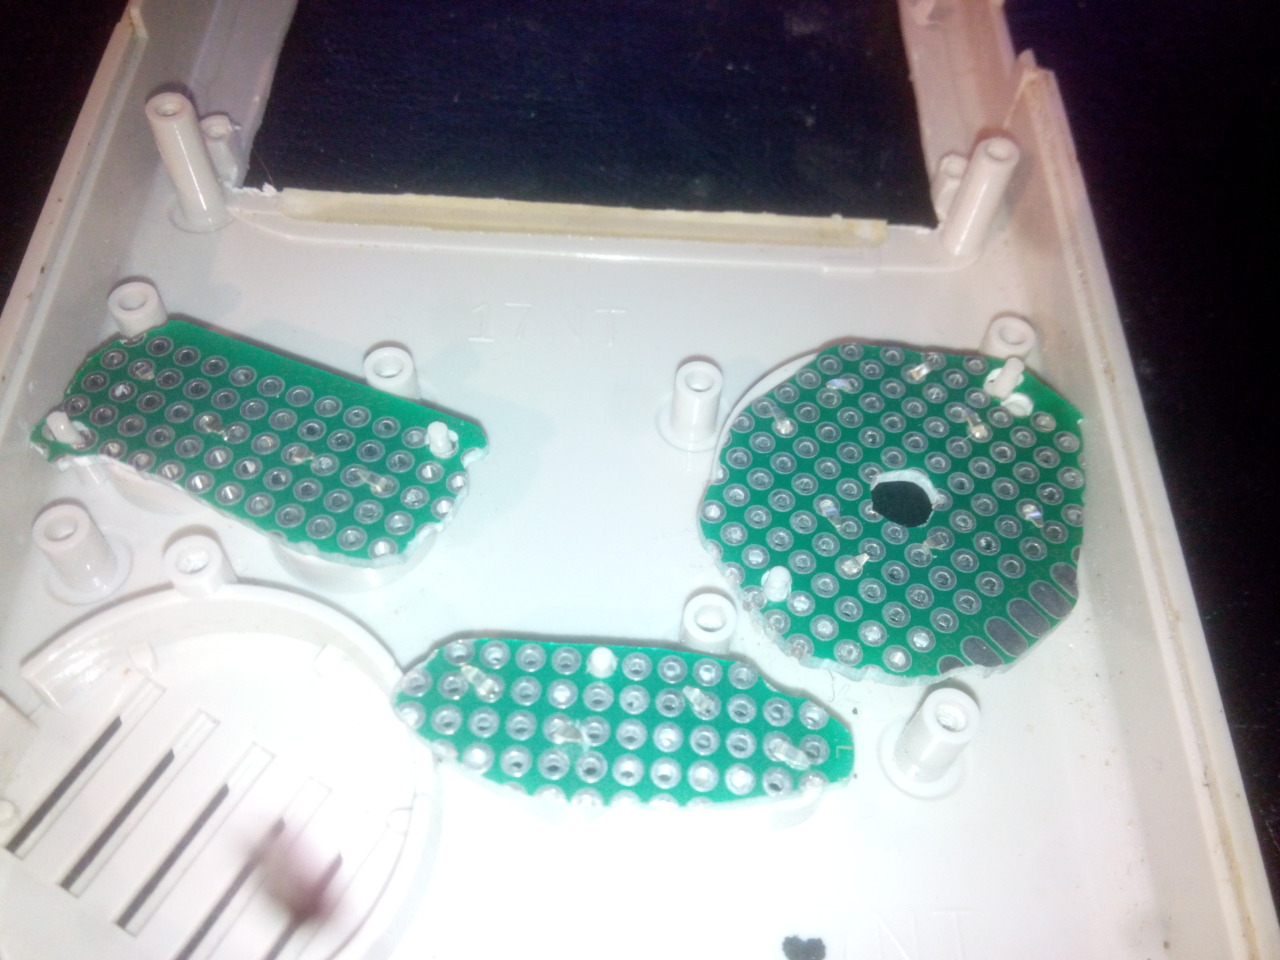
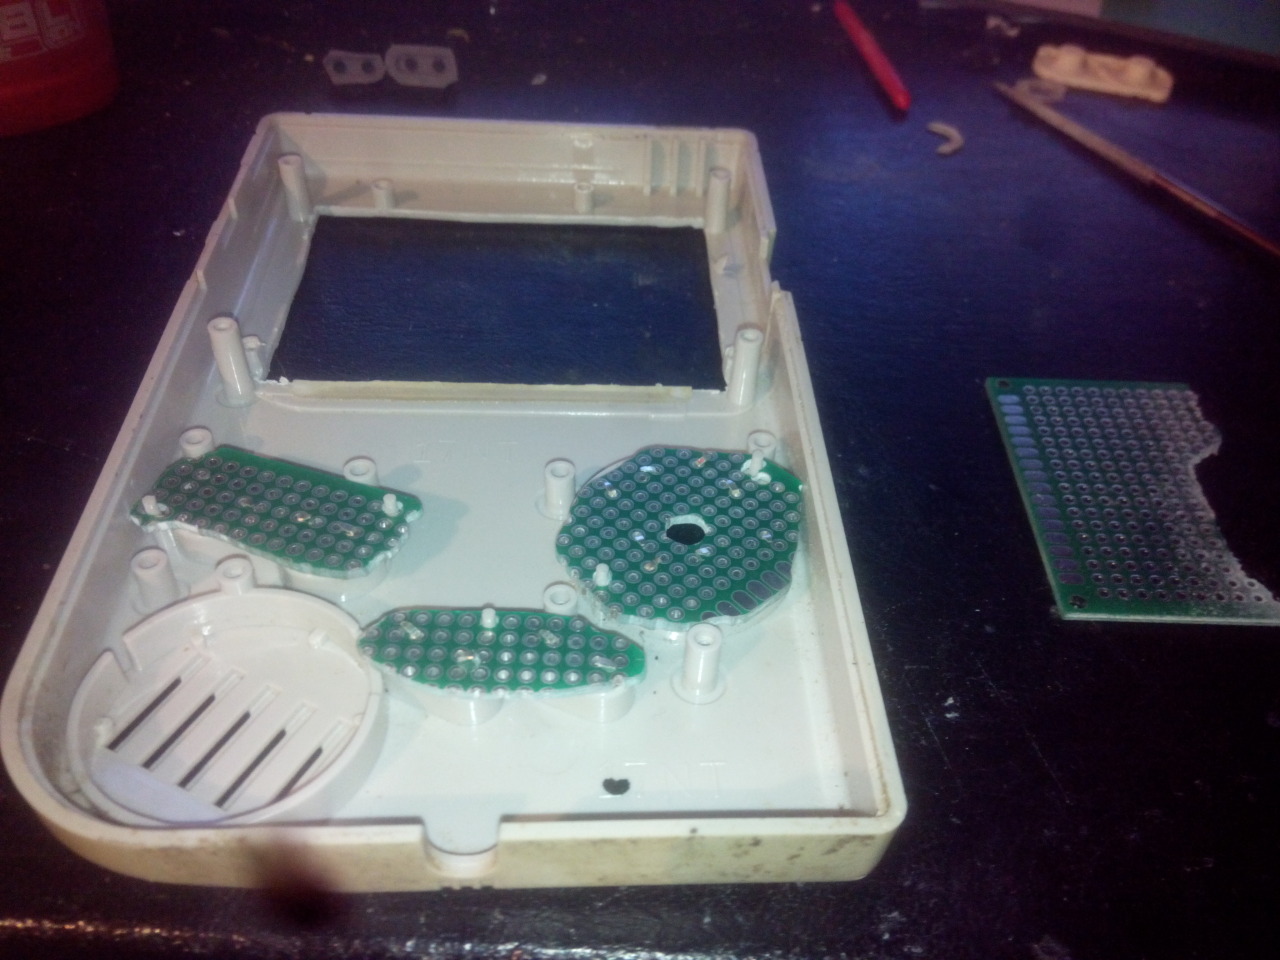
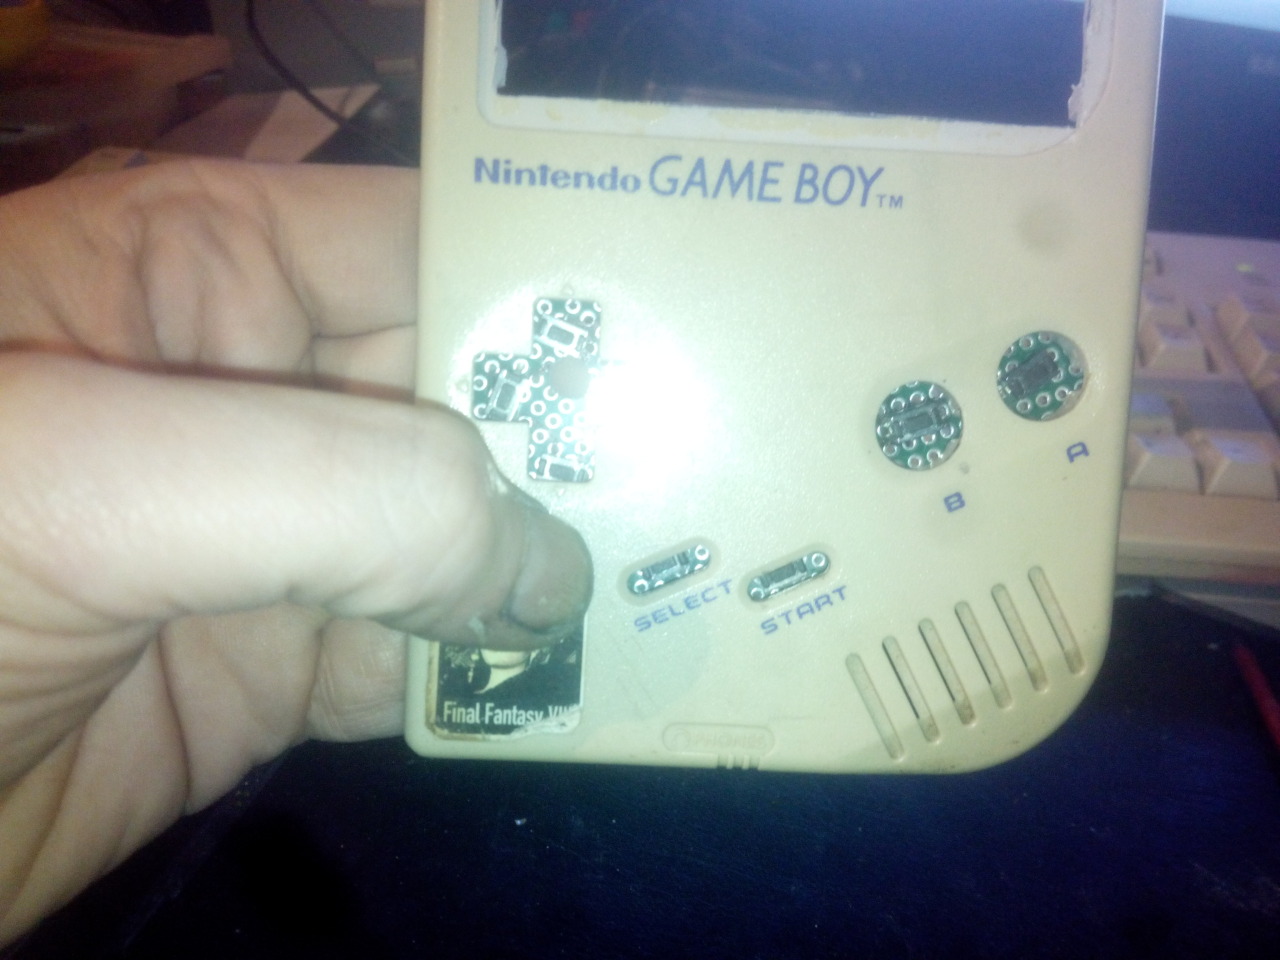
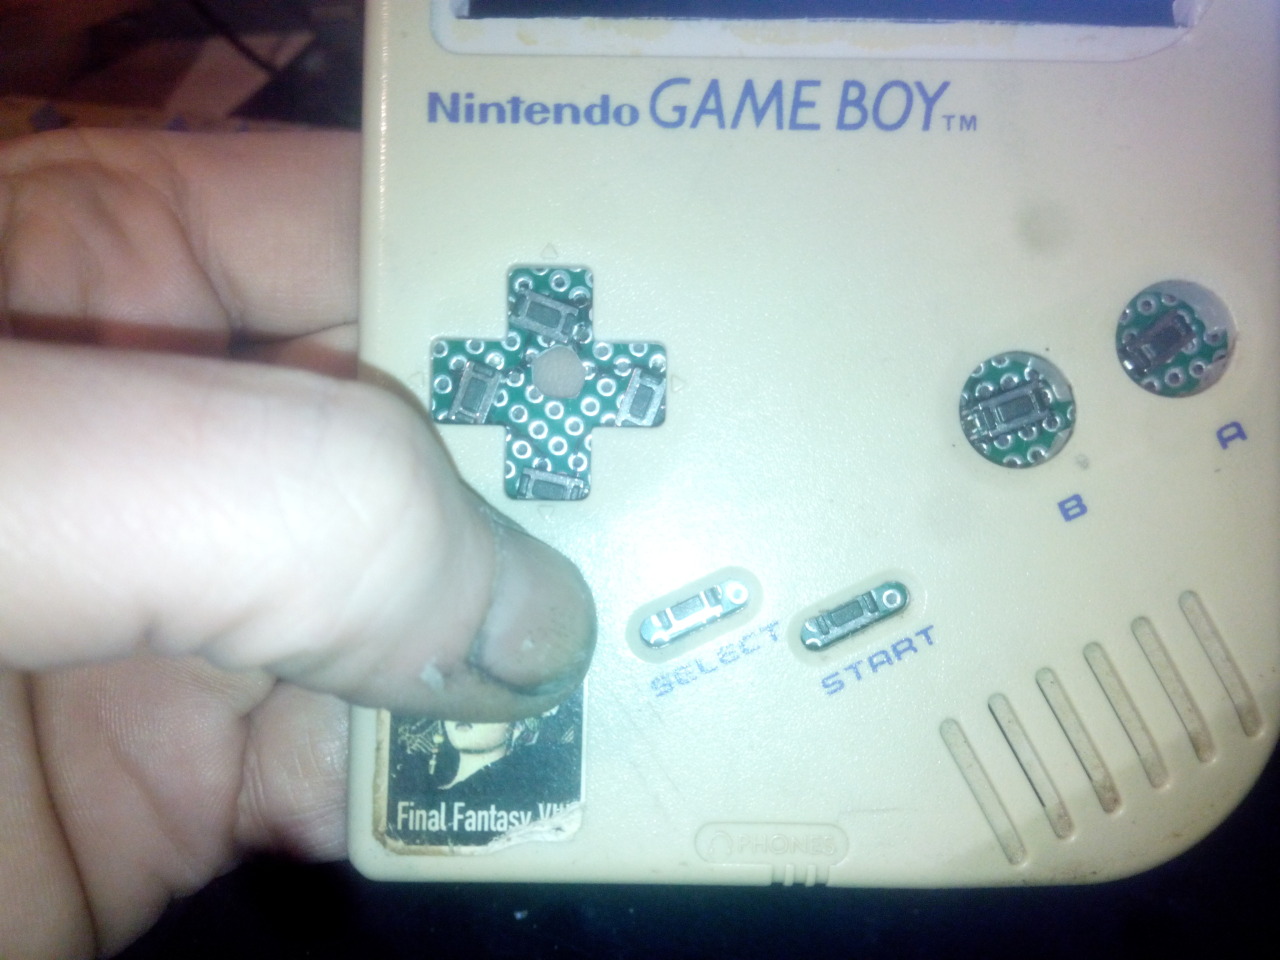
You need controls.
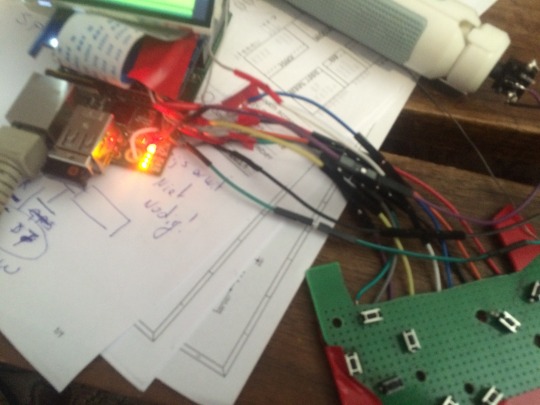 I have rebuild the pcb for the controls because this way its much stronger then before. And the board looks more like the original Gameboy PCB haha.
Also i made some video’s that show the different stages of the build :
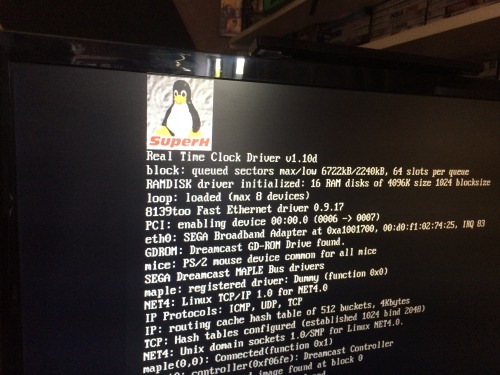
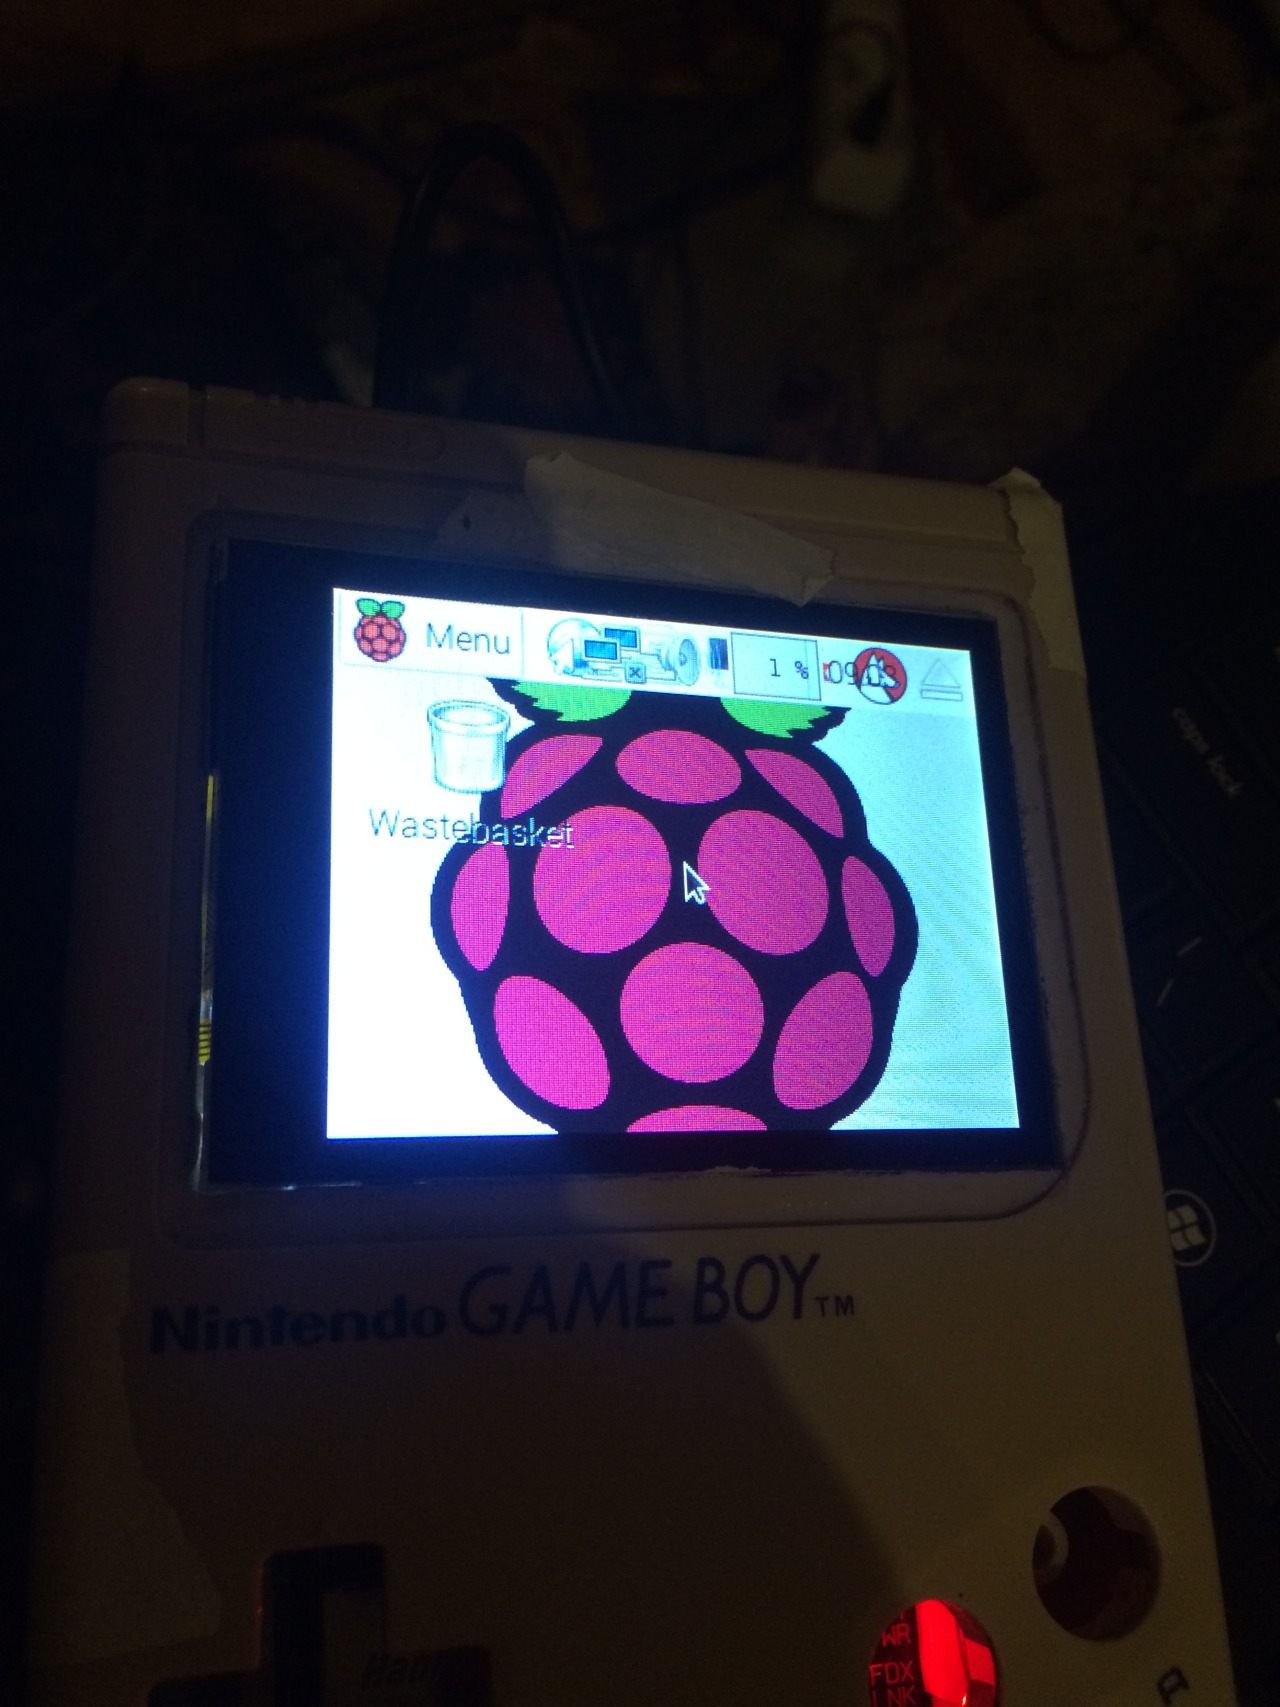
RetroPi and PiTFT from Ada fruit test!
(I have 4 Pi’s: two models B and one Model 2B+
RetroPi and PiTFT from Ada fruit test!
(I have 4 Pi’s: two models B and one Model 2B+
RetroPi and PiTFT and DIY Joystick test!
Testing the tact switches…
RetroPi and PiTFT and DIY Joystick test 2!
More testing of the tact switches… 😀 Mario is fun hahaha.
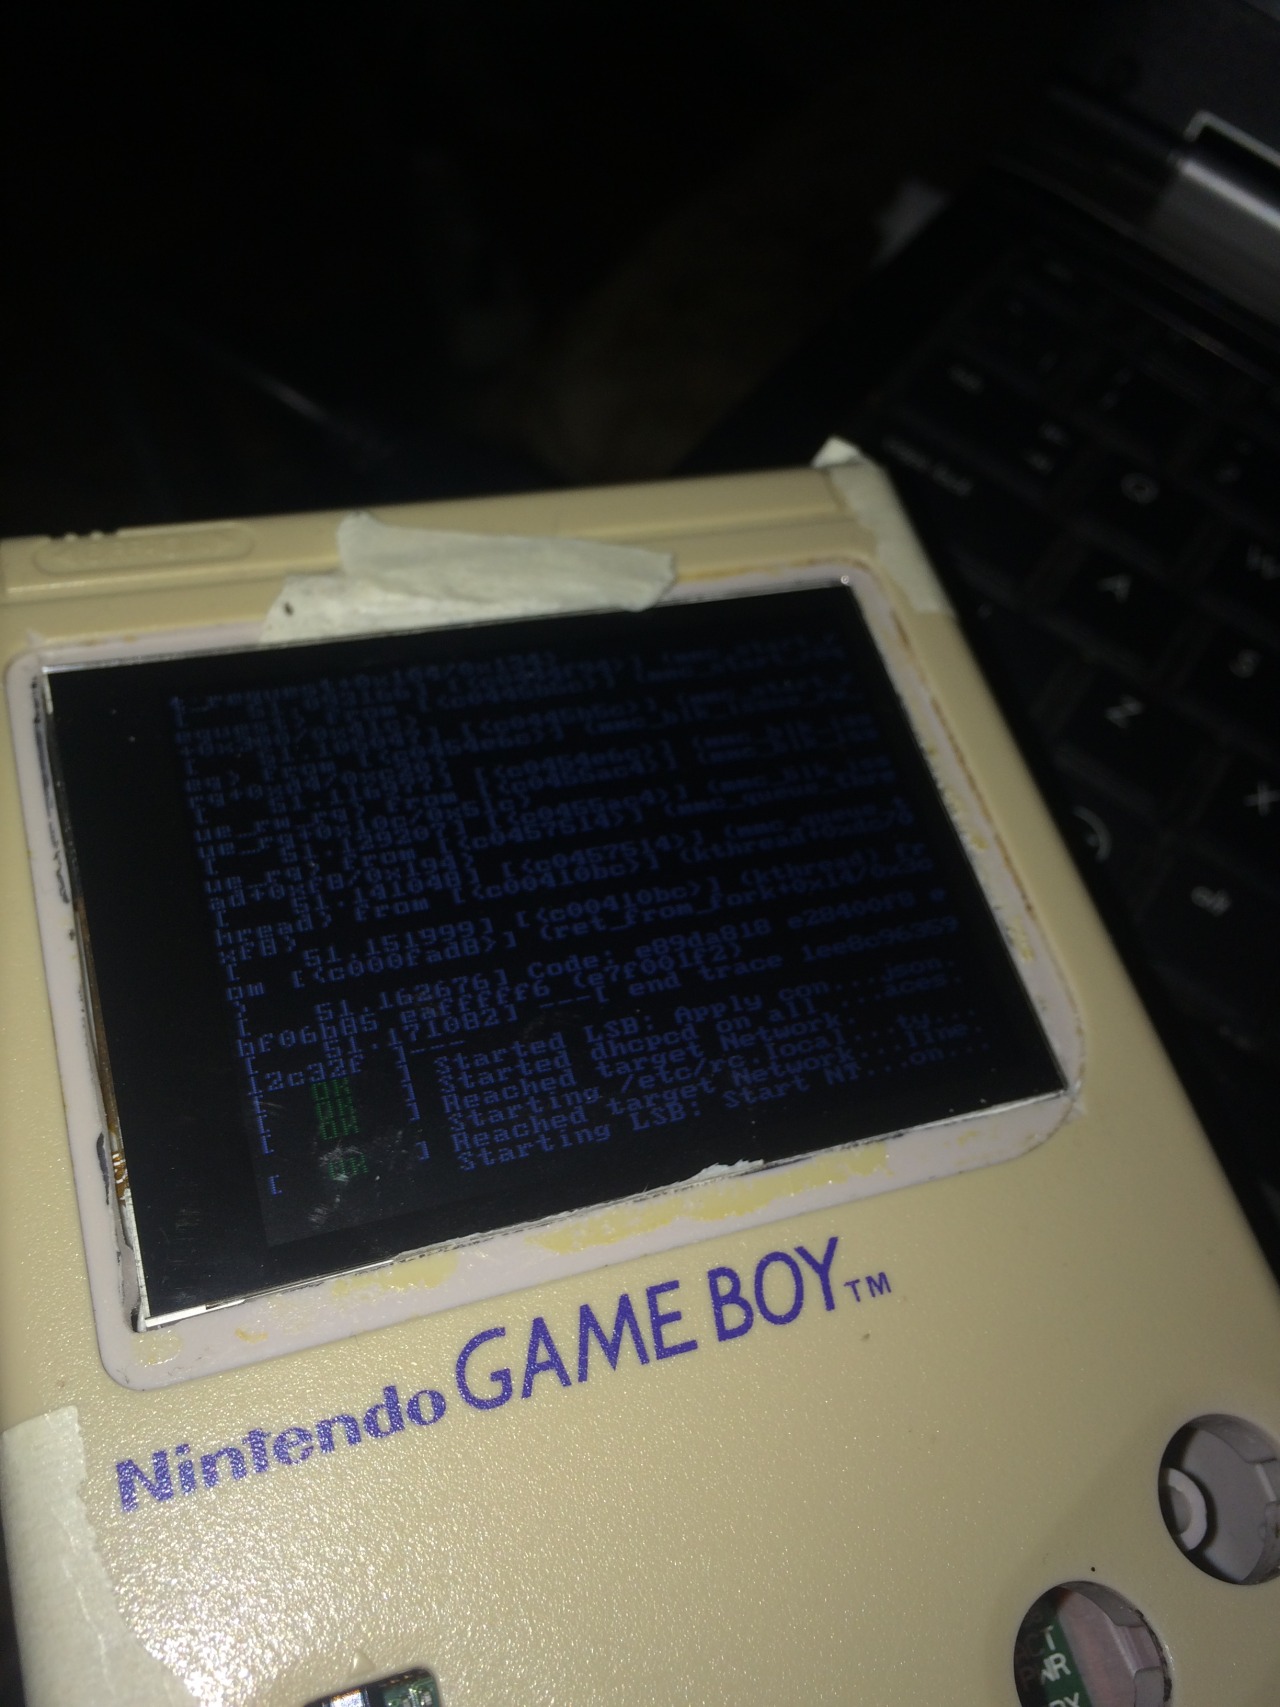
For those how notice i have some strange glitching in my screen in the video’s above.
This is because at that time my raspberry pi setup was not perfect. Not that its now LOL.
But the screen glitching is gone…
GAMEBOY PI Semi complete Test!
This is my last video i made for now showing it closed (taped down) and using the original GAMEBOY buttons on my custom pcb using those 8 tact switches.
If I have time i will make a new video showing it closed with screws and without glitches in the screen.
How i Did my software side:
This install will take about 1,5 hours
First download the 2016-03-25-28c.img.
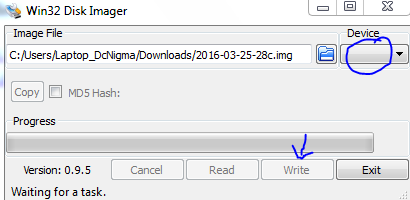
Make sd img from 2016-03-25-28c.img
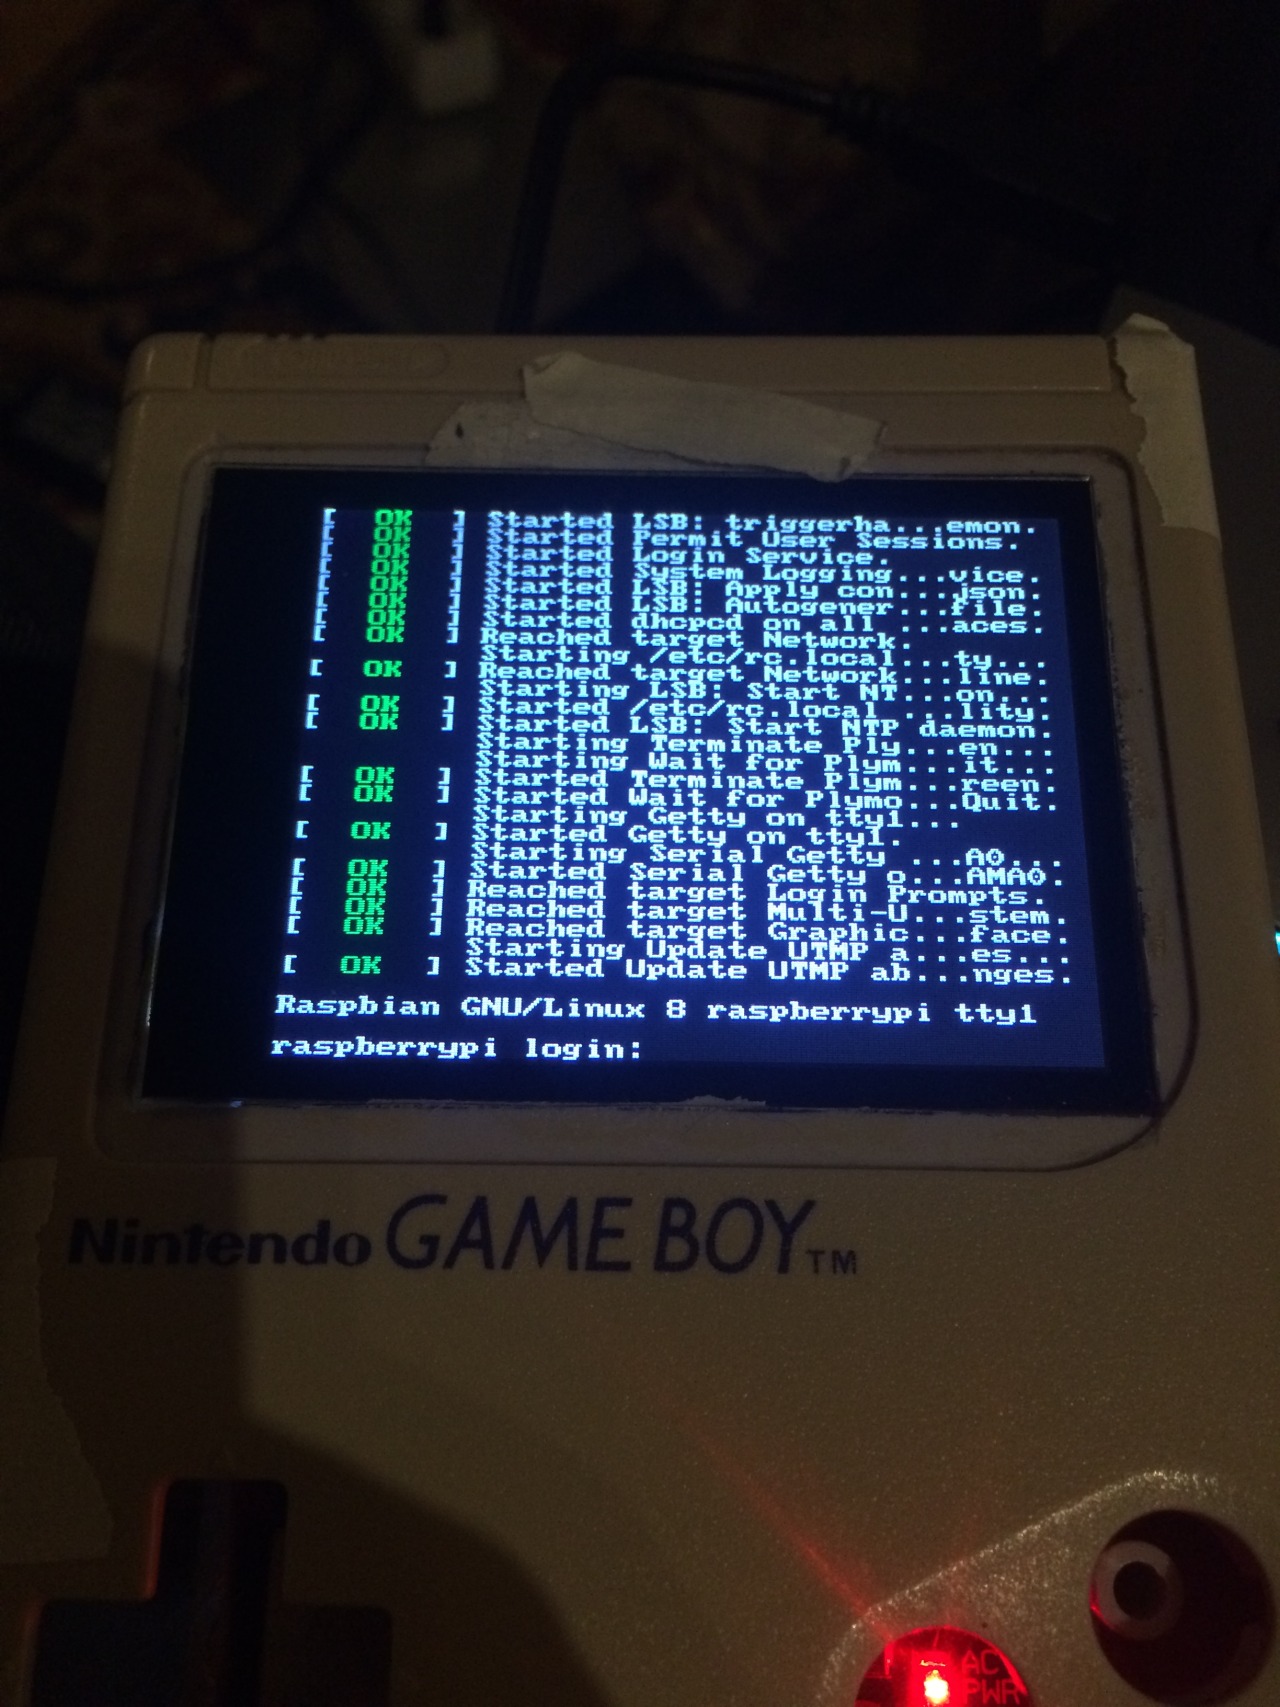
Boot in Raspberry pi, let it boot in to startx and then quit it to command line
And launch Raspi-config: (sudo raspi-config)

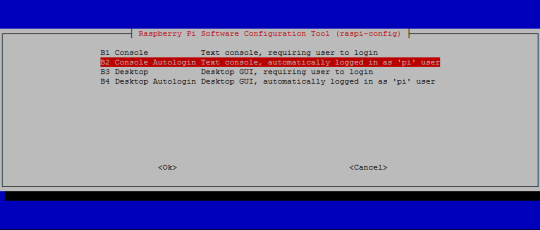

And launch Raspi-config: (sudo raspi-config)
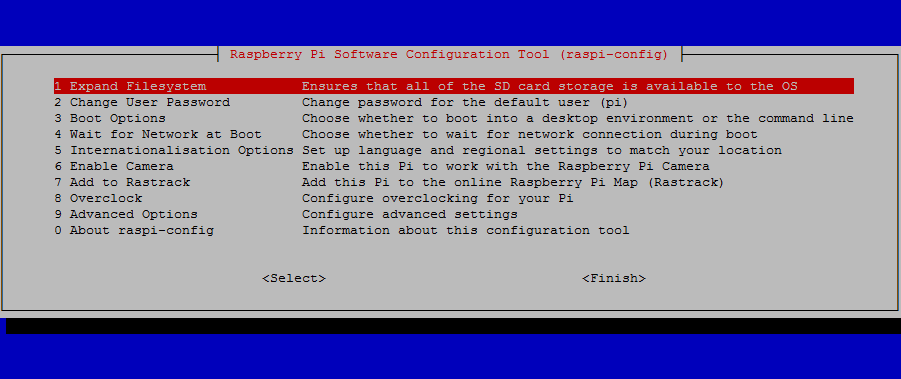
Always start by expanding filesystem ( most builds do this but i recommend it anyway)
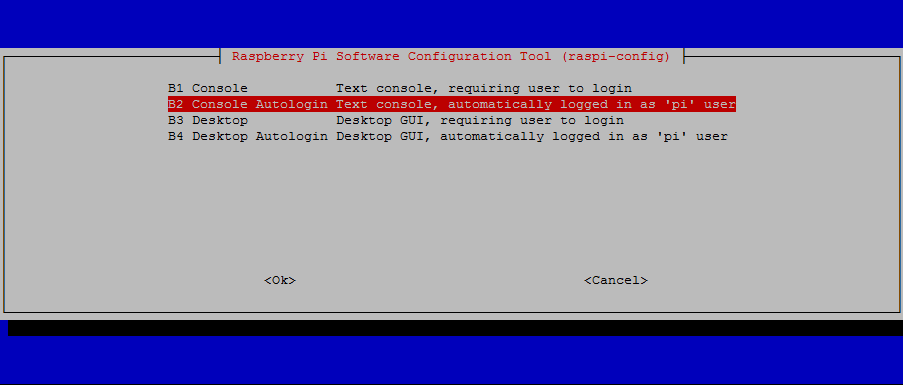
The choose 3 boot options and select console autologin.
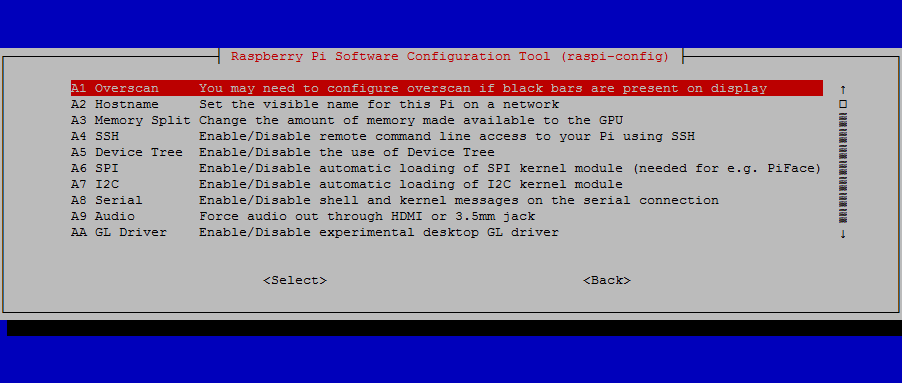
Last things: 1 Overscan disable, 4 SSH Enable, 5 Device tree Enable, 6 SPI 7 I2C and 8 Serial disable, 9 Audio force 3.5mm headphone jack.
Side note for those how need Tochscreen: I disable 6, 7 and 8 to get more Gpio pins working
but this will disable touchscreen control.
But this is not needed for this project anyway. And also you can make another SD card that can use the Touchscreen interface but you will lose the Gpio pins that use SPI, I2C and Serial.
but this will disable touchscreen control.
But this is not needed for this project anyway. And also you can make another SD card that can use the Touchscreen interface but you will lose the Gpio pins that use SPI, I2C and Serial.
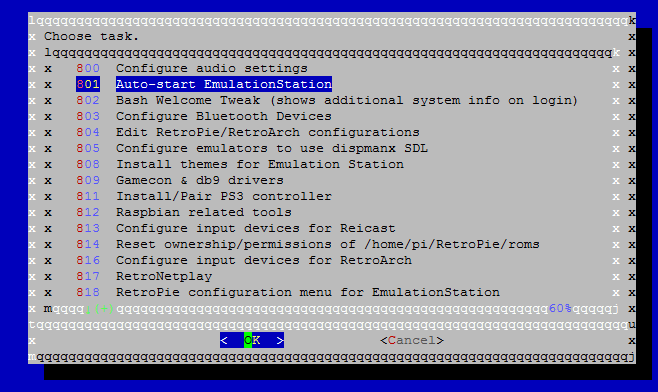
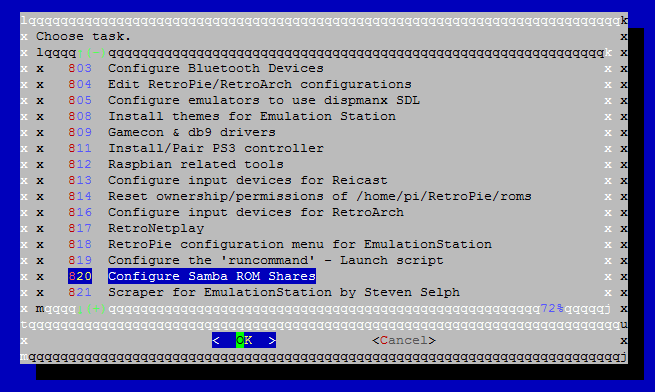
Install retropi:
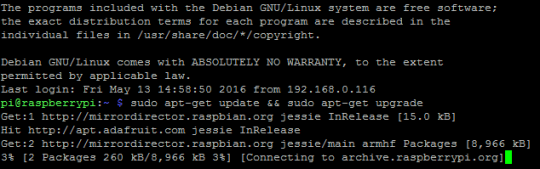
Run following commando’s to install RetroPie
sudo apt-get update && sudo apt-get upgrade
sudo apt-get install -y git dialog
cd /~/
git clone –depth=1 https://github.com/RetroPie/RetroPie-Setup.git
cd RetroPie-Setup
chmod +x retropie_setup.sh
sudo ./retropie_setup.sh
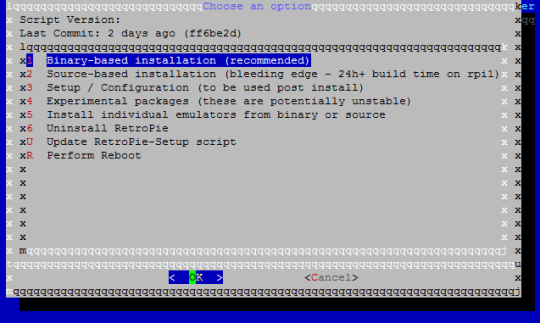
Install binary-based installation. (get cup of coffee or something)
in case kernel crash. happen to my a few times…..
(Reason a faulty usb power device…. raspberry don’t like)
sudo dpkg –configure -a
then
sudo apt-get autoremove
And try again… when successful exit don’t reboot.
We gonna install framebuffer first. (by Andrew From Melbourne)
sudo apt-get install cmake
sudo apt-get install libbsd-dev
Create file: /usr/share/X11/xorg.conf.d/99-fbdev.conf
sudo nano /usr/share/X11/xorg.conf.d/99-fbdev.conf
add in nano
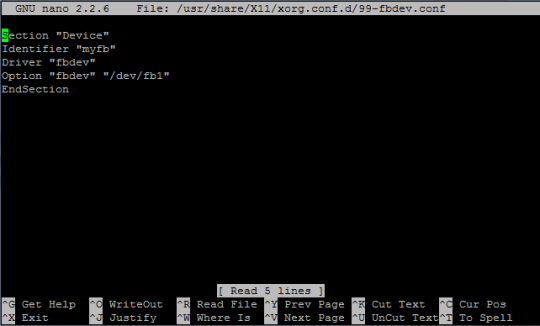
Identifier “myfb”
Driver “fbdev”
Option “fbdev” “/dev/fb1”
EndSection
Close Nano and Save ( CTRL+X, Yes, ENTER)
cd .. ( goto home cd /~/ will do just fine)
git clone https://github.com/AndrewFromMelbourne/raspi2fb
cd raspi2fb/
mkdir build
cd build
cmake ..
make
sudo make install
sudo cp ../raspi2fb@.service /etc/systemd/system/
sudo systemctl daemon-reload
sudo systemctl enable raspi2fb@1.service
sudo systemctl start raspi2fb@1
Almost done:
sudo dpkg-reconfigure console-setup
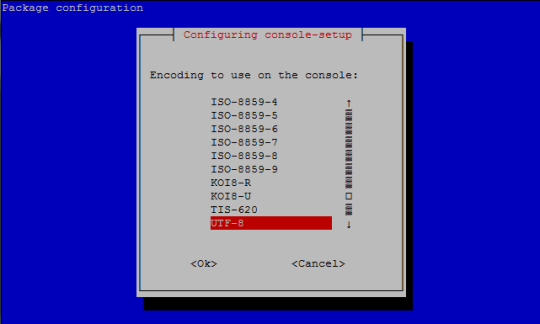 Select “UTF-8”, “Guess optimal character set”, “Terminus” and “6×12 (framebuffer only).”
Last edits before reboot.
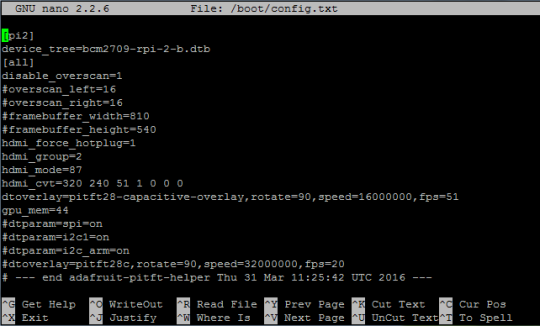
sudo nano /boot/config.txt
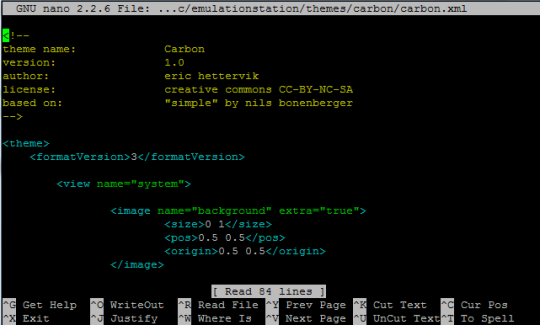
sudo nano /etc/emulationstation/themes/carbon/carbon.xml
Close Nano and Save ( CTRL+X, Yes, ENTER)
sudo reboot
And check if everything is still working if you want to add your own controls continue below
Adding Controls:

cd /~/
git clone https://github.com/adafruit/Adafruit-Retrogame
cd Adafruit-Retrogame
nano retrogame.c
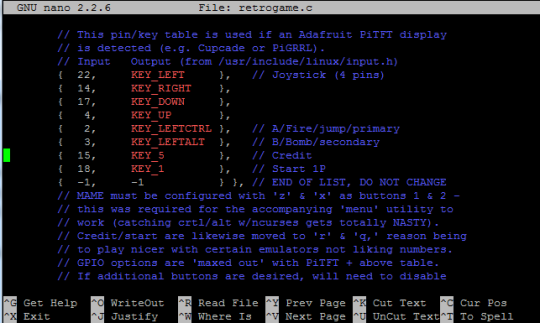
Edit the file retrogame.c, looking for the table called ioStandard and the input.h table. Each line in brackets represents one pin on the GPIO header and a corresponding key code.
The full list of available keycodes can be found in /usr/include/linux/input.h
My setup:
// Input Output (from /usr/include/linux/input.h)
{ 22, KEY_LEFT }, // Joystick (4 pins)
{ 14, KEY_RIGHT },
{ 17, KEY_DOWN },
{ 4, KEY_UP },
{ 2, KEY_LEFTCTRL }, // A/Fire/jump/primary
{ 3, KEY_LEFTALT }, // B/Bomb/secondary
{ 15, KEY_5 }, // Credit
{ 18, KEY_1 }, // Start 1P
{ -1, -1 } }, // END OF LIST, DO NOT CHANGE
You’ll need to be careful in your GPIO pin selection…some are used by the PiTFT display, others have certain reserved functions. Any green GPIO pin is free to use…yellow pins may be okay with additional setup. If you’ve configured a tactile button on the PiTFT for shutdown, that pin is unavailable for game controls.
One wire from each button connects to a GPIO pin, while the other wire connects to an available ground pin (GND). The 2.8″ PiTFT boards have an extra header breakout for the first 26 pins…for the remaining pins, you’ll need to get clever with female jumper wires on the exposed part of the Raspberry Pi GPIO header.
That is why i disable I2C and Serial so i can use gpio 2, 3, 14 and 15. Made a mistake and was easier to use gpio 14 and 15 instead. otherwise i would only disable I2C…

After editing, compile and install the code with:
make retrogame
sudo mv retrogame /usr/local/bin
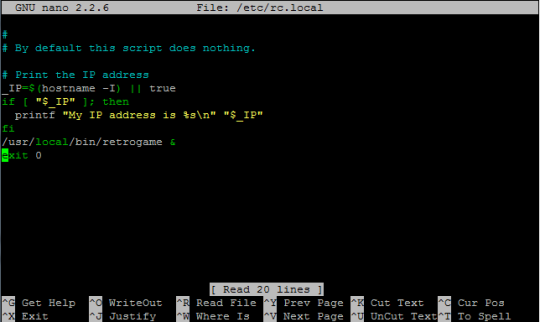
Test fist before making something boot that is not working.
sudo /usr/local/bin/retrogame &
sudo nano /etc/rc.local
sudo nano /etc/udev/rules.d/10-retrogame.rules
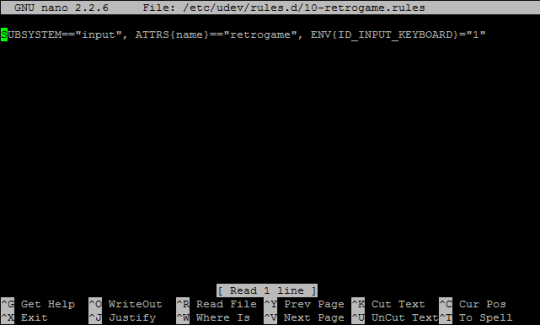
Reboot and you should now have “virtual” keys associated with GPIO buttons.
Or make it more fancy:
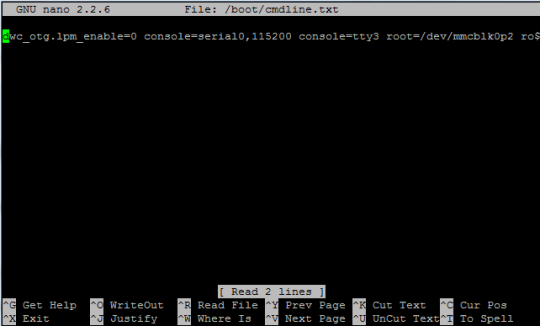
HOW TO HIDE BOOT TEXT:
sudo nano /boot/cmdline.txt
Add splach screen
Adding a splash screen can be done from in retropie so this is optional. but this way you know what is changed in retropie to show the splashscreen at start up, same method.
Custom Splash Screen for Raspberry Pi
This is a quick and dirty solution for an unanimated custom splash screen during boot.
First of all, you need to install fbi:
apt-get install fbi
Copy your custom splash image to /etc/ and name it “splash.png”
example code:
sudo mv splash.png /etc/init.d/
Next, create an init.d script called “asplashscreen” in “/etc/init.d/”.
sudo nano /etc/init.d/asplashscreen
I chose “asplashscreen” with an “a” at the beginning to be sure it starts first.
#! /bin/sh
### BEGIN INIT INFO
# Provides: asplashscreen
# Required-Start:
# Required-Stop:
# Should-Start:
# Default-Start: S
# Default-Stop:
# Short-Description: Show custom splashscreen
# Description: Show custom splashscreen
### END INIT INFO
do_start () {
/usr/bin/fbi -T 1 -noverbose -a /home/pi/RetroPie/splashscreens/splash.png
exit 0
}
case “$1” in
start|””)
do_start
;;
restart|reload|force-reload)
echo “Error: argument ‘$1’ not supported” >&2
exit 3
;;
stop)
# No-op
;;
status)
exit 0
;;
*)
echo “Usage: asplashscreen [start|stop]” >&2
exit 3
;;
esac
:
Then make that script executable and install it for init mode:
chmod a+x /etc/init.d/asplashscreen
insserv /etc/init.d/asplashscreen
Reboot and watch your custom splash screen:
sudo reboot
If everything is correct you still boot in console but now is everything setup to start retropie
Start by typing:
emulationstation
After the startup you need to setup you fresh made controls by pressing one of the keys and then follow the onscreen text. Skipping by holding down one button.
After that your done and can start adding roms, you have 2 options for this by usb or by samba.
So you probably need to set that up 2 lucky for us you can do this from in emulationstation
choose retropie setup from the menu.
The let it boot directly in to emulationstation.
 Next Samba: Oleee
and if you did’t follow my splashscreen install you can choose it here: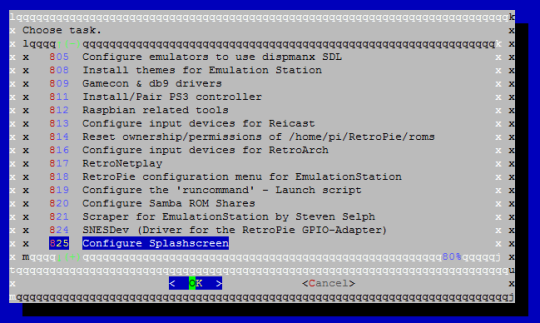

For now i leave this project to rest, i am glad whit the progress that i made.
also after 6 months I can close the case 😀 hooray!!!
Recap of what to do:
-Fix asla error….
-Build power cartridge for power.
-Build in speaker
-Extend usb to connector port and replace it by usb.
September
24
Ps3 Mod by Ipod :-D
My first ps3 that i modded i used my ipod touch to unlock it.
it was fairly easy to do below you can find a guide to setup the exploit.
This picture shows the mod in progress.
(How to install PSfreedom on iPod touch 1G)Updated PL3 payload

What you will need:
An iPod Touch 1g running 3.1.2 with blackra1n
Vmware Player
Ubuntu 10.04
Openiboot
PS3freedom for ipod touch PL3
PS3freedom for iPhone 2g/3g PL3
Winscp
iFunbox
OpenSSH (Installed from Cydia on your iPod touch)Alright, so I start here assuming you have the above.
Please note that 3.1.2 iPods with redsn0w may or may not work.Install ubuntu on your vmware player and start it.
First we will install OpeniBoot, get it from the link.
First, make a folder in your home directory named openiboot, move the files from the download above into the openiboot folder.Now, open a terminal (under applications, accessories) and type “cd ~/openiboot” without the quotes. Next, type “sudo su” (for the rest of this section, do not type the commands with the quotes around them). Enter your password that you use to sign in to linux (don’t be afraid if you don’t see yourself typing anything, its a security feature).Now then, we get to installing openiboot. Plug your iPod touch in with recovery mode (shows up as connect to itunes on your iPod). In VMware, go to the VM tab, go to removable devices, and look for anything saying apple device or iPod. On that, click “Connect (Disconnect from Host)”.Now, in terminal type “./loadibec openiboot.img3”. You should see openiboot come up on your iPod Touch. On your iPod Touch, click the top left button once, so you highlight Console. Now, click your home button. On linux, in terminal, type “./oibc” quickly after doing that last step. You should see the text on your iPod come up in the linux terminal. When you see “Welcome to OpeniBoot” type “install” into the terminal.
You should it start to install, so wait a few minutes until it is completed. Congratulations, you have installed OpeniBoot and finished the first part of the tutorial!
Now then, to get the exploit installed installed ( Don’t need ubuntu from now on)
Take the 2 files from the .gz(extract using 7zip) you downloaded (android.img.gz, zimage) and put them in a place you will remember. Next, open up iFunbox(in windows) and navigate to root file system/private/ and copy those 2 files into the var folder (root file system/private/var).
Make sure that the 2 files are exactly the same size as the files on your computer, as this is an annoying part to screw up on. Now that that is done, open up winscp. But before you can do anything with that, go to your iPod Touch and find your IP address (Press the blue arrow in Wifi Settings).
Now, copy the IP address into the winscp “host name” box. Then put the name “root” as username, and the password “alpine” as the password. Now, before connecting, change the file protocol to scp. Then, press login. It should take a moment, then display your iPod Touch directories on the right side of the screen.
Navigate to private/var and check that all 2 files are there. Now, right click each file, select properties, and change the permissions to 777 (make sure the first 3 rows of boxes are selected).
Turn your iPod Touch off, and then on, and OpeniBoot should come up. Select Android, and it should boot.
The actual exploit.
Switch of ps3 and then switch it off and on at the back.
Have the iPod connected to the PS3 with no other USB devices.
Click on Android on your ipod
When you see the Loading Firmware line, hit your power+eject
Press power then eject quickly.
Should boot up with the 2 new icons

September
24
Beta tester for a PS3 tool
Back in the hay days of the ps3 RealPsDev Contacted me to test his new ps3 tool.
Its a all in one tool for ps3 in a nice GUI.
He contacted me because i have been checking different build versions of eboot.bin files.
Results of scetool:

I shared a lot of info on forums like psx-scene.com ps3hax.com and i got his attention.
On twitter he asked me to beta test the final version of his tool.
I never beta tested a program my self and found it a great honor to do.
Over twitter i told him my results and he updated the bugs afterwards.
This was a great experions and found it very cool.
Below is the release info on psx-scene.com where you can download the tool your self.
Source: psx-scene.com
In a turn of events, PsDev has released his final edition of PS3Tools GUI Edition, v3.3.
He has also stated he plans on releasing the source code to his project at a later time, so others may continue the work he started. He has told me the reason he wishes to stop work on this project, is so that he can move on to develop other projects. Below you will find all 12 releases, all of which were released here at PSX-Scene first. Thanks PsDev!

It has been fun making this program, it has gone threw 12 awesome updates. I’m sad to stop working on it, but I’m happy to see what you guys can continue to make it into. I will release the source code, but not today, not in this thread. lets leave that for another time and focus on this release. This is also the most stable version, all features have been tested not only by me but other people too, (Dcnigma, Industerialcode) and all features work properly.
CHANGES:
- scetool v0.28 added
- New keys added to keyset
- New script for EBOOT resigning
- New file system layout
- Removed do it button
- Now everytime you select a option from one of the drop down menu it does that option right away
- Removed SELF tool
- Cleaner
- Every option has its individual message box completion of operation
There is a new way that the file system works. There is a individual folder for all the tools (PUP Tools, scetool, Core_os Tool ect) And when you want to use the tool just place the file in the correct folder and use the GUI. This system is cleaner and allows me to not use as much code.
there is a script in the scetool folder called fix. This script is what can be edited to your standards for the EBOOT resigning. I did this so if you want to sign for 3.41 ect or change compression or anything just edit the script and run the GUI no need for new update, much more efficient
@echo off
FOR /F "tokens=1,2 delims= " %%A IN ('scetool.exe -i EBOOT.BIN') DO (
if [%%A]==[ContentID] set CID=%%B
)
scetool.exe --decrypt EBOOT.BIN EBOOT.ELF
rename EBOOT.BIN ORIGINAL_EBOOT.BIN > NUL
pause
scetool.exe --sce-type=SELF --compress-data=FALSE --skip-sections=TRUE --key-revision=0A --self-auth-id=1010000001000003 --self-add-shdrs=TRUE --self-vendor-id=01000002 --self-type=NPDRM --self-fw-version=0003005500000000 --np-license-type=FREE --np-content-id=%CID% --np-app-type=EXEC --np-real-fname=EBOOT.BIN --encrypt EBOOT.ELF EBOOT.BIN
pause
del /Q EBOOT.ELF > NUL
scetool -i EBOOT.BIN
pause
There is no more “Do It” button, since I change the way the files are modified I thought I will just make every option a button it self, si when you click the option you like from the drop down menu it will do the operation
Note* After click may take a sec for the operation to start be patient.
DOWNLOAD: PS3Tools Final
September
20
Test card/screen Simulator!
My dad is a Ham Radio/TV amateur and he asked if i could write a better version of his version Test card/screen program that he found on the internet.
 |
http://home.worldonline.nl/~peterdb/testcard/ | Site is offline |
My version is almost a one 2 one copy of Peter his program the only different aspect is: custom screen options.
My dad complains that after he upgrade his video card he could get Peter’s version working correct.
So i looked at the application and told my dad that i could code that in one day and make it better.
I took this challenge because i written some code for custom screen options before.
My version got all basic functions that peter’s version got i left out the RGB options because otherwise i couldn’t make the dead line of one day 😀

If you select view set location Testbeeld you get another window and you can drag it to the desired screen/location…
after hitting the Set button the location is fixed.

If you hit the fullscreen button it will load the Test card/screen on that location.
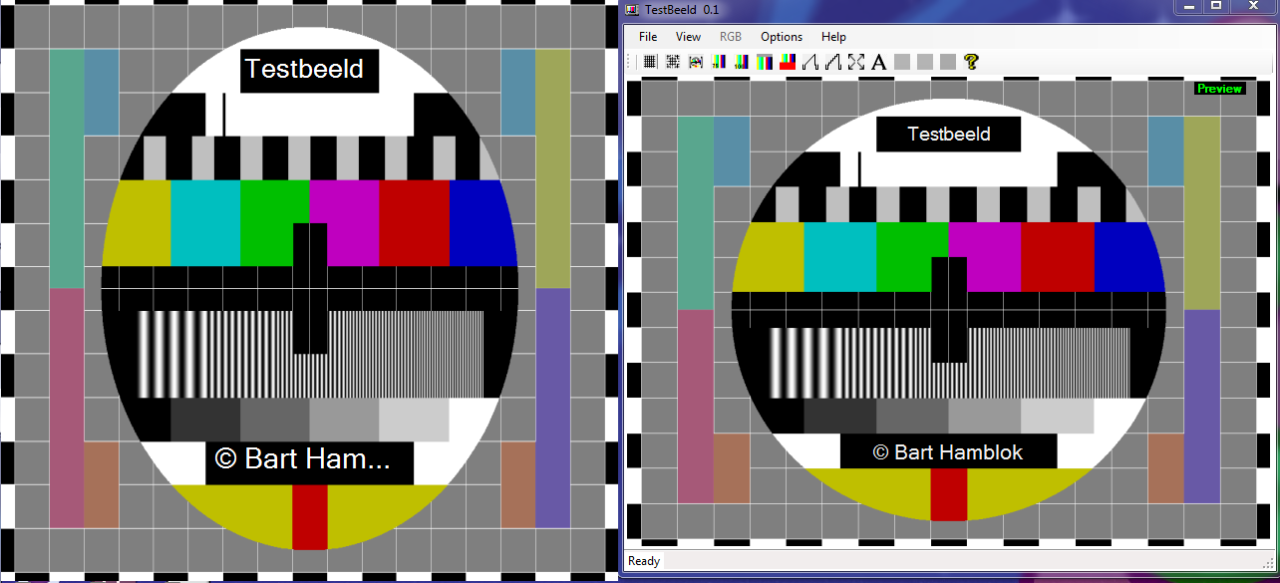
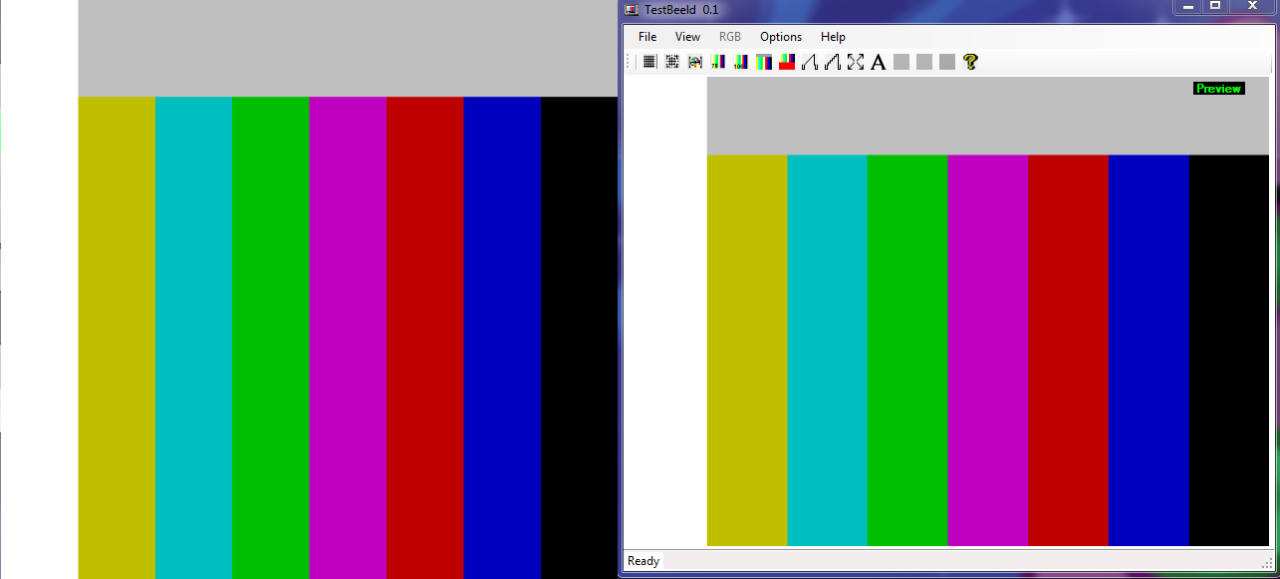
Some more test card options:
Download: Dropbox download. Testscreen app
Source code : Github
Video demo:
September
14
My Wii homebrew pong game
In 2010 i made a WiiPong game just to demonstrate that Wii Game Studio can have Multiplayer..
At that time Wii Game Studio was under heavy fire from developers. they said it was not really a good product…….
And that the creator can’t charge money for other peoples work…
It was a hole flame war, ok the creator
did’t credit any of the dev kit or other tools used for compiling Wii homebrew.
And it din’t came also include in the pack.. so at the time i found it no problem still not.
I found it easy to create simple games for my Wii without a extend knowledge of the WII Dev kit..
So for a graphic designer that wants to learn and create games for his wii its was a dream came true.
I payed for the gui and start making my first demo’s for my self..
Later on tehskeen.com wii game studio got such a bad name that i wanted to do something about it..
So i decided to make a game for it. to show that wii game studio can produce a good looking homebrew game and have multiplayer in a creative way..
Because Game studio only supported one wii controller you needed a good idea to map your controls for
two players on one controller..
so i thought to my self witch game use’s simple controls?
Pong!
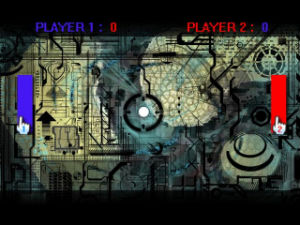
So my WiiPong version of Pong will use only 1 controller.
There is no cpu play because the goal of this project was to show that 2 player games
where possible in Wii game studio you just needed to be creative to work it out..
How to play?
Left and Right for player 1
Plus and Minus for player 2
Game Types:
– Best of 3
– Best of 5
– Best of 100
Download at: wiiPong.rar incl tutorial for Wii Game studio
September
10
Music Projects….
For along time my friends and I made music…
Always surrounded me with music!
Now its time to share some of my music:
Made this track with a friend just for fun.
It supposed to be a dirty track for a stupid local radio station that only plays crap 😀
These songs where made just for fun on my own, just like my header says:
its a journey to knowledge and this means Music too.
This one is a little special its a glitched version of the big hit by Tegan And Sara…
Also just for fun at that time i was very into glitchy sounds and noise. 😀
Recently I got really involved in the music scene…
At the moment i am VJ for a local band Holo Vex:
with one of the band members we have a side project.
Called Beefcheeks and Bartclub.
Here are the First 2 Tracks:
So now i started my own side project called Bartclub.
Here is my first track:
Of-course there is more to come from this….
August
7
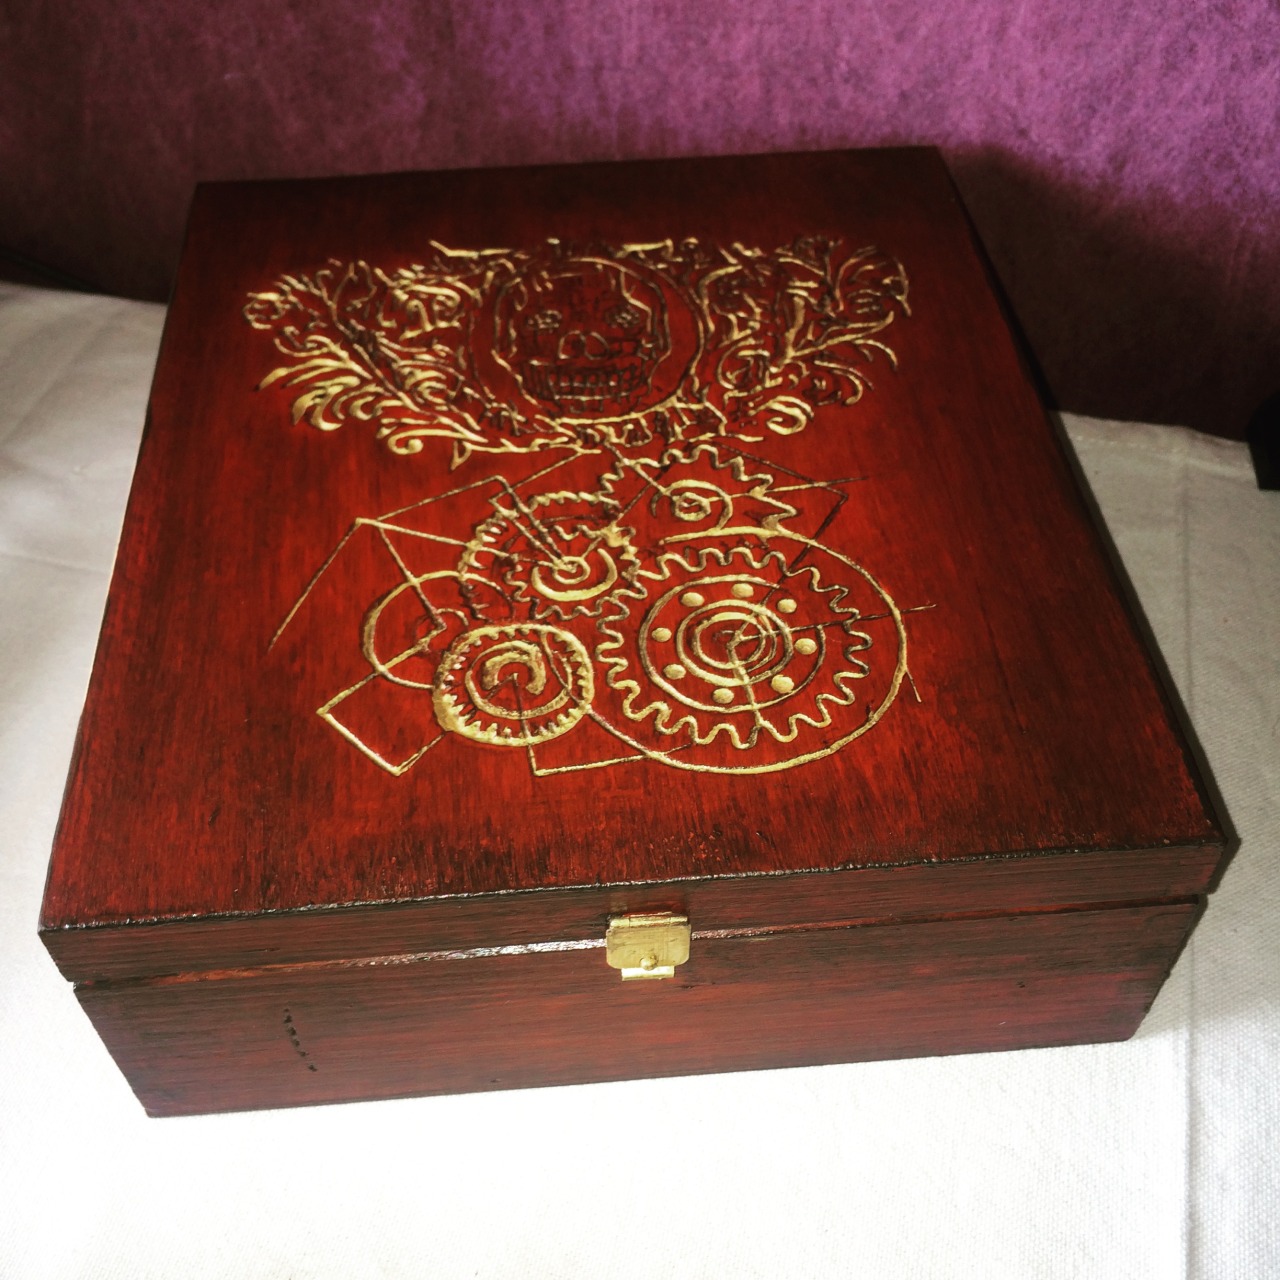
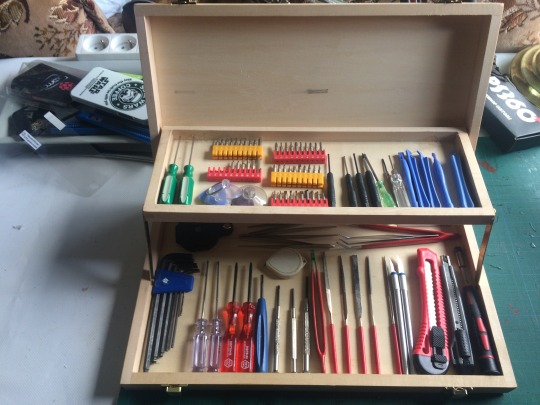
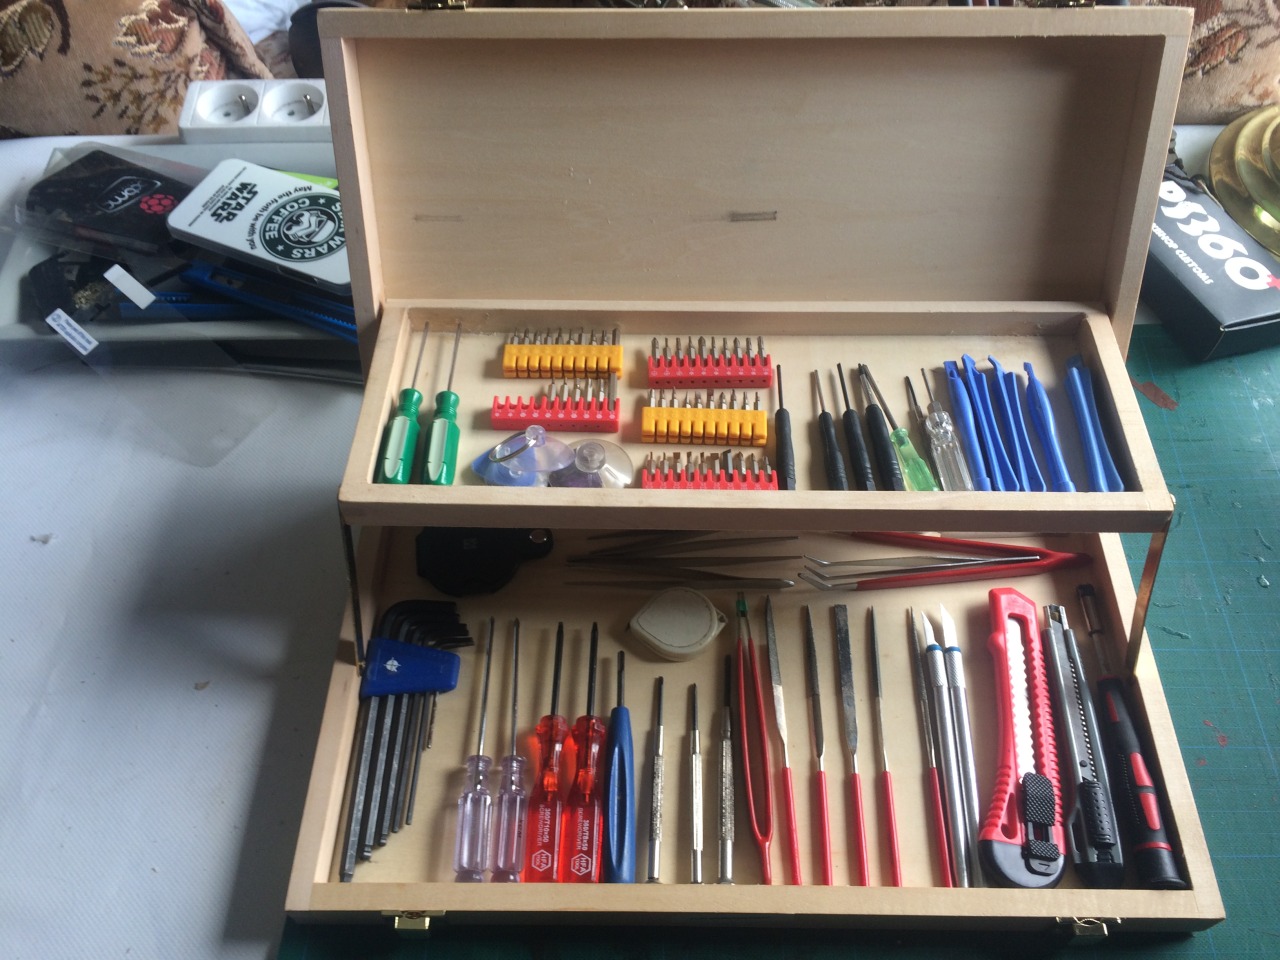
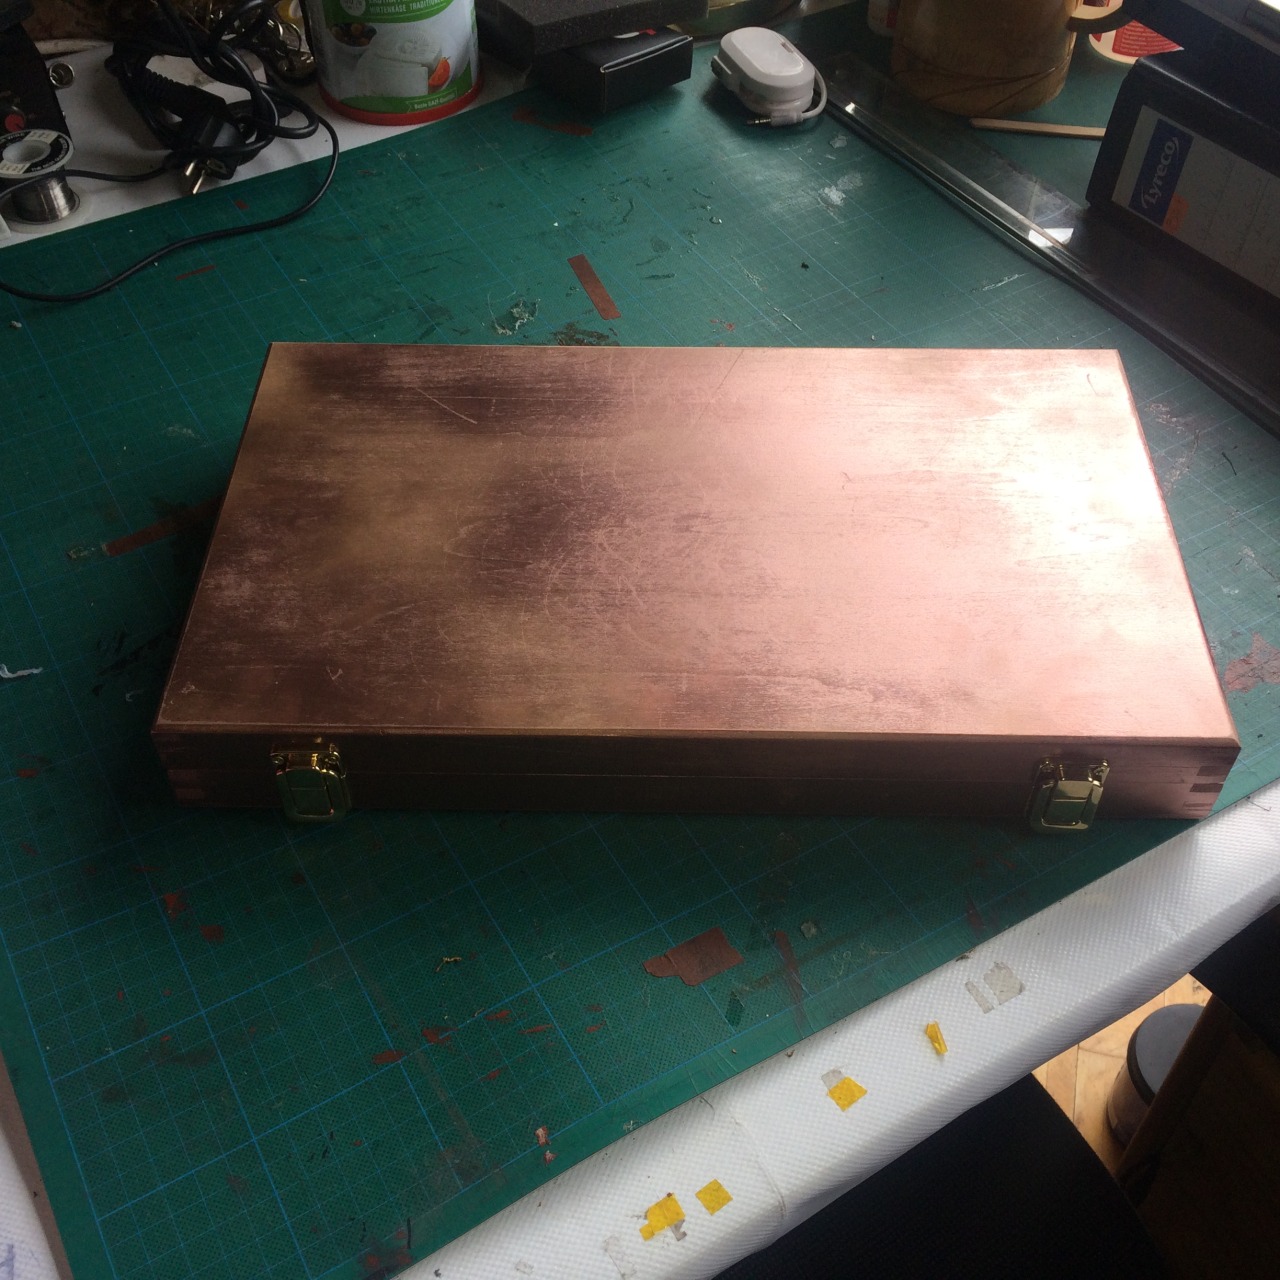
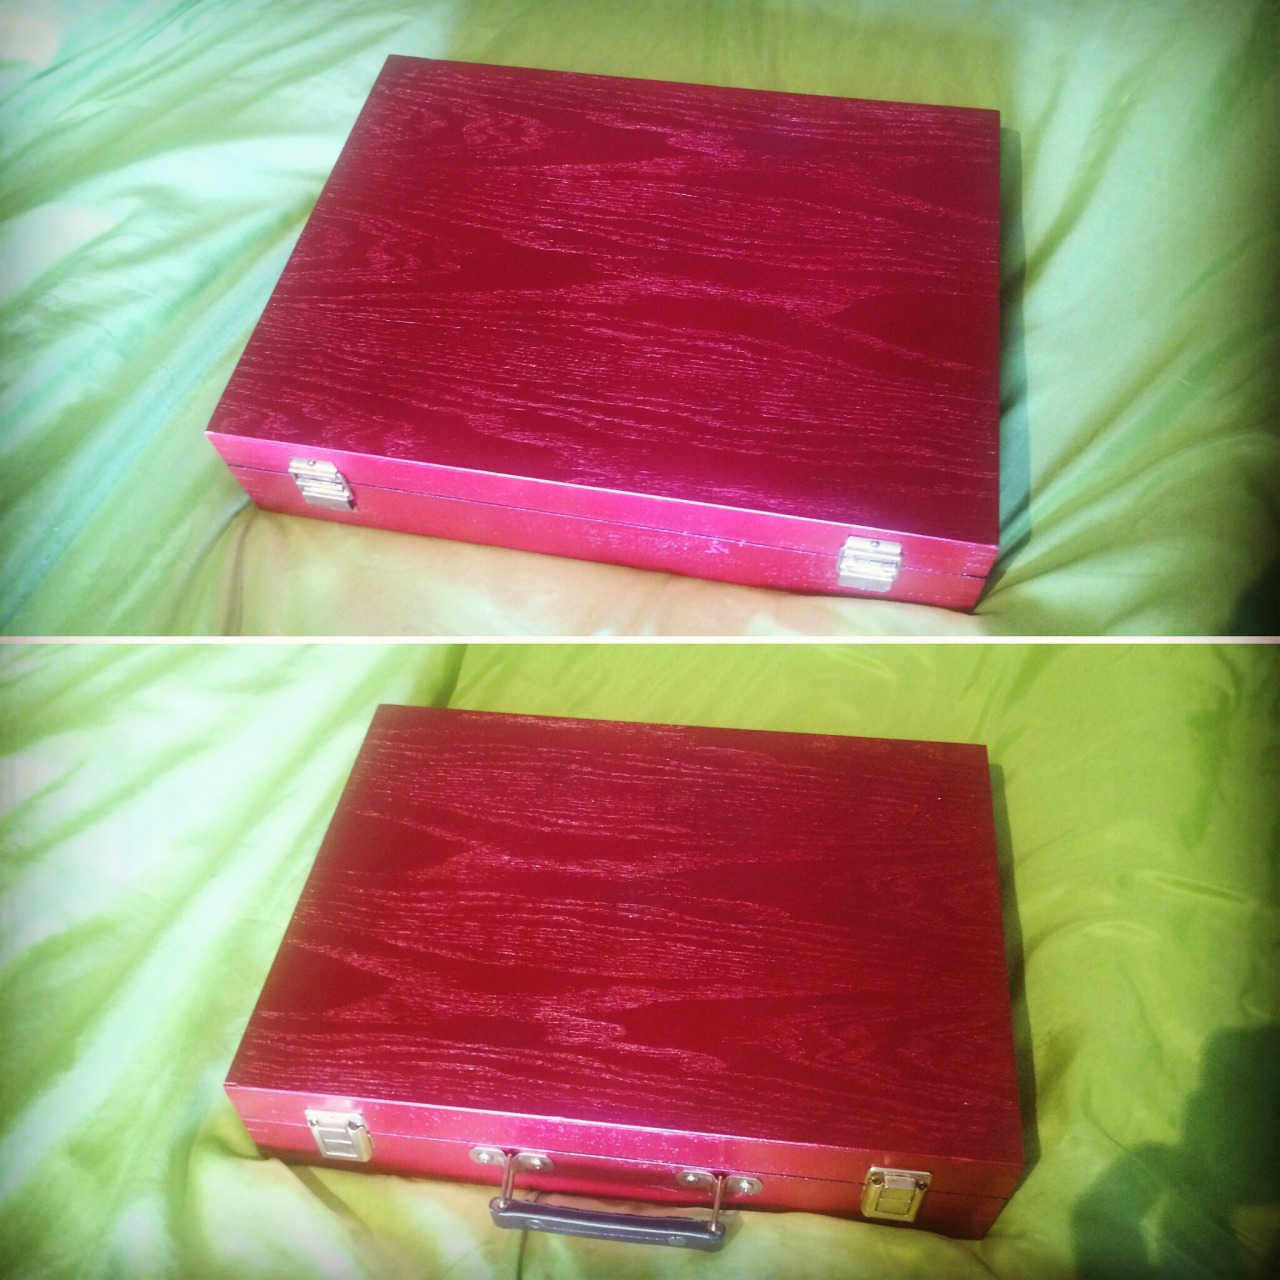
Steampunk theme Wooden Box Update

Also I painted my steampunkt themed box golden and I like it a lot:

August
7
Paint Work!

August
3
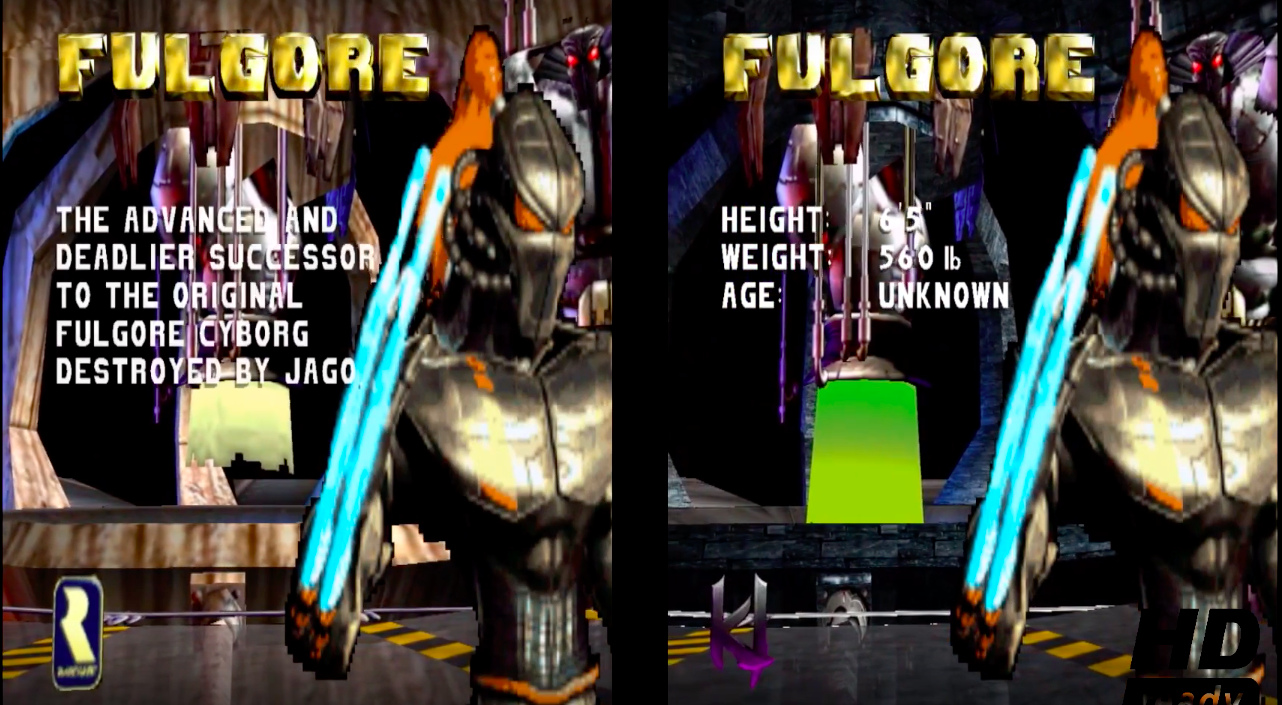
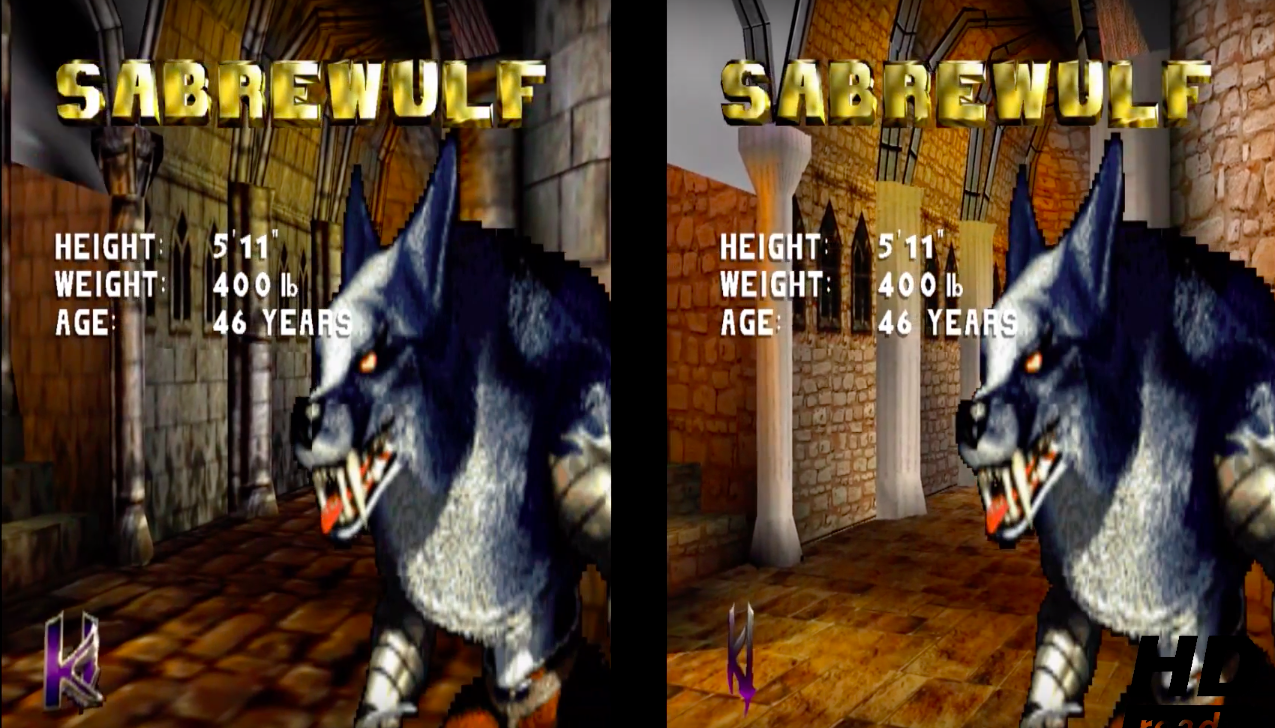
Killer Instinct Gold N64 HD textures Test.
Here are some screenshots of my HD upscale mod:
The characters is very hard because they are made up out of a lot of little sprites look at 7:57 to see my try on spinal… 😀

the backgrounds can be done:

letters also: see the names in game


Jago HD Sabrewulf not yet


Difference between original and new bit to red above 😀
More screenshot taken form the youtube video.


