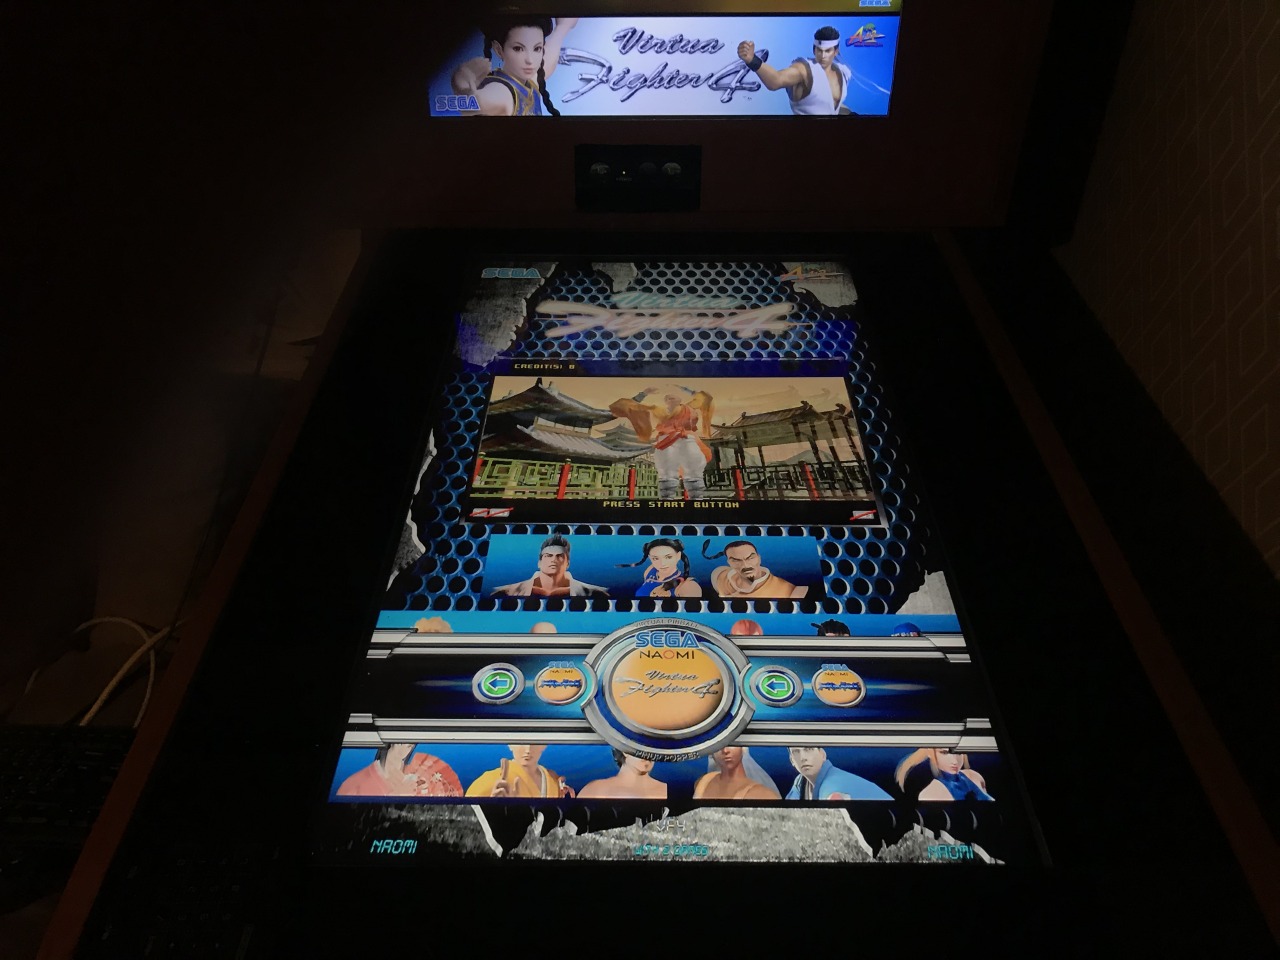
I got MAME running, but I wanted more.. So I tried loading Demul.
This didn’t go like I wanted at first needed to edit the script use a hidden command in pin popper to load the playfield “bezel”
But before I did that I needed to fit it on the screen, I don’t know if I want to play on the playfield like I do now. For now its ok but maybe I will change it in the future. To make it work I needed to install windows app. Found a good one that works, but after running it I found out that I lost focus so I wrote a Autokey script to keep it ontop and press f3 to remove the menu bar in window view.. Script and hidden command for keeping playfield running below. Here is a video how it resizes:
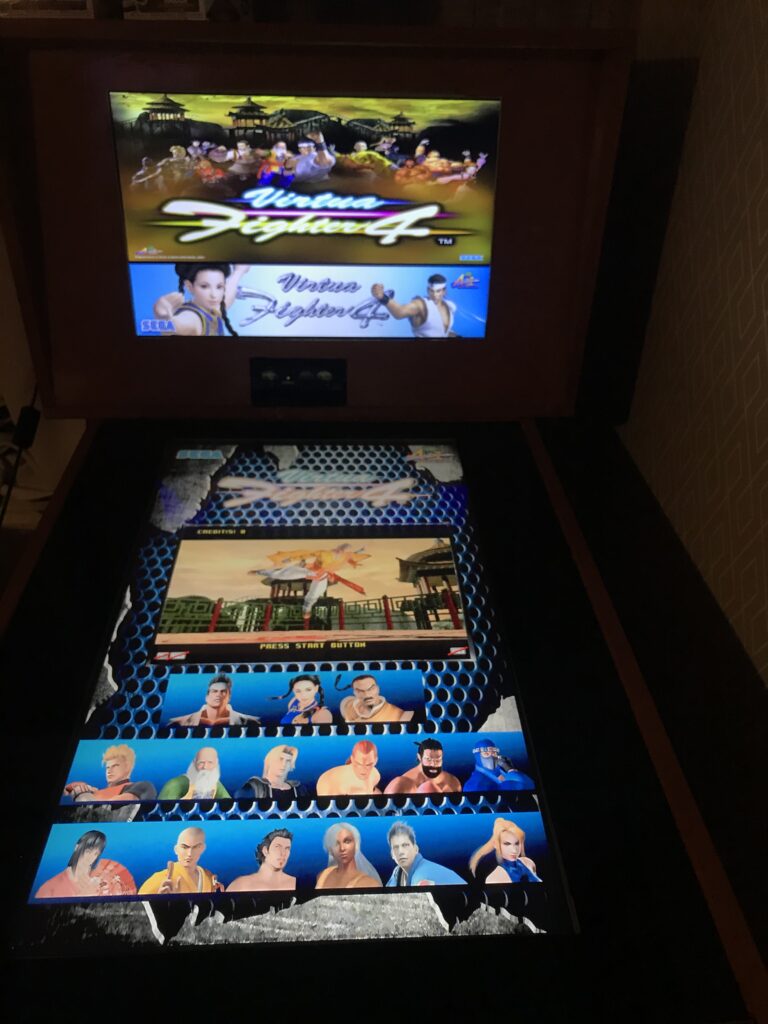
Here are some pictures of the 2 games I have running for now:
Dead or Alive 2 and Virtual Fighter 4
Made some backglasses for them and DMD images.. Wanted to use video, but found nothing fitting…
Most of the homebrew on switch uses + to exit I modded FTPD to do that too.
My first button press was always + so I fixed that for my self.
If you want to use it your self you can grab a copy form the download link below.
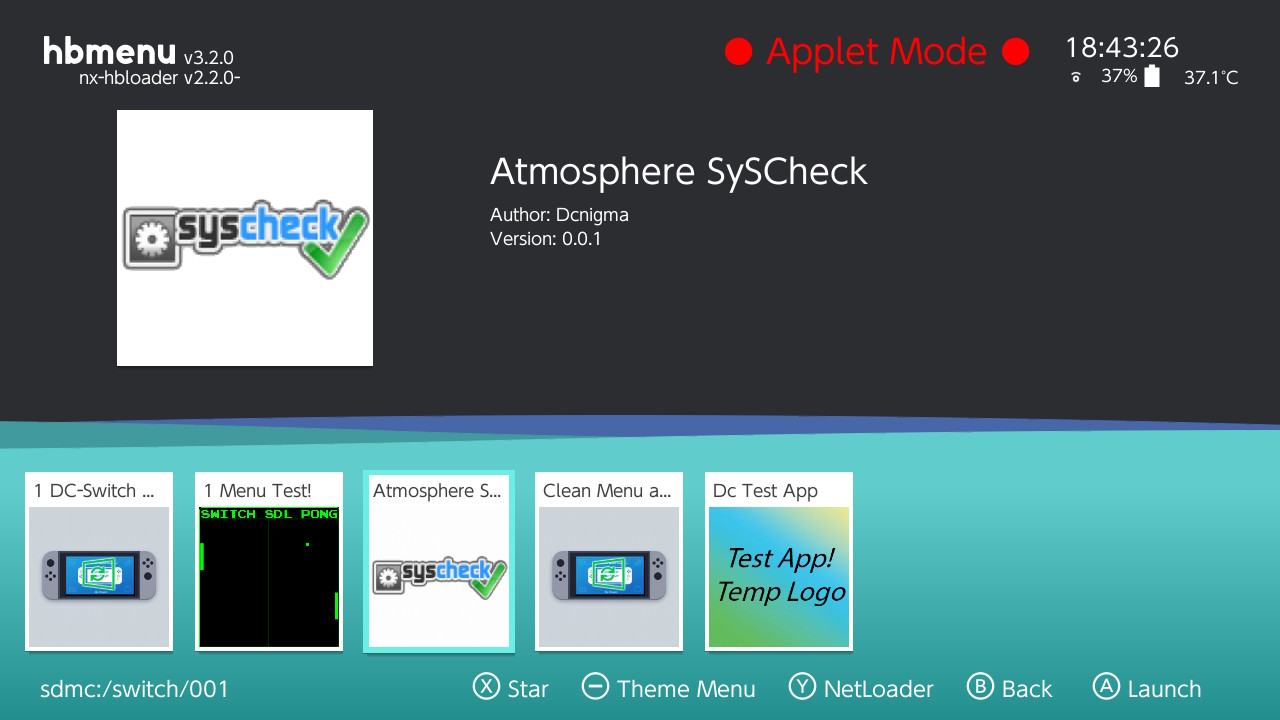
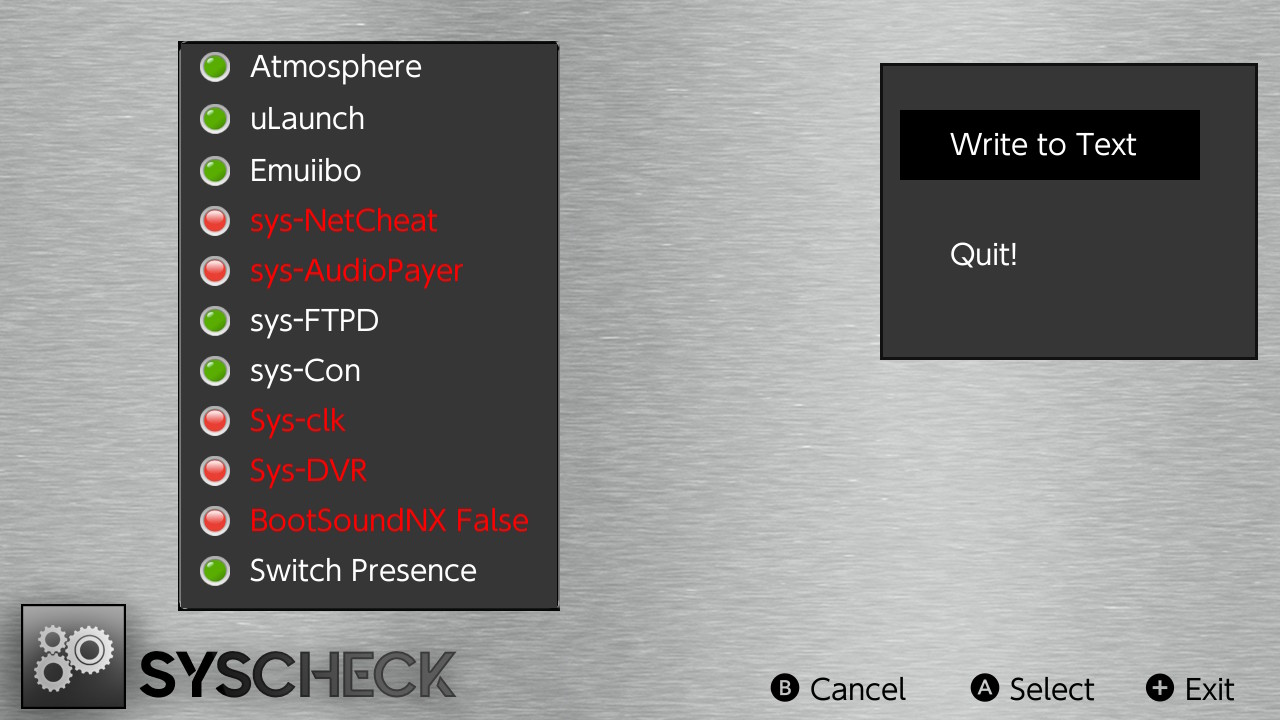
Just something to check what extra things are installed on your switch.
Before making this I did’t know that I have Sys-FTPD installed 😀
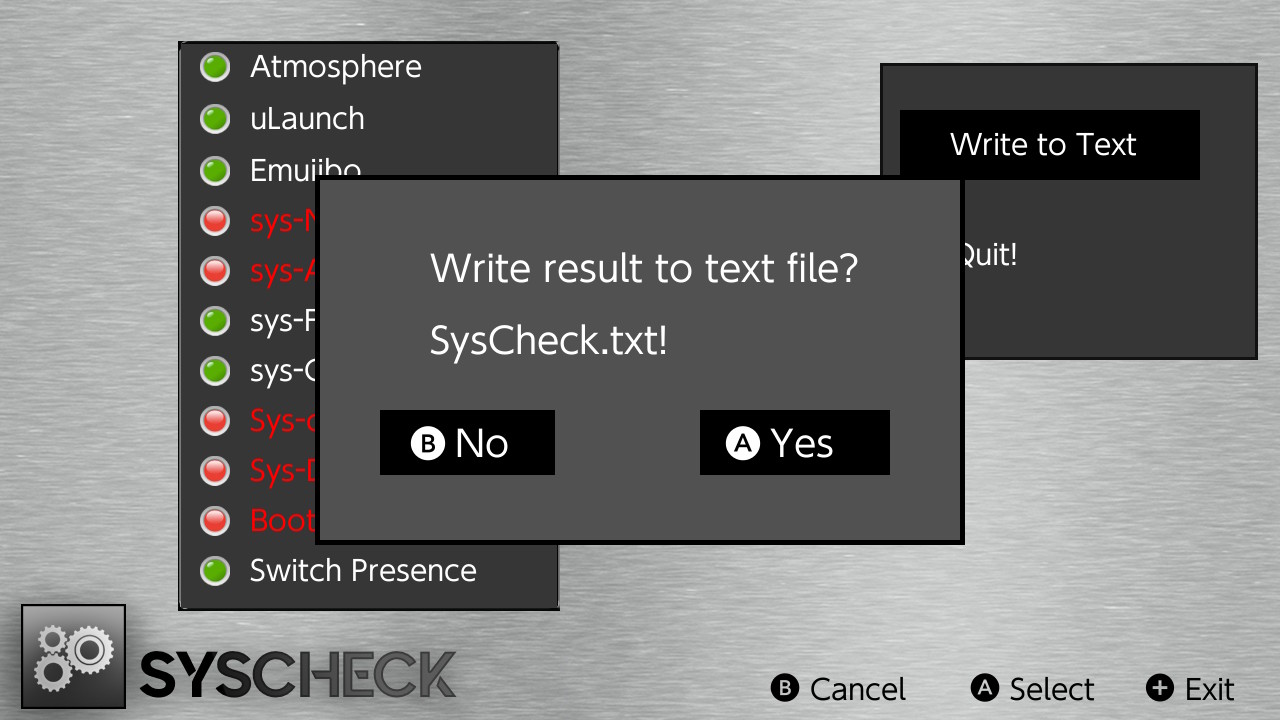
But its still in Dev fase need to find out how to write better to a txt. My methode works and it doesnt work. Get output but not the correct 😀
Got it working by cheating in the code….
But it works.. SysCheck.txt gets created and holds the right information
Added ; so you could load it in as a csv..
Plus some self promotion, and the credits will be added soon.
Need to check this firs 😀 sorry guys
Will not release this at this moment because of:
Since Atmosphère 0.10.1 changed the folders for these programs.
Atmosphere will move them at start up so the user will not notice.
So its not anymore in titles like in 0.9.4 but in contents,
I need to rewrite the checks code for 0.10.0 this is a easy fix but still something to do.
And i did’t expected this move of Atmosphere..
But if you can compile, you can download it from github Dcnigma SysCheck
My first real useful homebrew app for the Nintendo Switch.
This is what happens when you watch 2h youtube tutorials of a 4h course. Youtube C++ Tutorial for Beginners.
Video clip showing it in action:
Uses:
- Install/update uLaunch.
- Remove uLaunch.
- Install extra Themes.
- In app update.
- Reboot to payload.
uLaunch Screenshot (icon):
. When uLaunch came out I was very excited to try it out, it looks very promising like the design.
Open source and I guess there will be loads of new features in the future.
But it's still in beta 0.1 so its not realy stable, not that I found breaking bugs.
So I wanted a easy way to remove it and re-install it without re-ftp or sdswap.
Started my journey in to Switch develepment just this month and I really like the progress I made.
Here are some screenshots:
Main Menu:
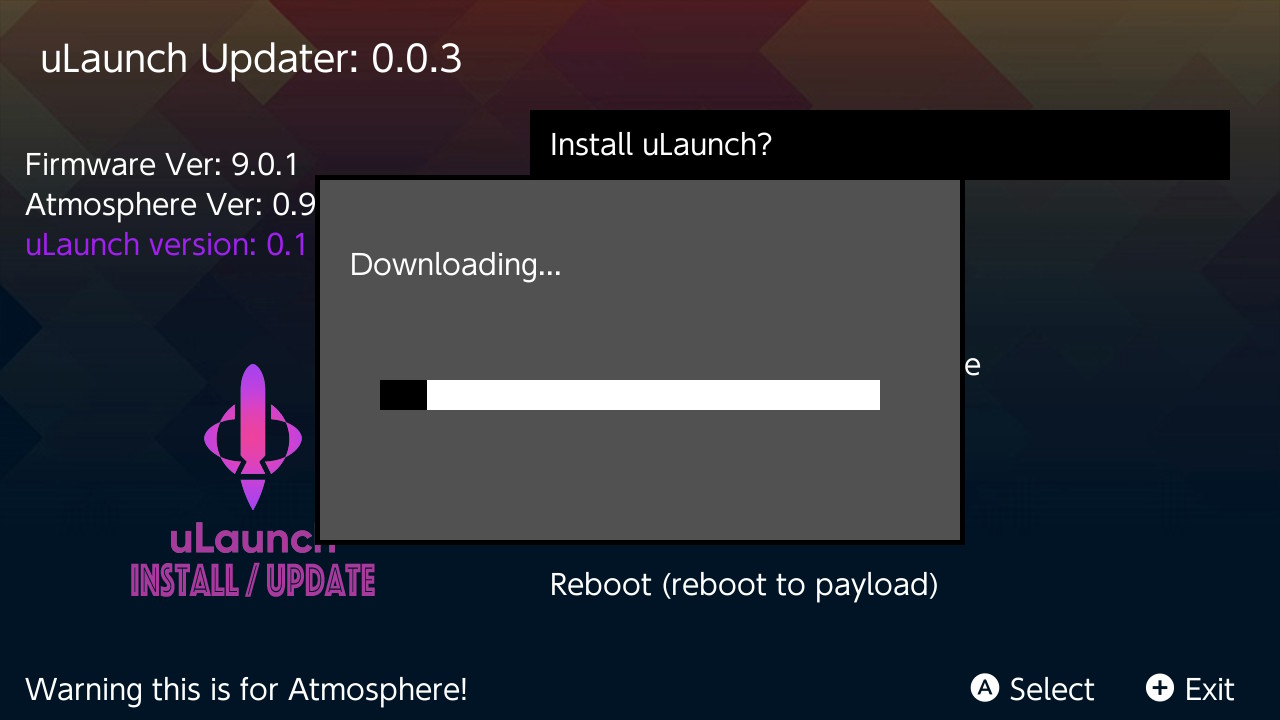
Download:
Nice progress menu.
Install complete!
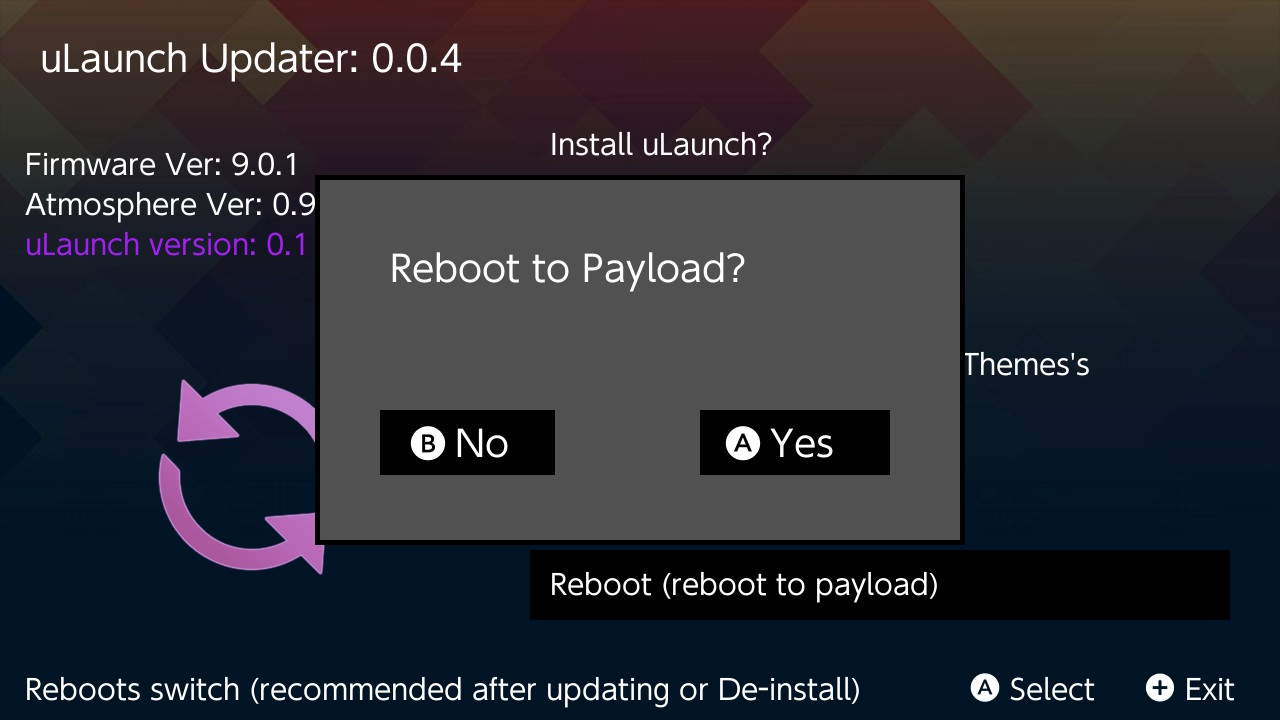
Like the screenshot says use Reboot Payload to do restart in to uLaunch.
De-Intsall!
De-Install complete:
This will only De-Install the Titles, not the users information at ”/uLaunch/” Themes will not be deleted.
Like the screenshot says use Reboot Payload to do restart in to uLaunch.
Install Extra Themes!
Themes will appeare directly after closing app in uLauch theme selector.
You need to restart uLaunch to apply the theme.
Use Reboot Payload to do so.
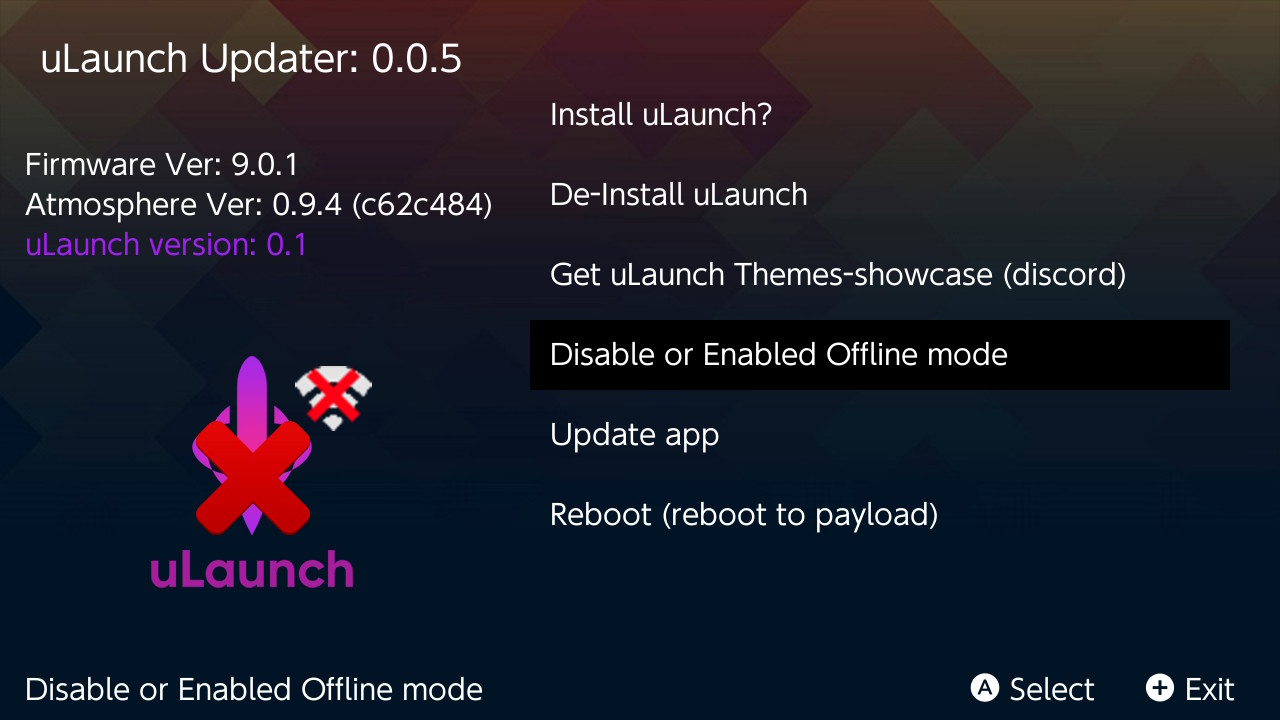
Disable or Enable uLaunch!
Disable or Enable uLaunch without deleting it. Title folders will be moved except for 0100000000001000 only the exefs.nsp file will be moved.
And as bonus Included all Themes that are in the Showcase.
In App Update!
Just restart after download and if there is a new version this one will be started.
Reboot to Payload!
Homebrew Menu launch icon corrupt.
Like you can see the Icon shows “!” because I used a icon.png and not icon.jpg.
In uLauch my png icon is showing correct but not in Homebrew Menu
Installation:
This is very simple just download the DC-uLaunch_Updater.nro
and create and place in your /switch/Ulaunch-update/ folder.
And then your done launch from HBmenu or uLaunch.
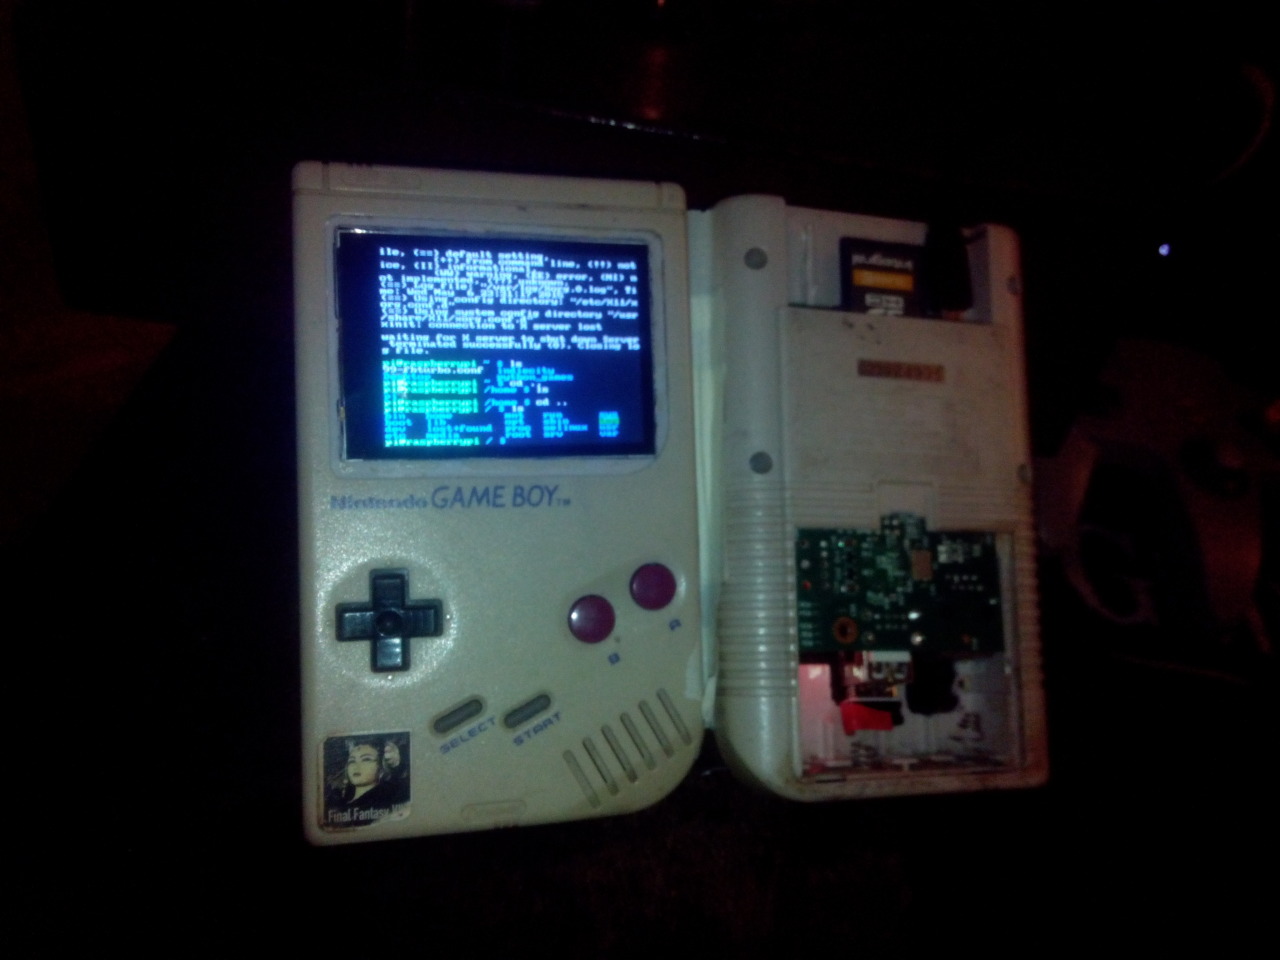
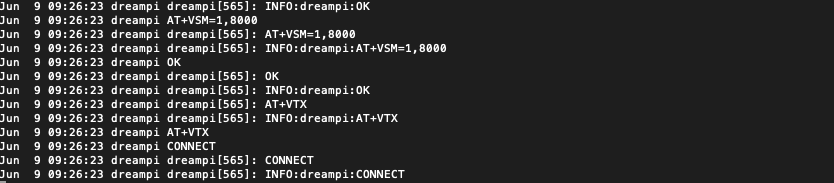
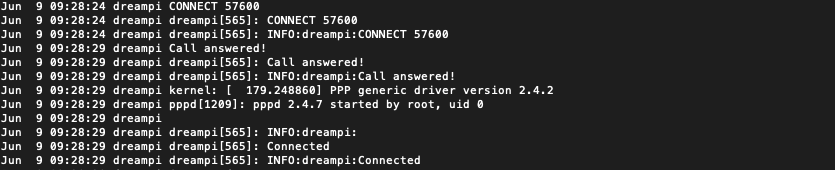
Good for debugging errors: sudo tail -f /var/log/syslog
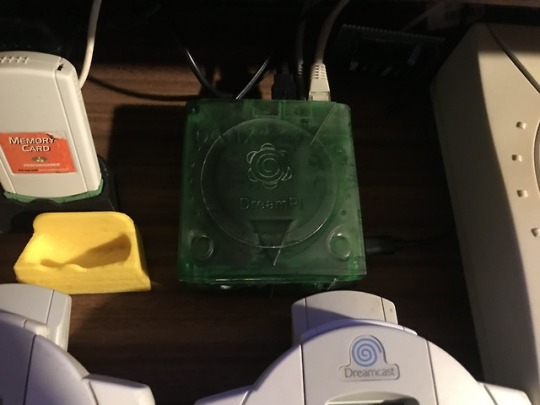
Had some trouble getting Dreampi working so I checkt the syslog:
I need to wait to connect the the line inducer until Dreampi is started.
After this log I connect the power to my line inducer when i connect it before it’s started dreampi crashes because it cant find the modem.
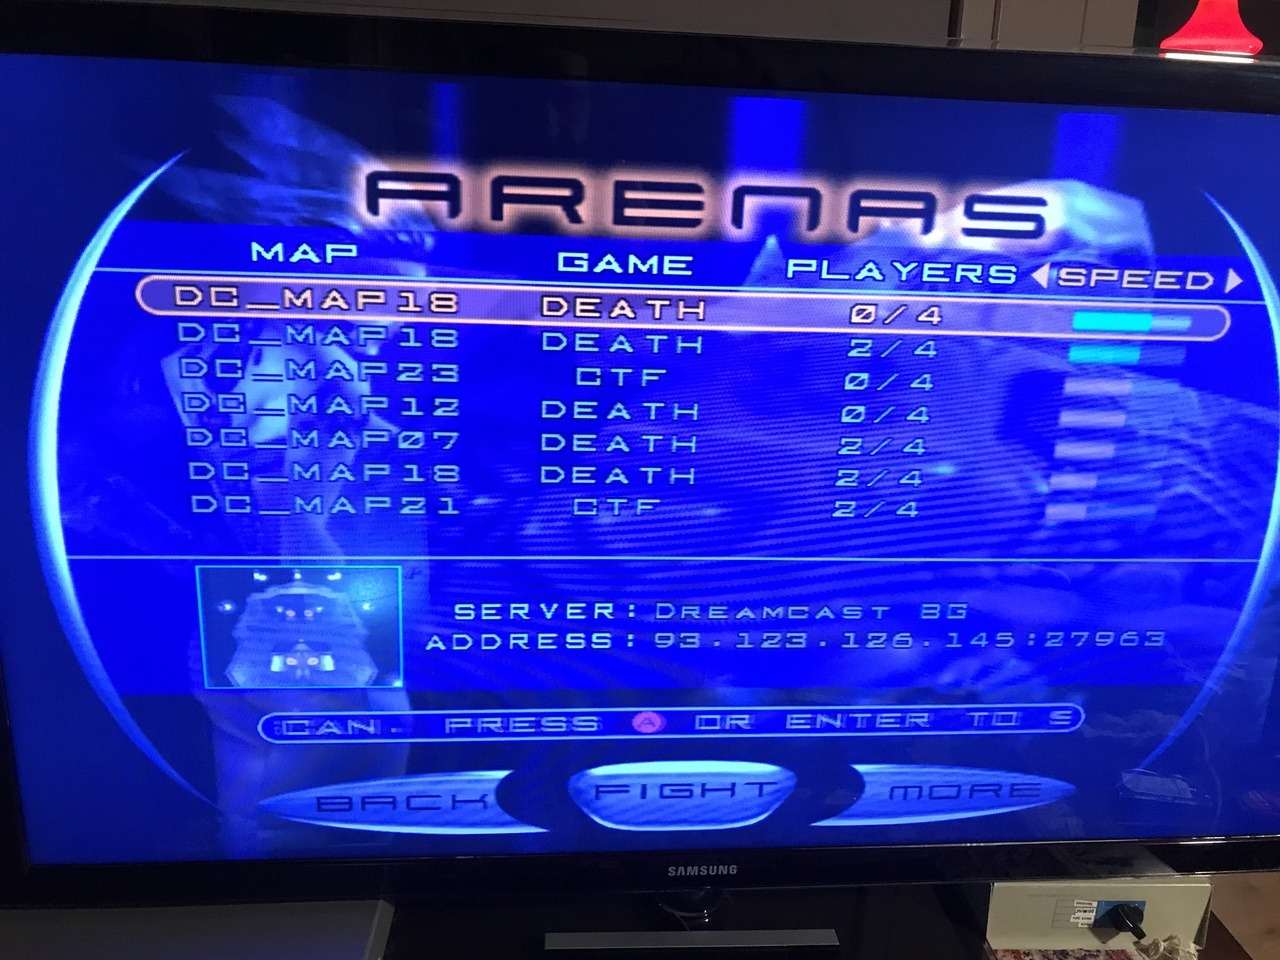
Just a test when i connect to Quake 3 servers
Quake 3 is my goto test game. To check if my DreamPi works…
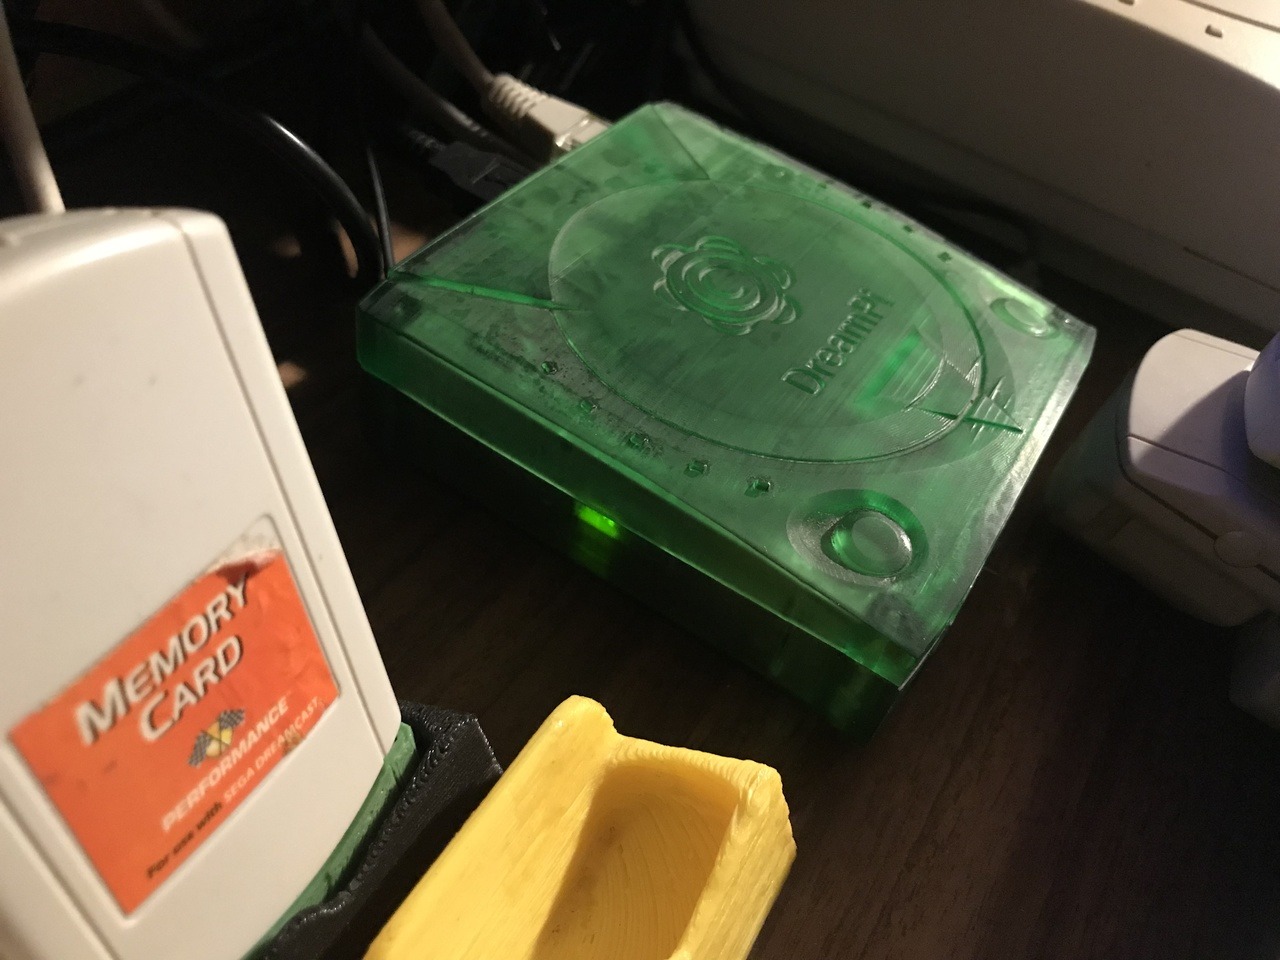
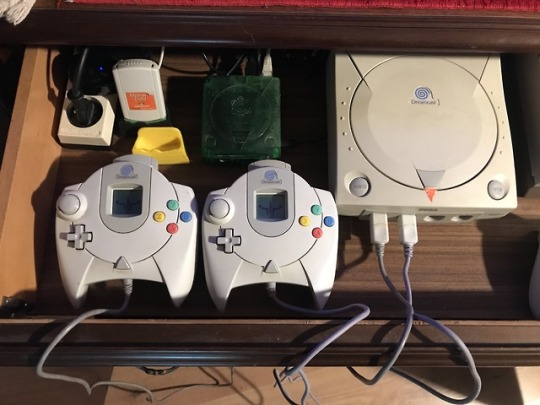
Now my dreamcast is almost ready for 2019 😀 one more mod (Noctua NF-A4x10) already printed the fan duc.
Don’t forget to CHANGE your Pi’s password, DMZ will make your Pi attractive to bad people….
Some game info:
[spoiler title=’More info’ style=’green’]
4×4 Evolution Nothing!
The game will connect without any modifications.
Alien Front Online*
Automatic with DreamPi. Currently it will not work with any other connection methods. Note: This game requires you to configure a standard length phone number (e.g. 111-1111) or it won’t even attempt to connect.
ChuChu Rocket!*
Automatic with DreamPi. For other connection methods, set your DNS server to 46.101.91.123 using your Dreamcast web browser or in your Netopia/PC-DC configuration. Maximum Pool Automatic with DreamPi. For other connection methods, set your DNS to 46.101.91.123 using your Dreamcast web browser or in your Netopia/PC-DC configuration.To play online with all the tables and modes unlocked, download the save file from the Downloads section using your Dreamcast web browser.
Monaco Grand Prix Online
Automatic with DreamPi**. For other connection methods, set your DNS server to 46.101.91.123 using your Dreamcast web browser or in your Netopia/PC-DC configuration.**You must create an account before logging in. NBA / NFL / NCAA 2K Series* Automatic with DreamPi (1.7 required for these games). For real dial-up connections, set your DNS server to 46.101.91.123 using your Dreamcast web browser.
The Next Tetris: Online Edition*
Automatic with DreamPi**. For other connection methods, set your DNS server to 46.101.91.123 using your Dreamcast web browser or in your Netopia/PC-DC configuration.**You must create an account before logging in. When creating an account, use “pass” as the password.
Ooga Booga*
Automatic with DreamPi**. For other connection methods, set your DNS server to 46.101.91.123 using your Dreamcast web browser or in your Netopia/PC-DC configuration.**When creating an account, you will be assigned a random username (Player_).
PBA Tour Bowling 2001*
Automatic with DreamPi**. For other connection methods, set your DNS server to 46.101.91.123 using your Dreamcast web browser or in your Netopia/PC-DC configuration.**You must create an account before logging in. When creating an account, use “pass” as the password.
Phantasy Star Online
NTSC-U/J v2: Download the Sylverant PSO Patcher, burn it to a blank CD-R using ImgBurn, insert it into your Dreamcast, and swap it with the Phantasy Star Online disc when prompted.All other versions: Automatic with DreamPi.
For other connection methods, set your DNS to 46.101.91.123 in your Dreamcast web browser or in your Netopia/PC-DC configuration. POD SpeedZone Automatic with DreamPi**. For other connection methods, set your DNS server to 46.101.91.123 using the Dreamcast web browser or in your Netopia/PC-DC configuration.**You must create an account before logging in.
Planet Ring*
Automatic with DreamPi. For other connection methods, set your DNS to 46.101.91.123 using your Dreamcast web browser or in your Netopia/PC-DC configuration. If you’re using real dial-up, you may require the Sylverant Planet Ring Patcher
Quake III Arena US Version:
Automatic with DreamPi. For other connection methods, set your DNS in the game to 46.101.91.123. If you’re unable to see the master server list, you can manually connect to a server by selecting “More” and inputting the IP address of the server. You can find the list of servers here.
PAL Version: Automatic with DreamPi. For other connection methods, set your DNS to 46.101.91.123 using your Dreamcast web browser or in your Netopia/PC-DC configuration. Once connected, select any username from the list and input anything for the password
Sega Swirl
This game is played via e-mail so you must set up an email account from within a Dreamcast web browser.
Most modern e-mail providers are not supported so workarounds are needed.
Starlancer*
Automatic with DreamPi. For other connection methods, set your DNS server to 46.101.91.123 using your Dreamcast web browser or in your Netopia/PC-DC configuration.
Toy Racer
Broadband Adapter: When connecting, the game will ask you for an IP address and TCP port number. Input 209.42.147.174 for the IP and 2048 for the TCP port number.
Modem: Automatic with DreamPi. Set your DNS server to 46.101.91.123 using your Dreamcast web browser or in your Netopia/PC-DC configuration. Once connected, select any username from the list and input anything for the password.
World Series Baseball 2K2*
Automatic with DreamPi**. For all other connection methods, set your DNS to 46.101.91.123 using your Dreamcast web browser or in your Netopia/PC-DC configuration.**When creating an account, you will be assigned a random username (Player_).
Worms World Party* Automatic with DreamPi. For other connection methods, set your DNS to 46.101.91.123 using your Dreamcast web browser or in your Netopia/PC-DC configuration.
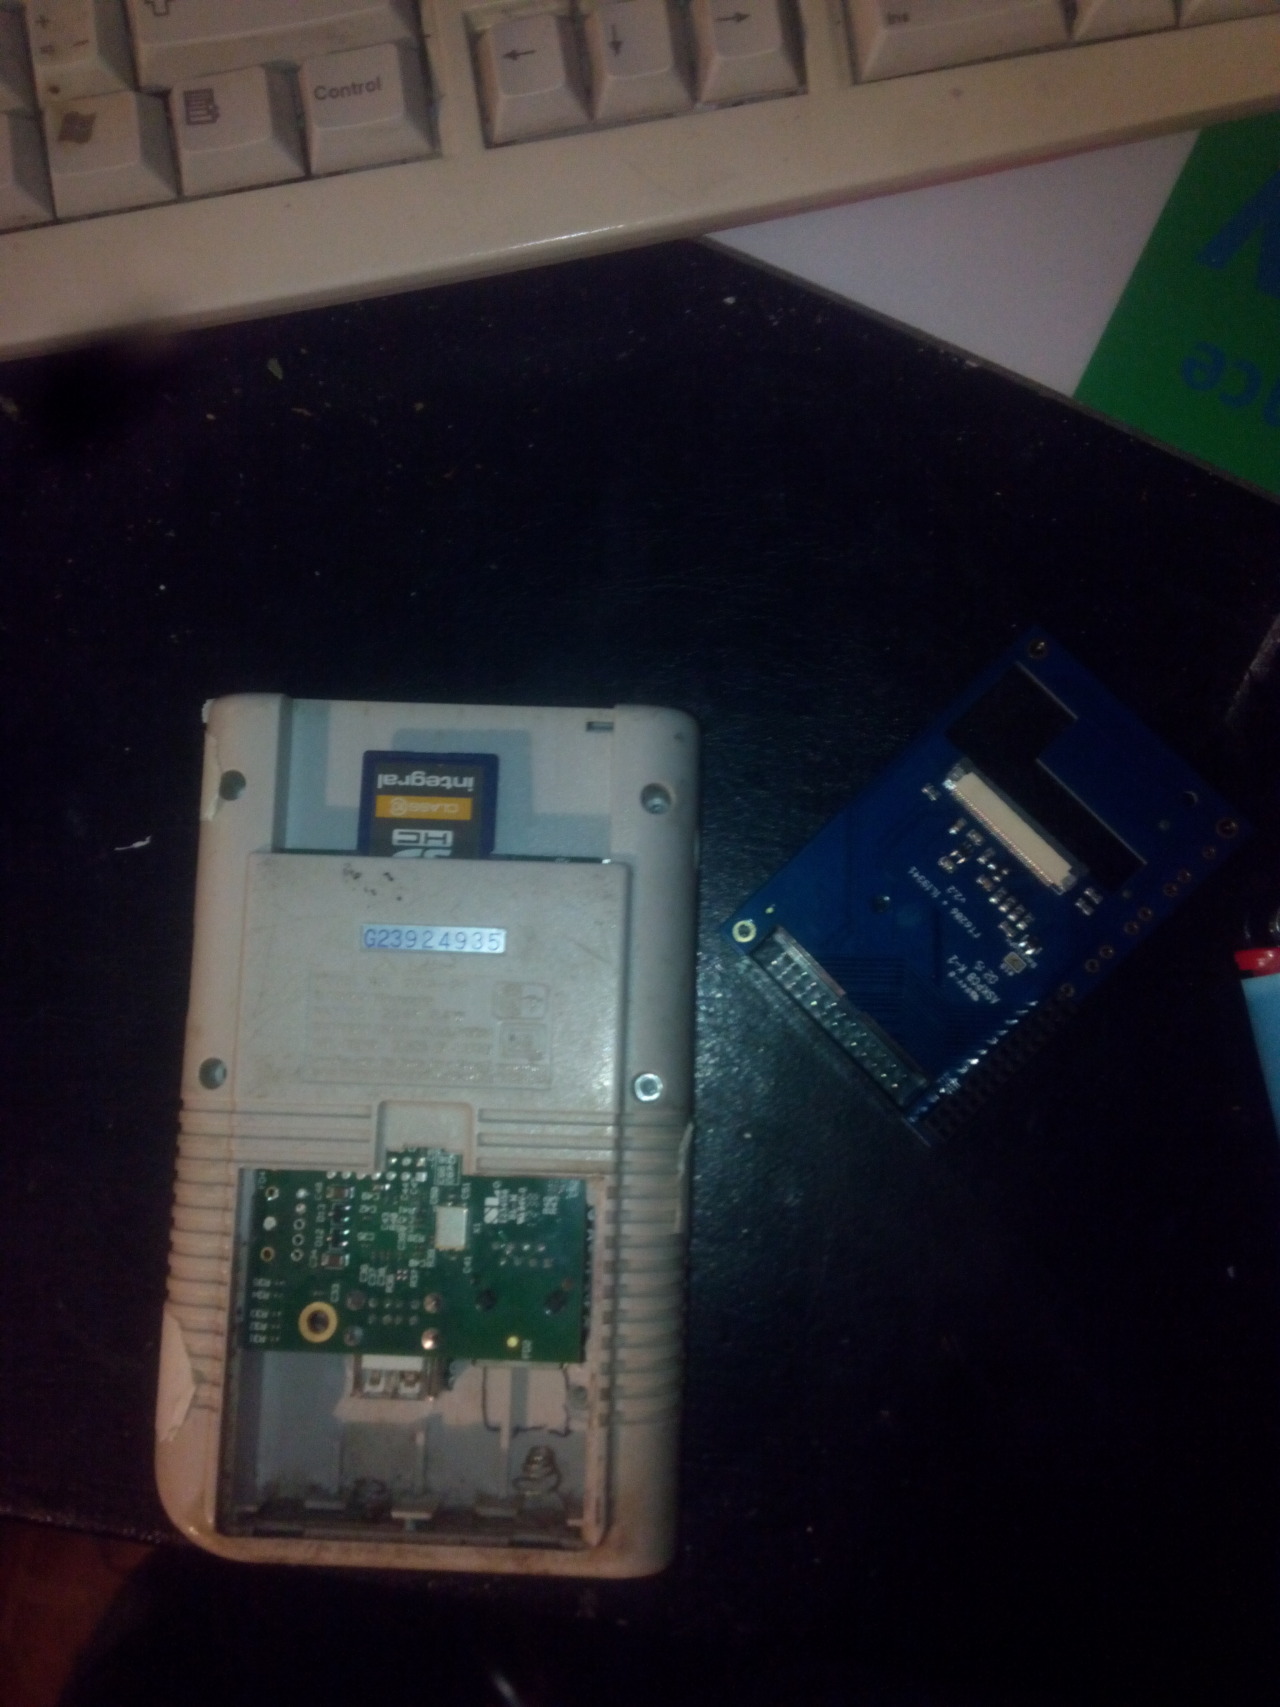
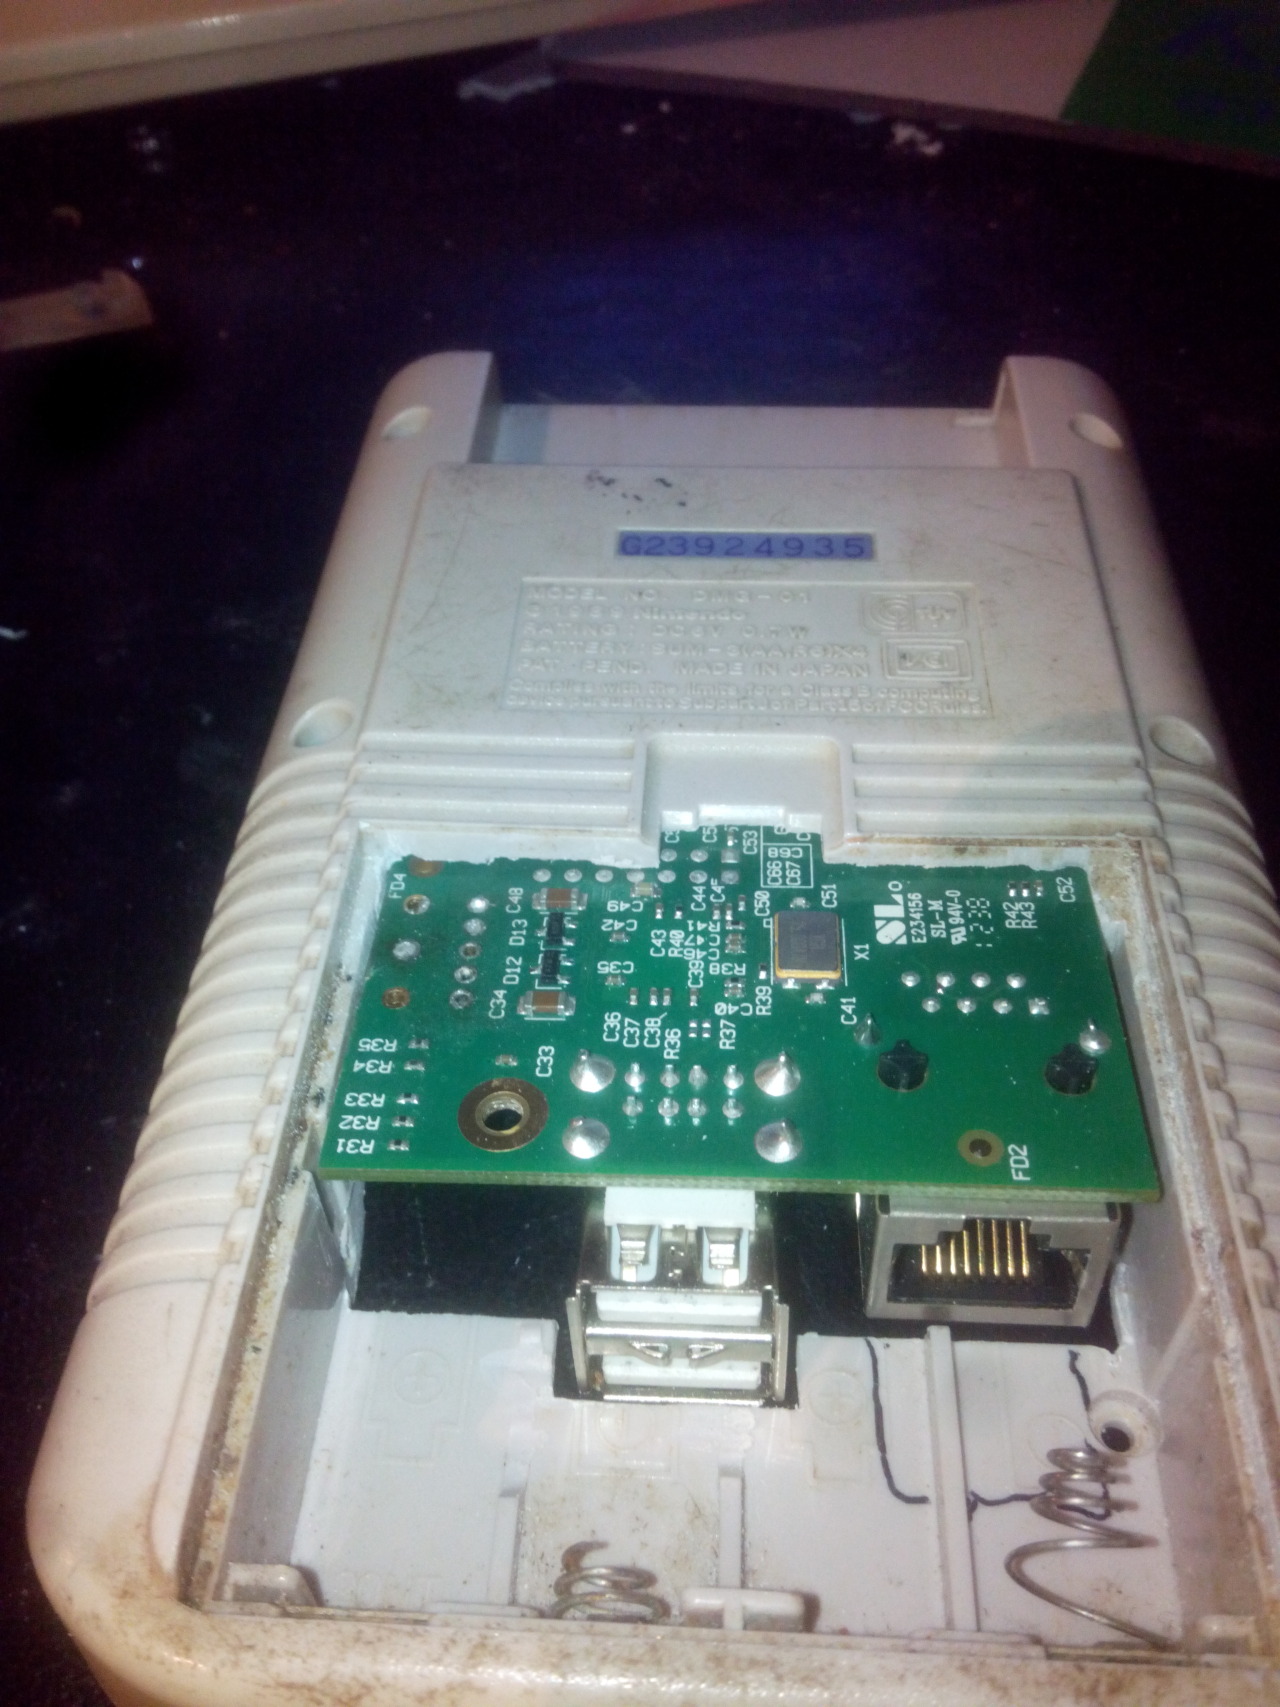
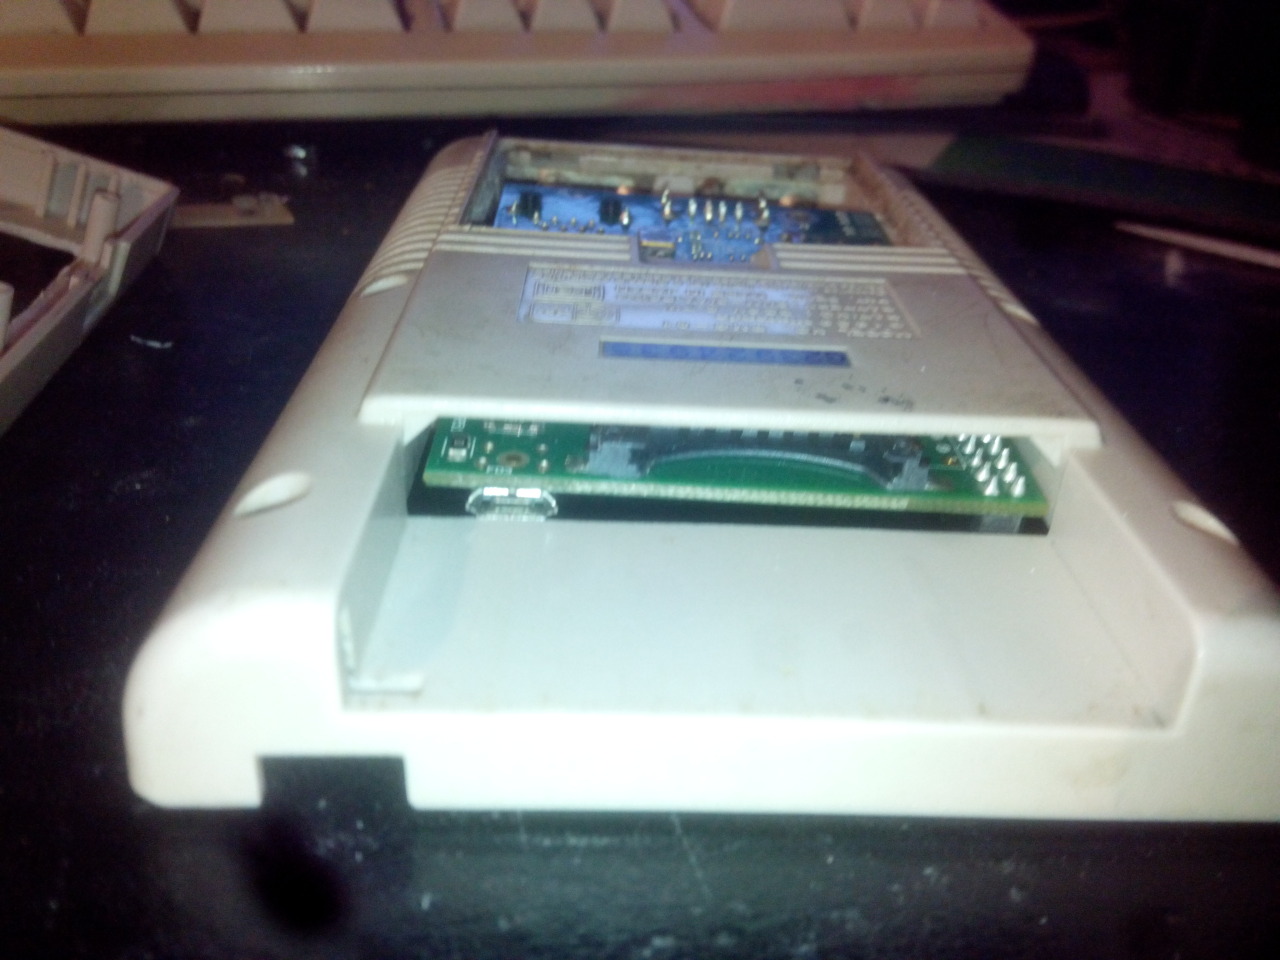
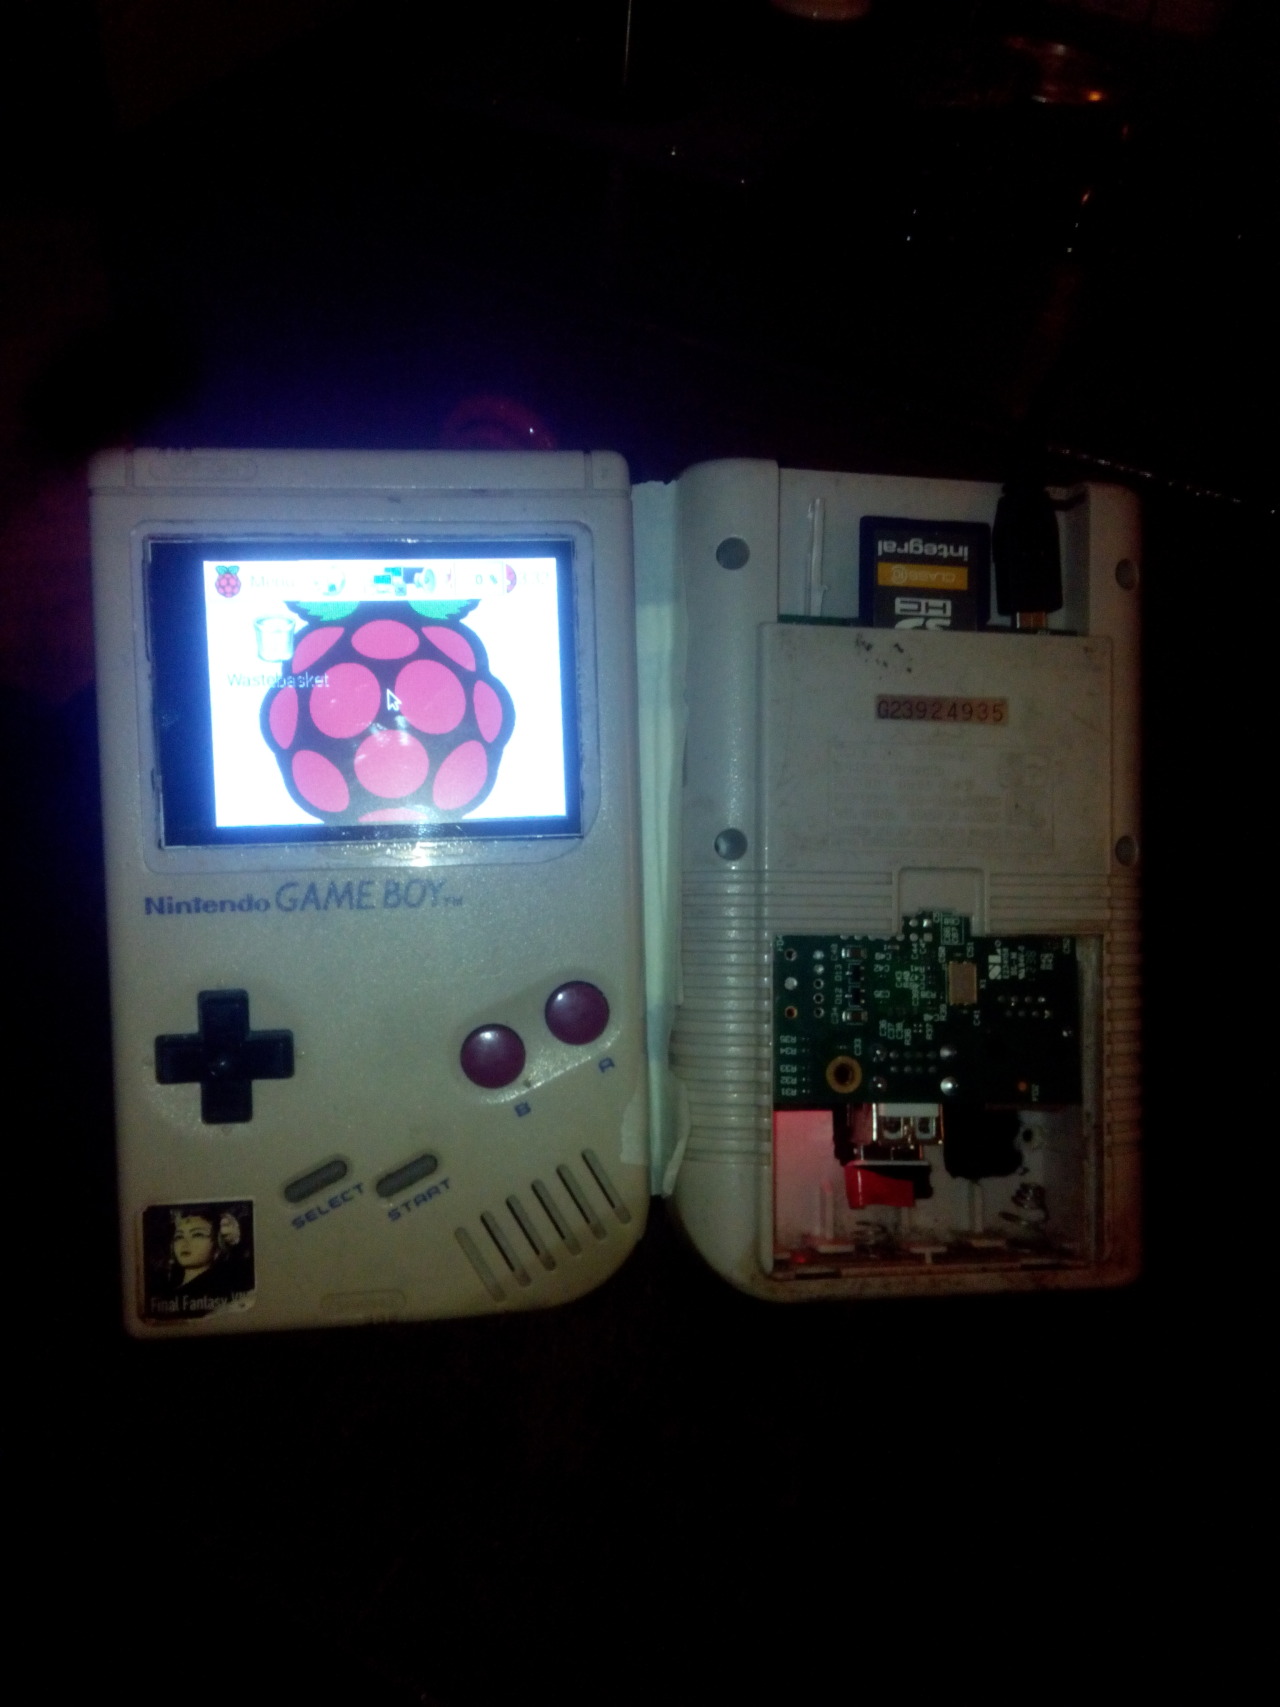
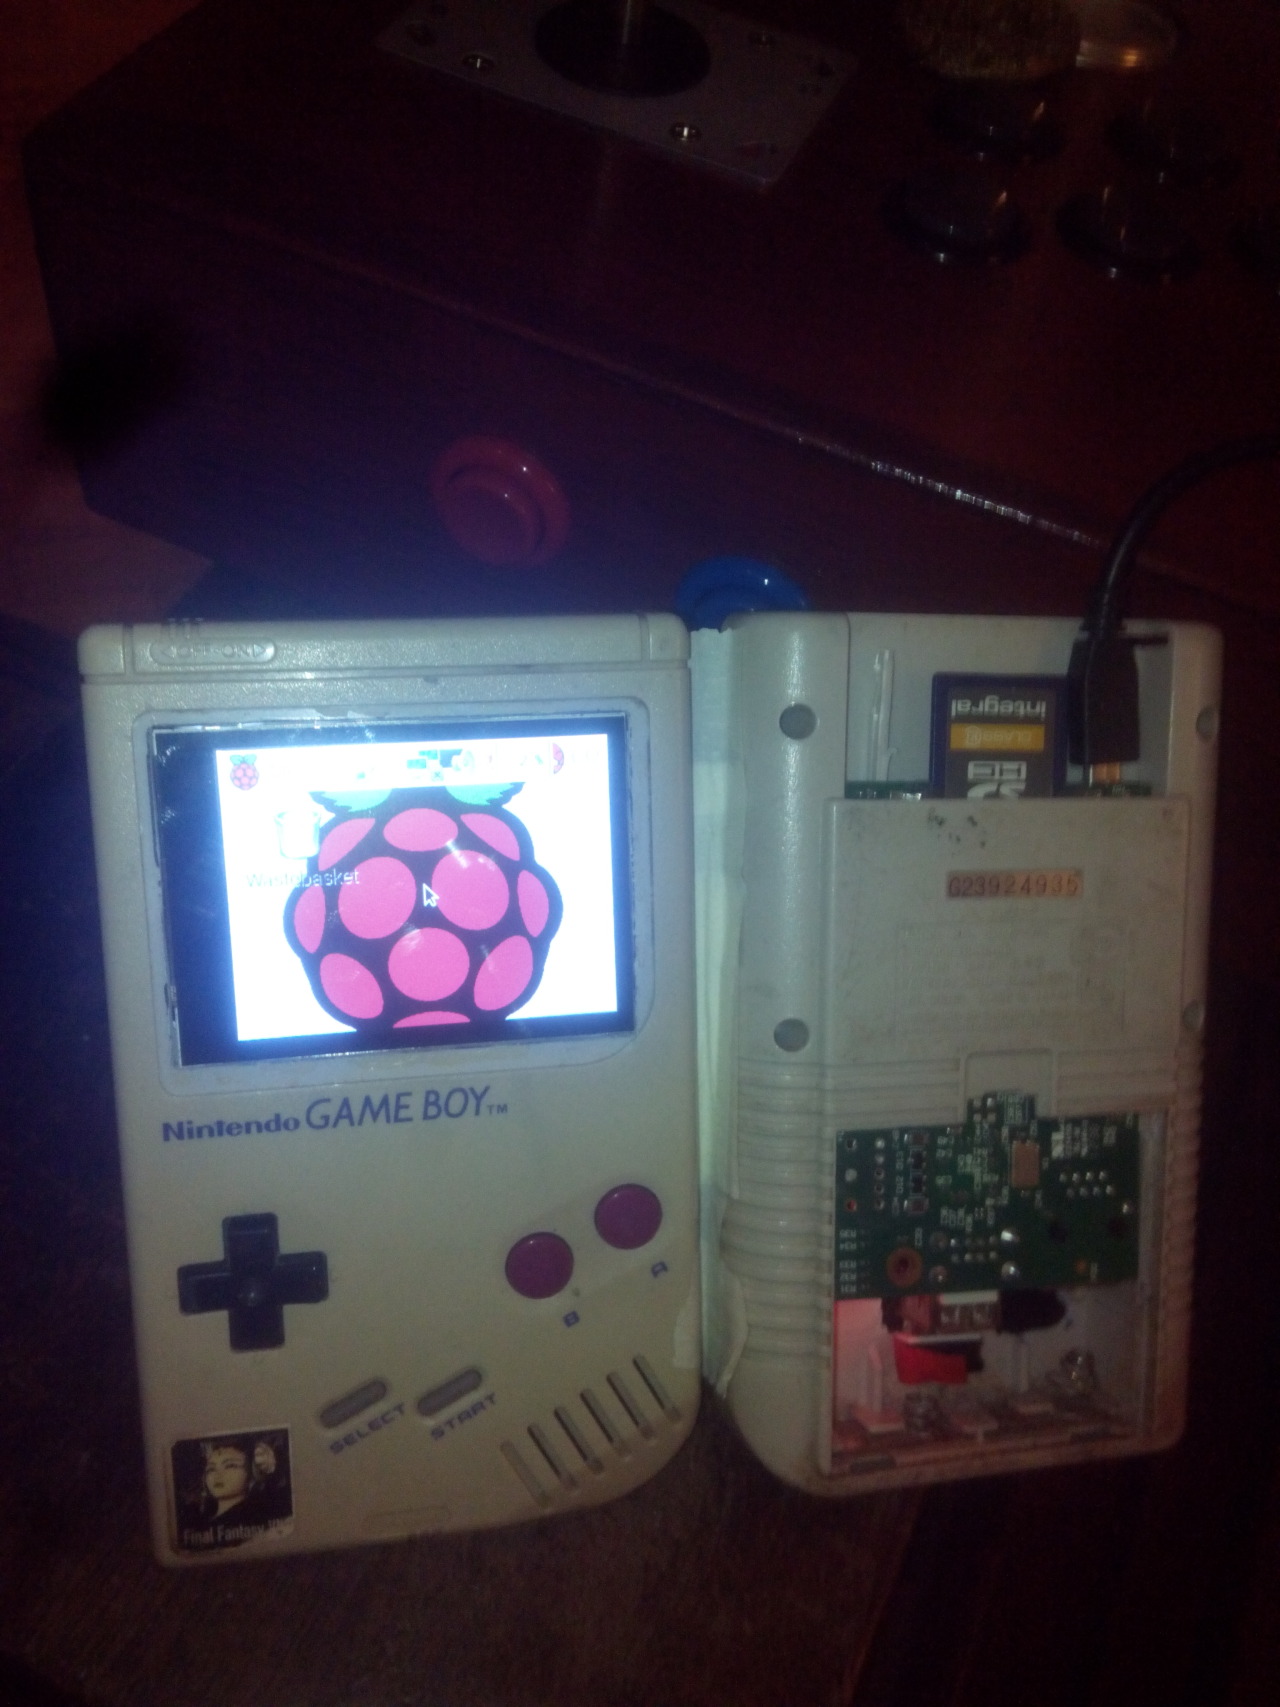
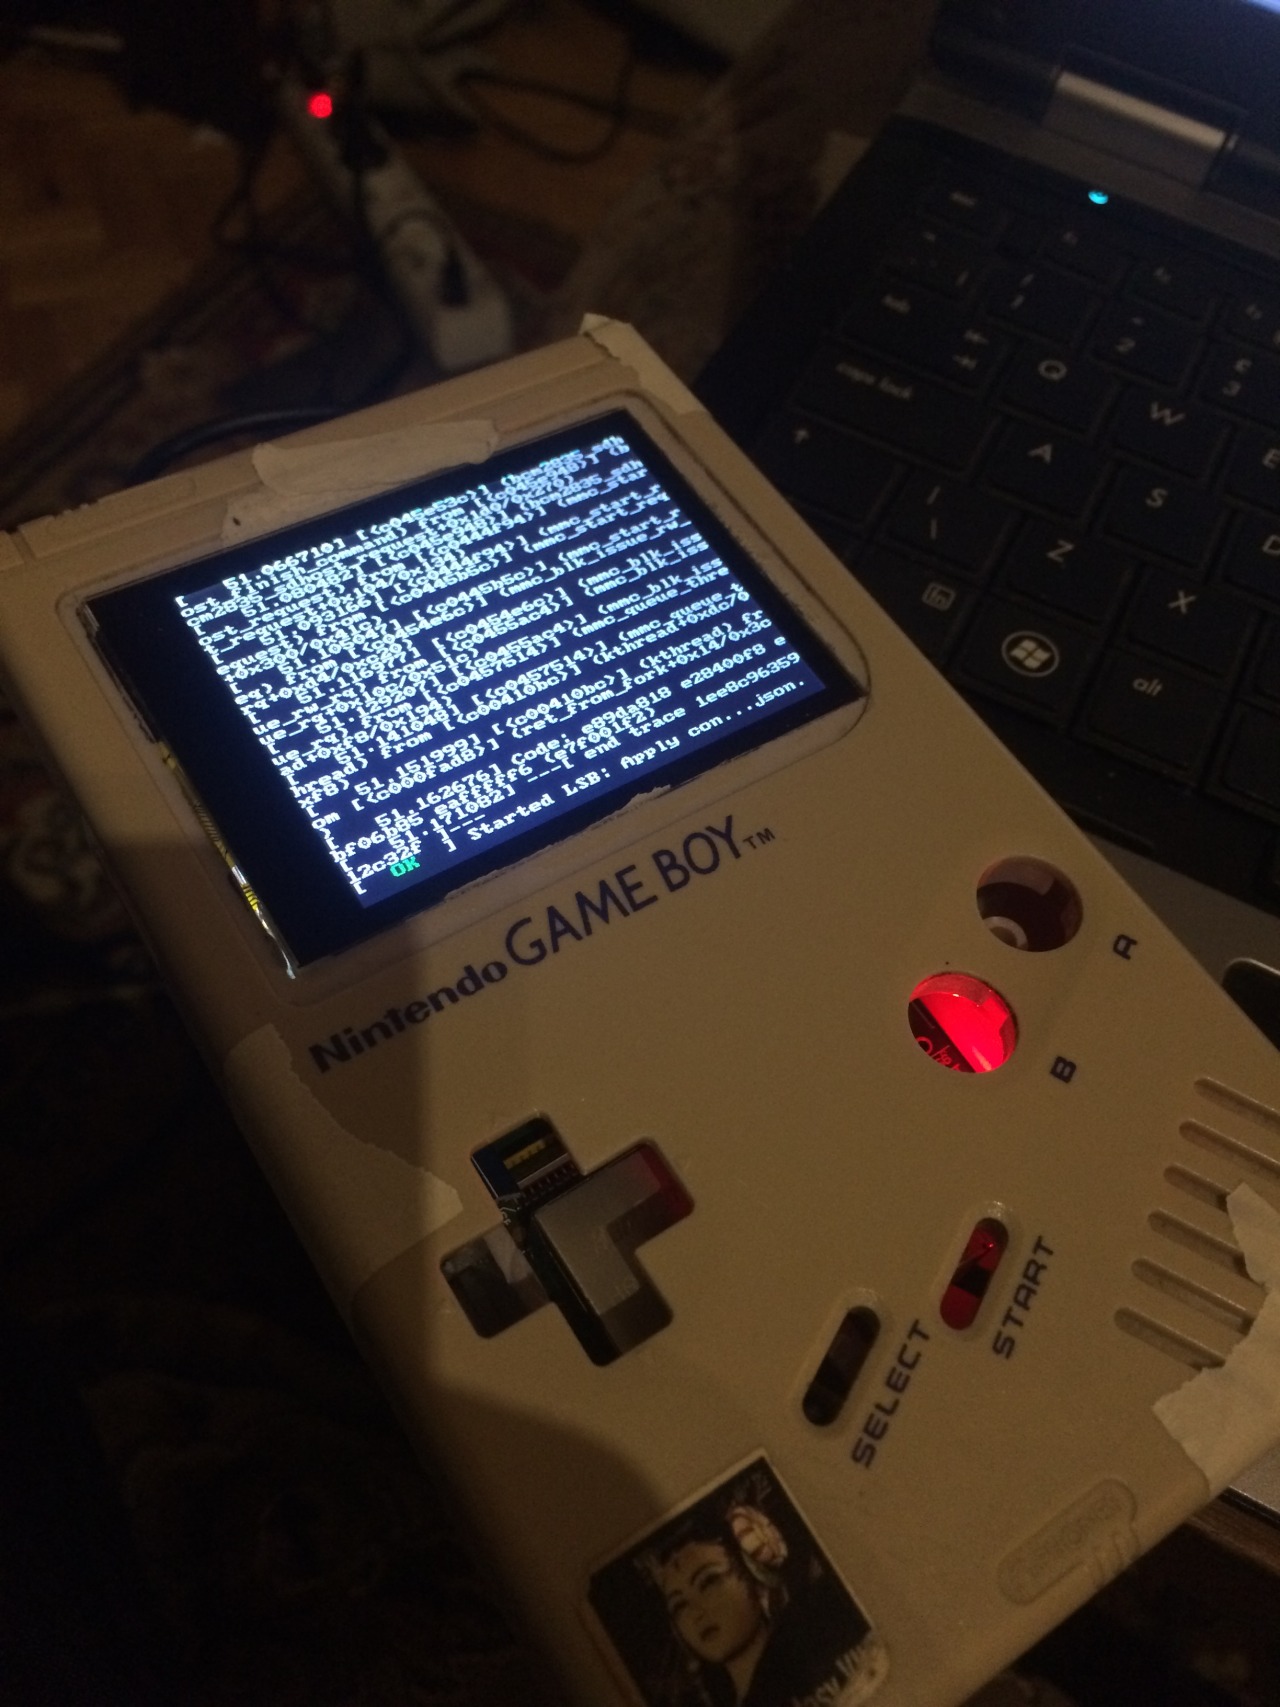
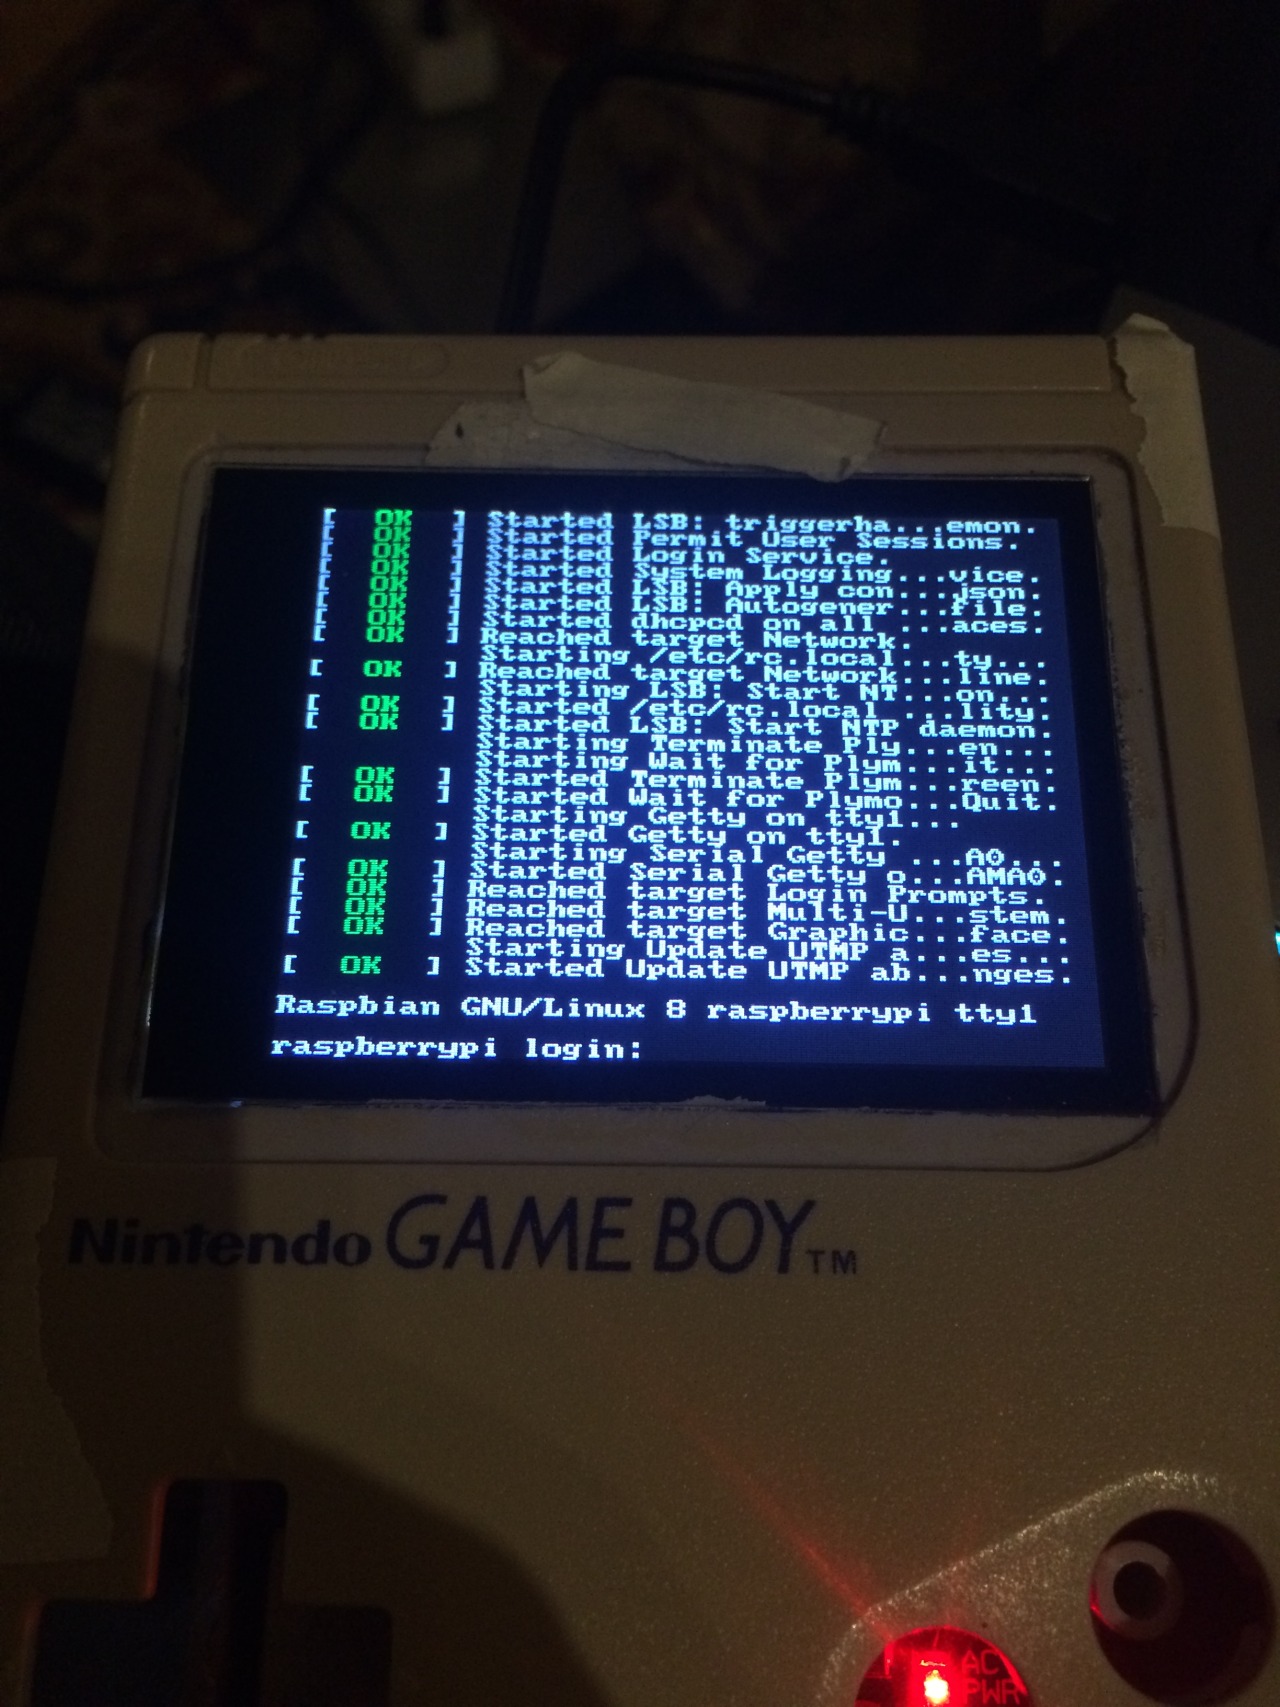
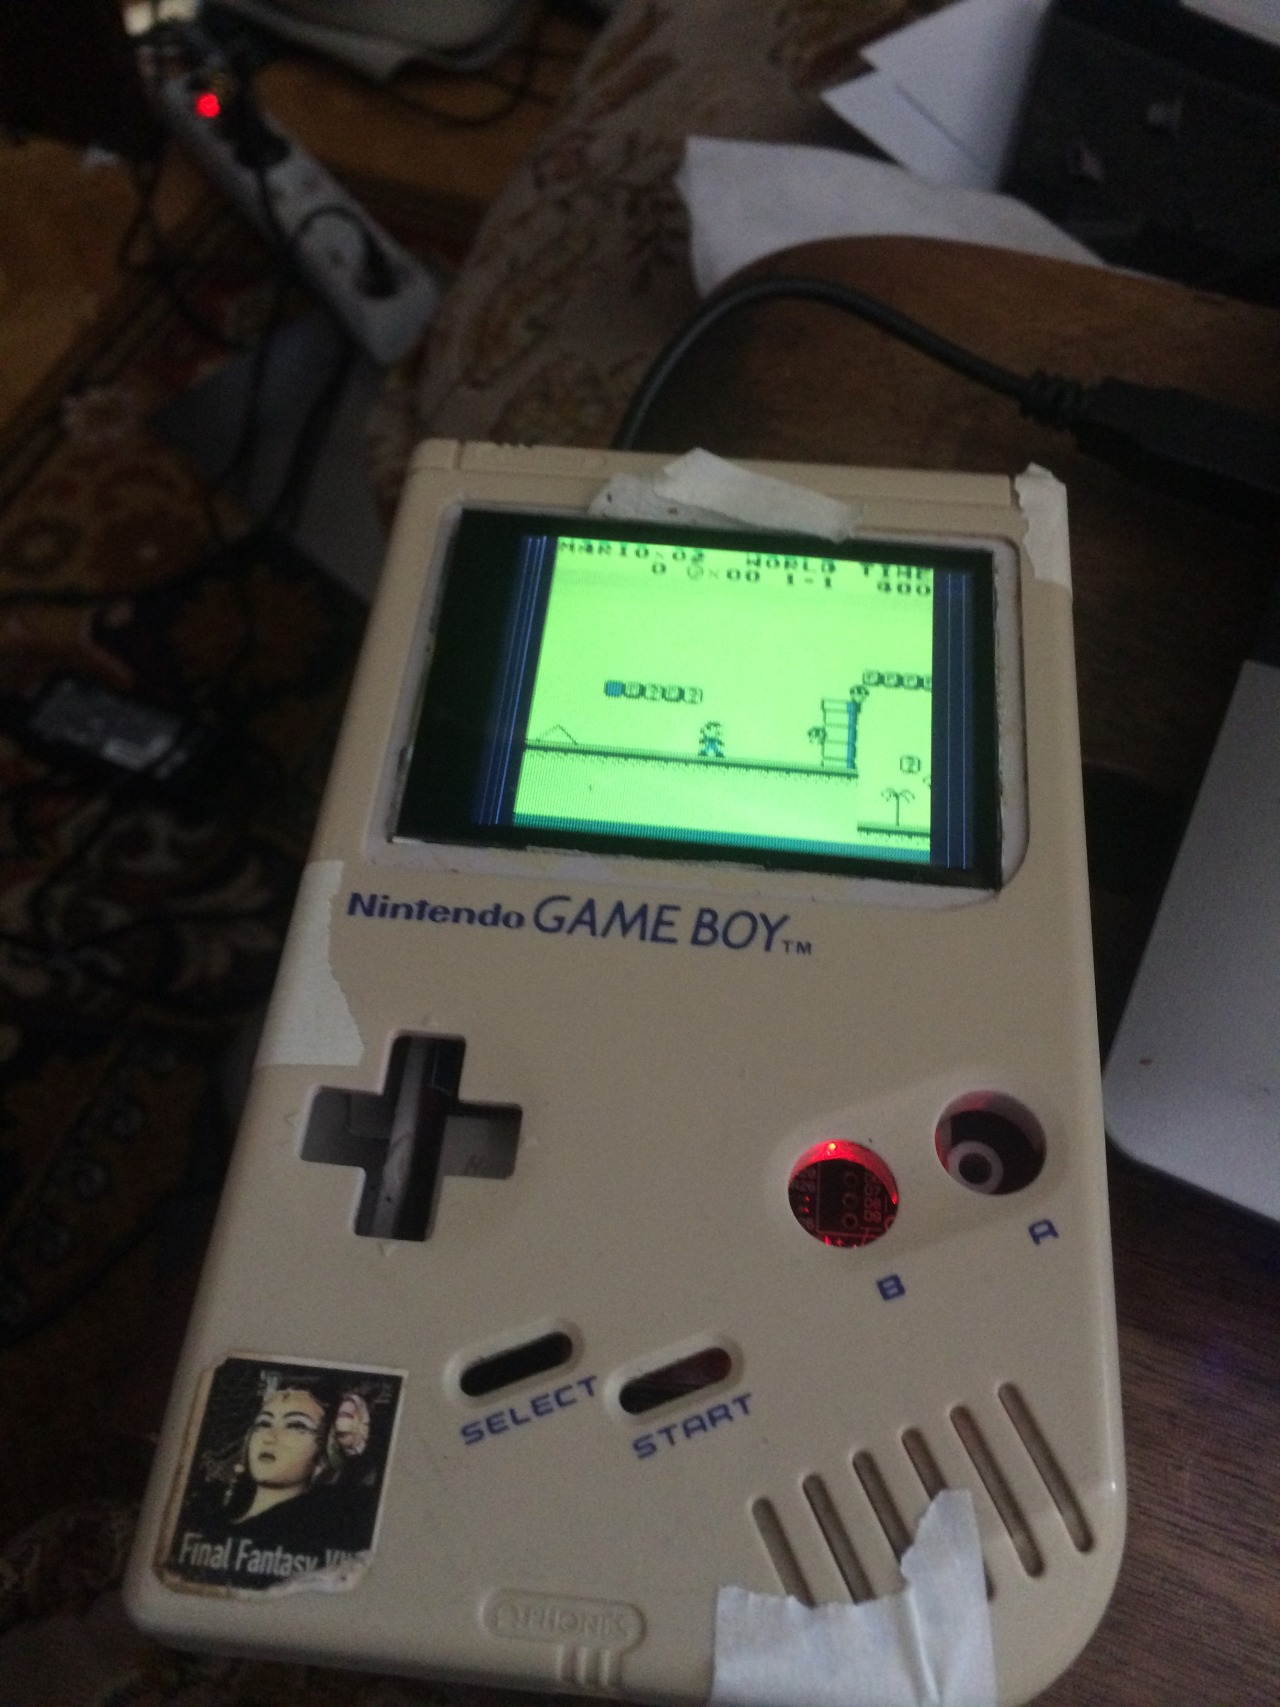
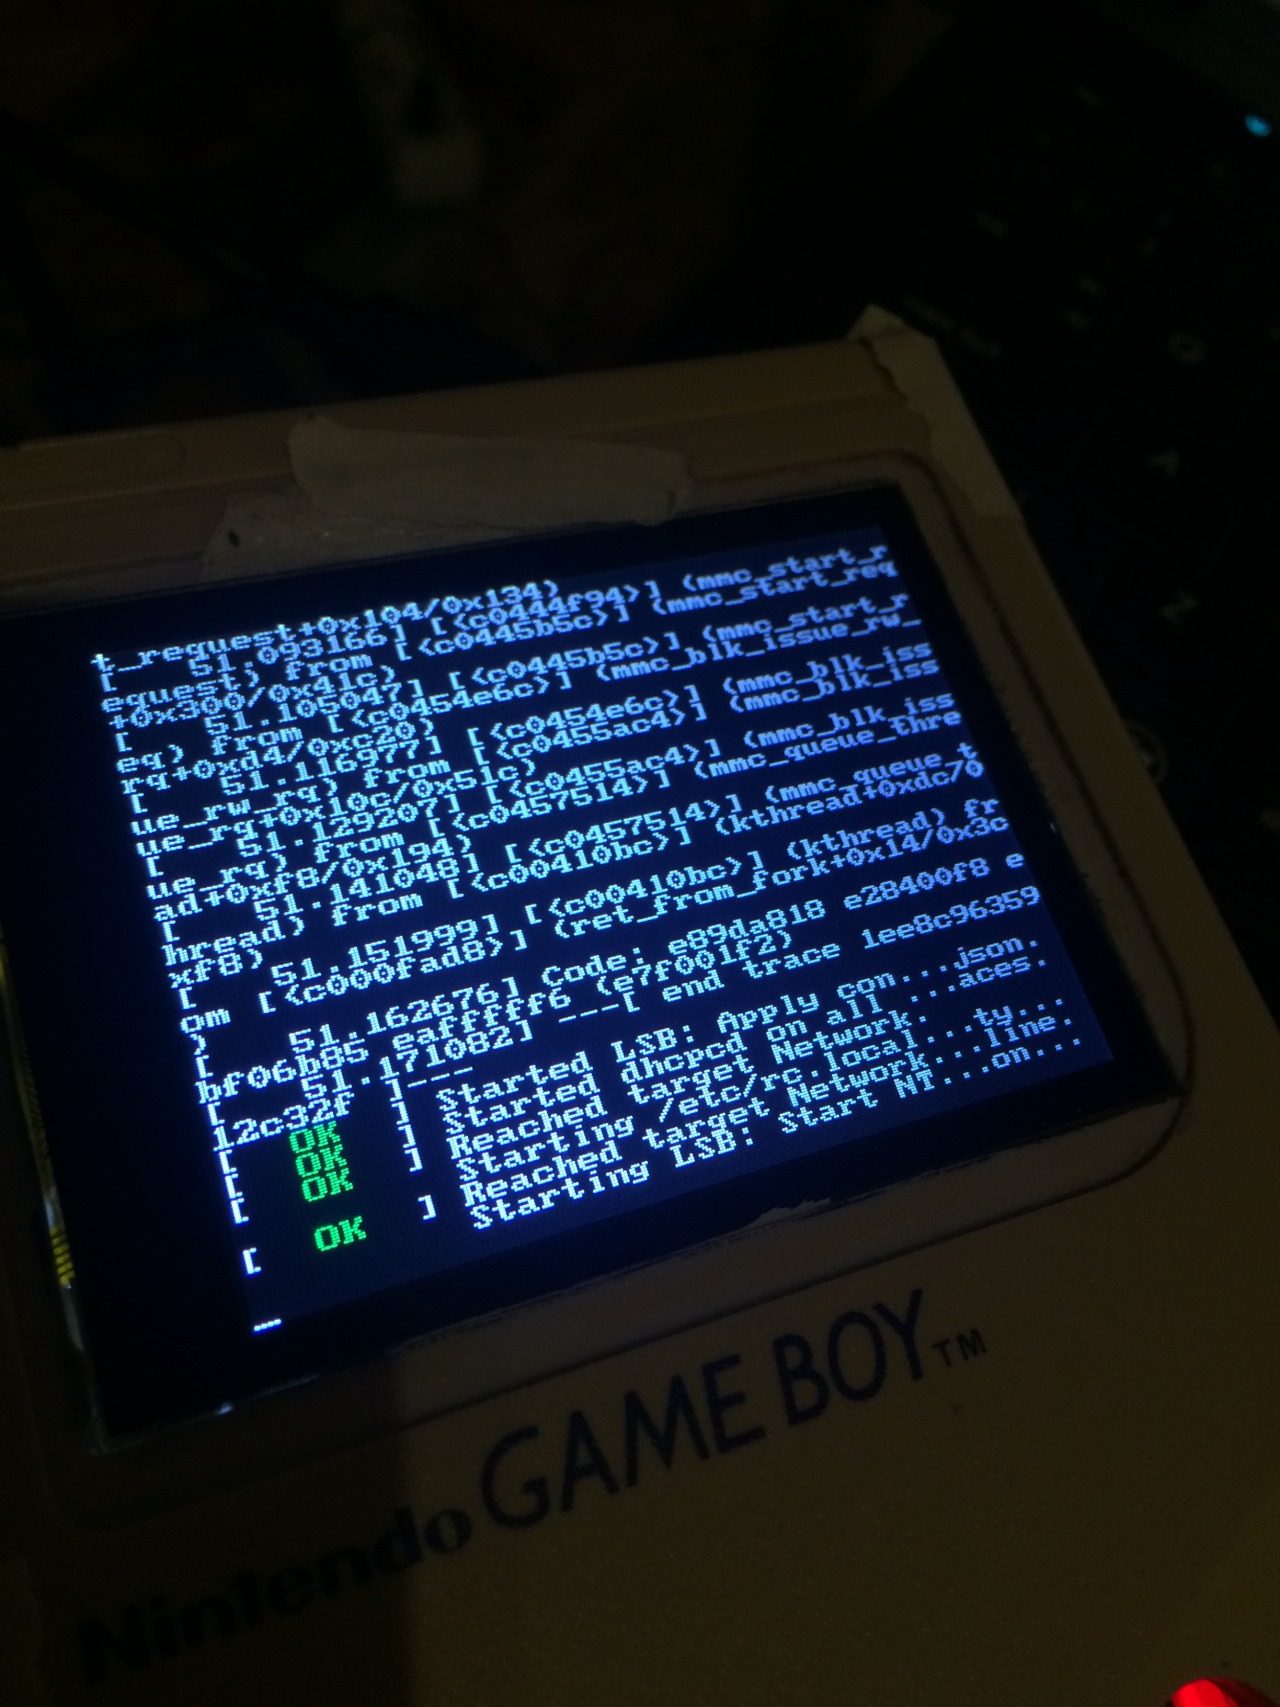
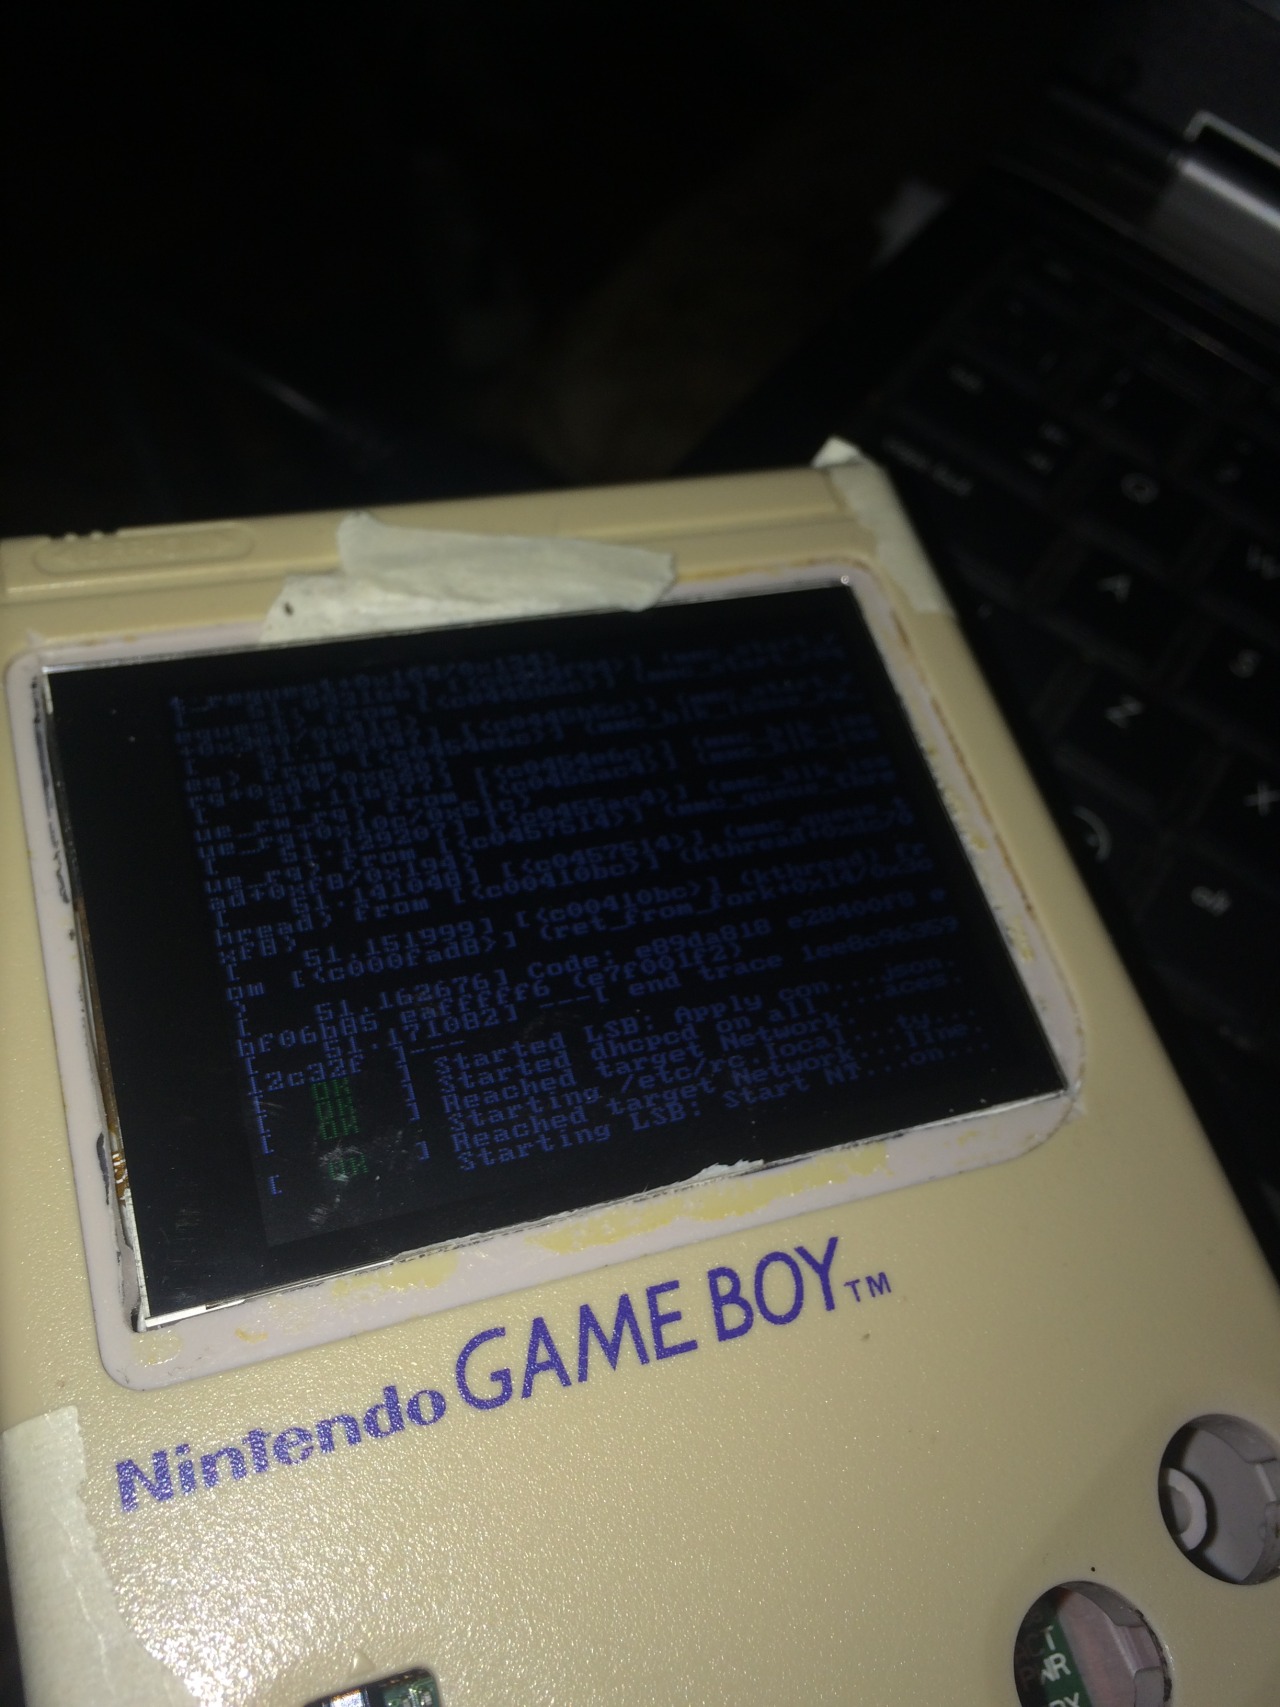
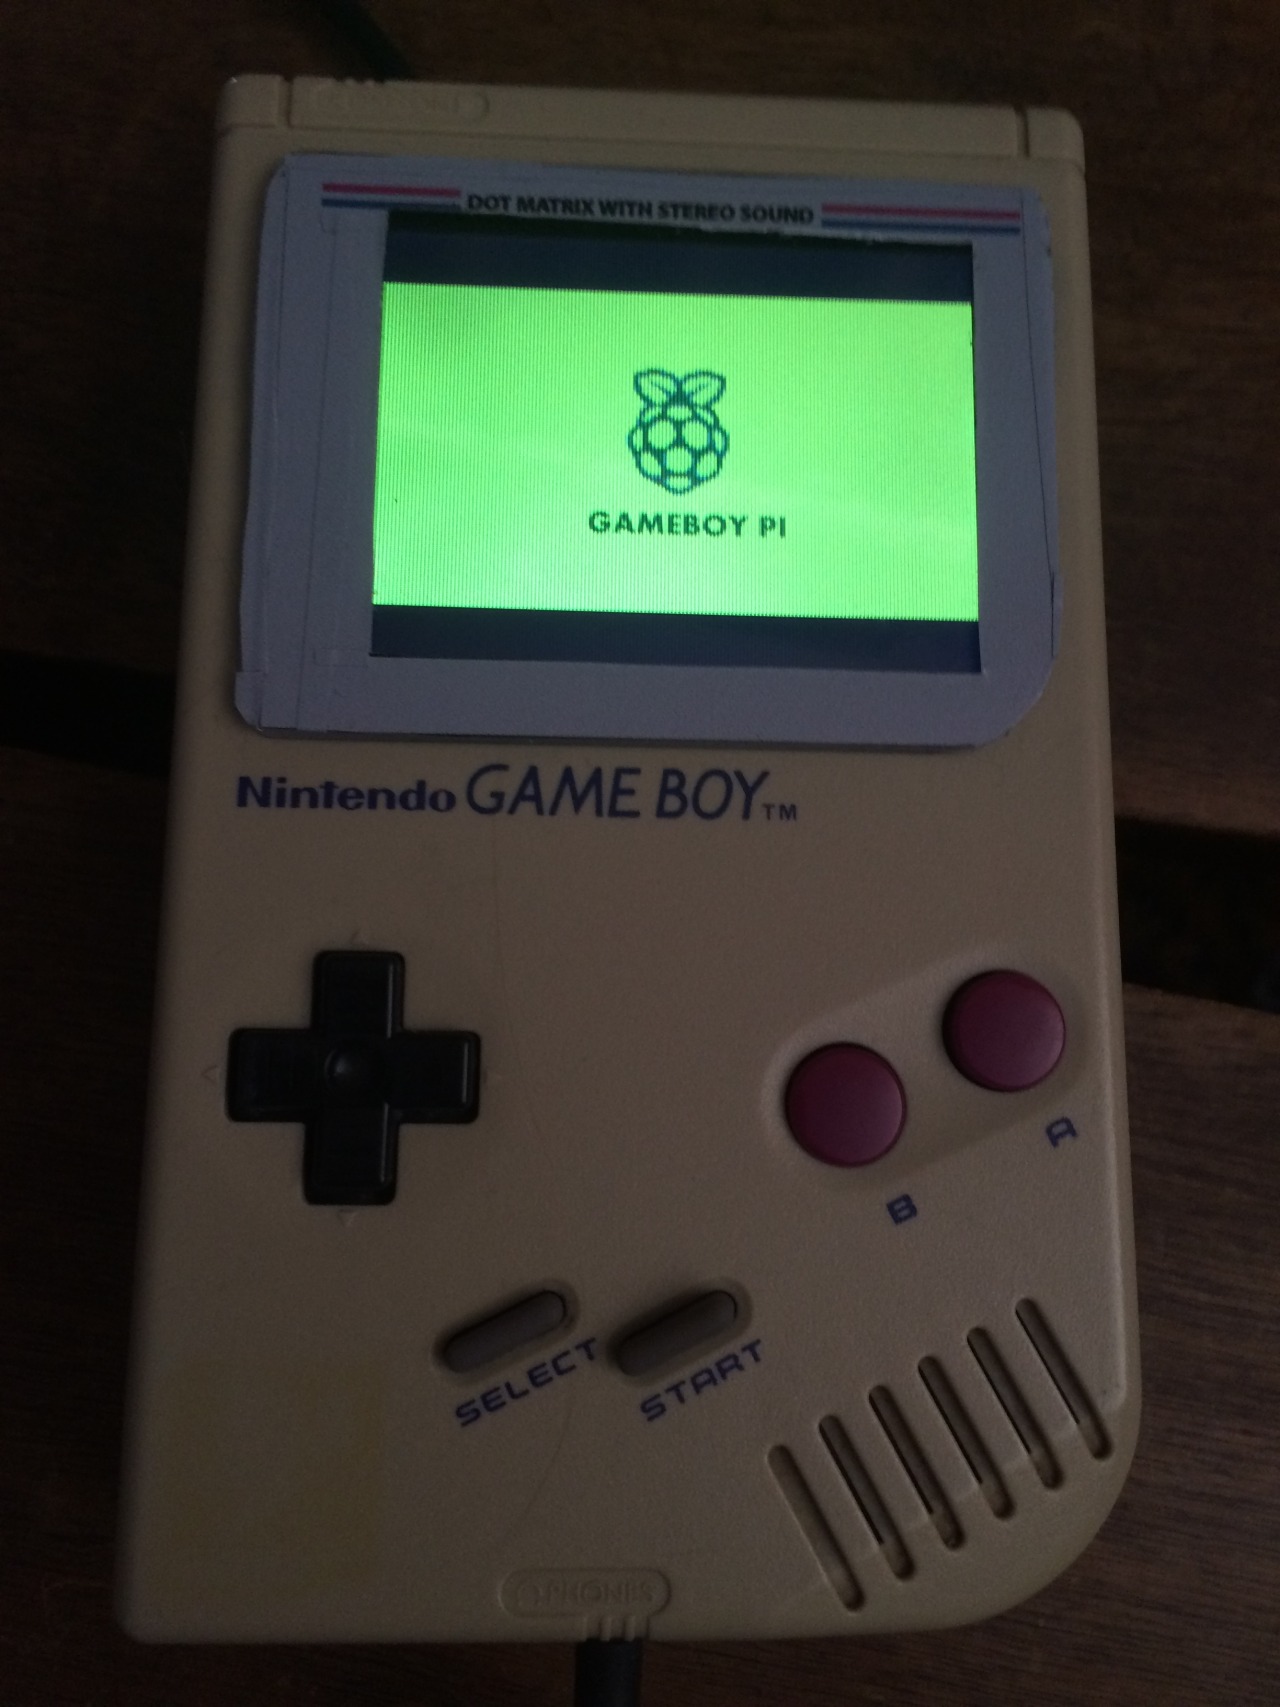
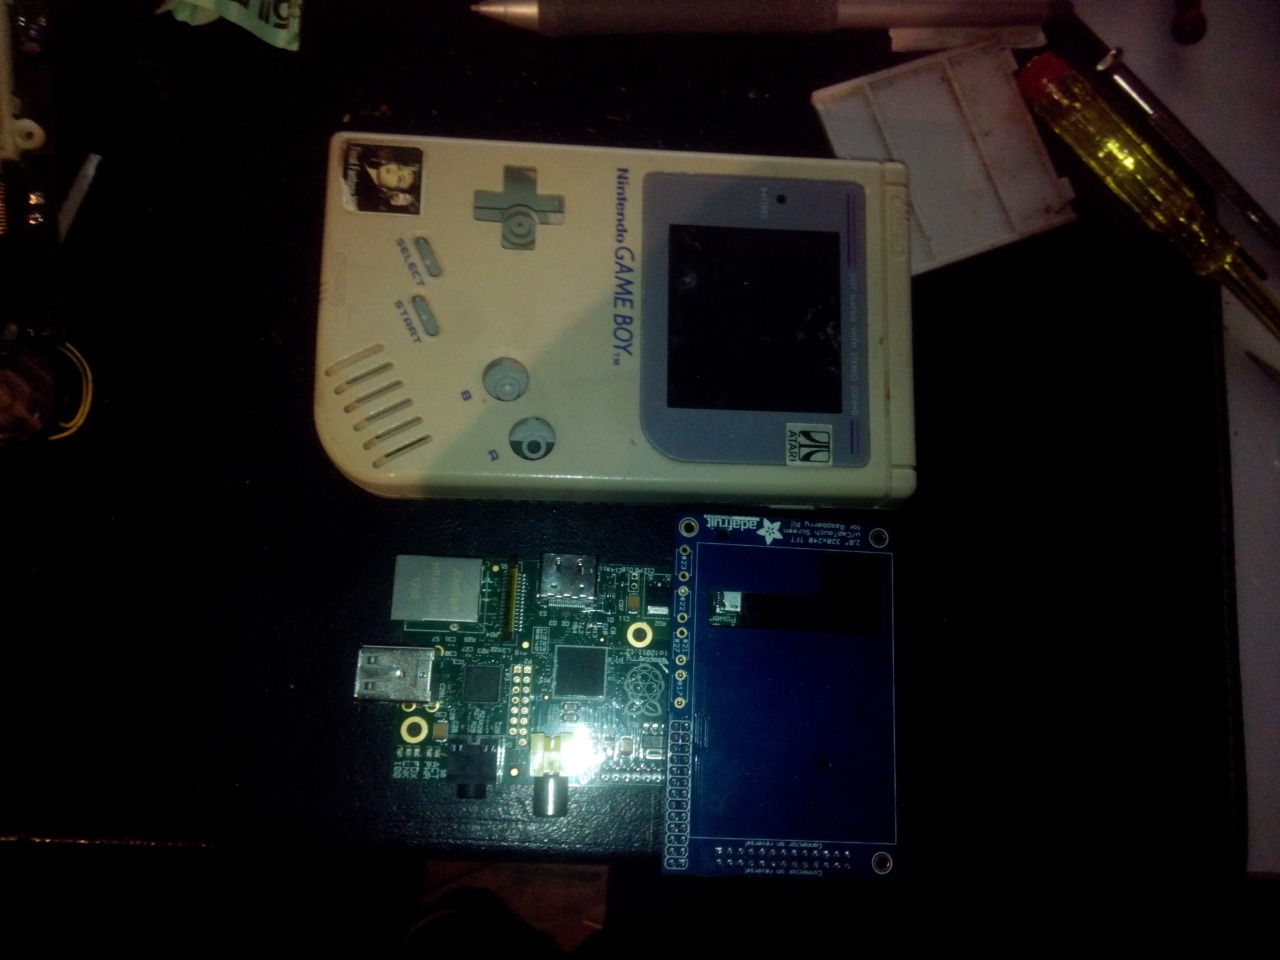
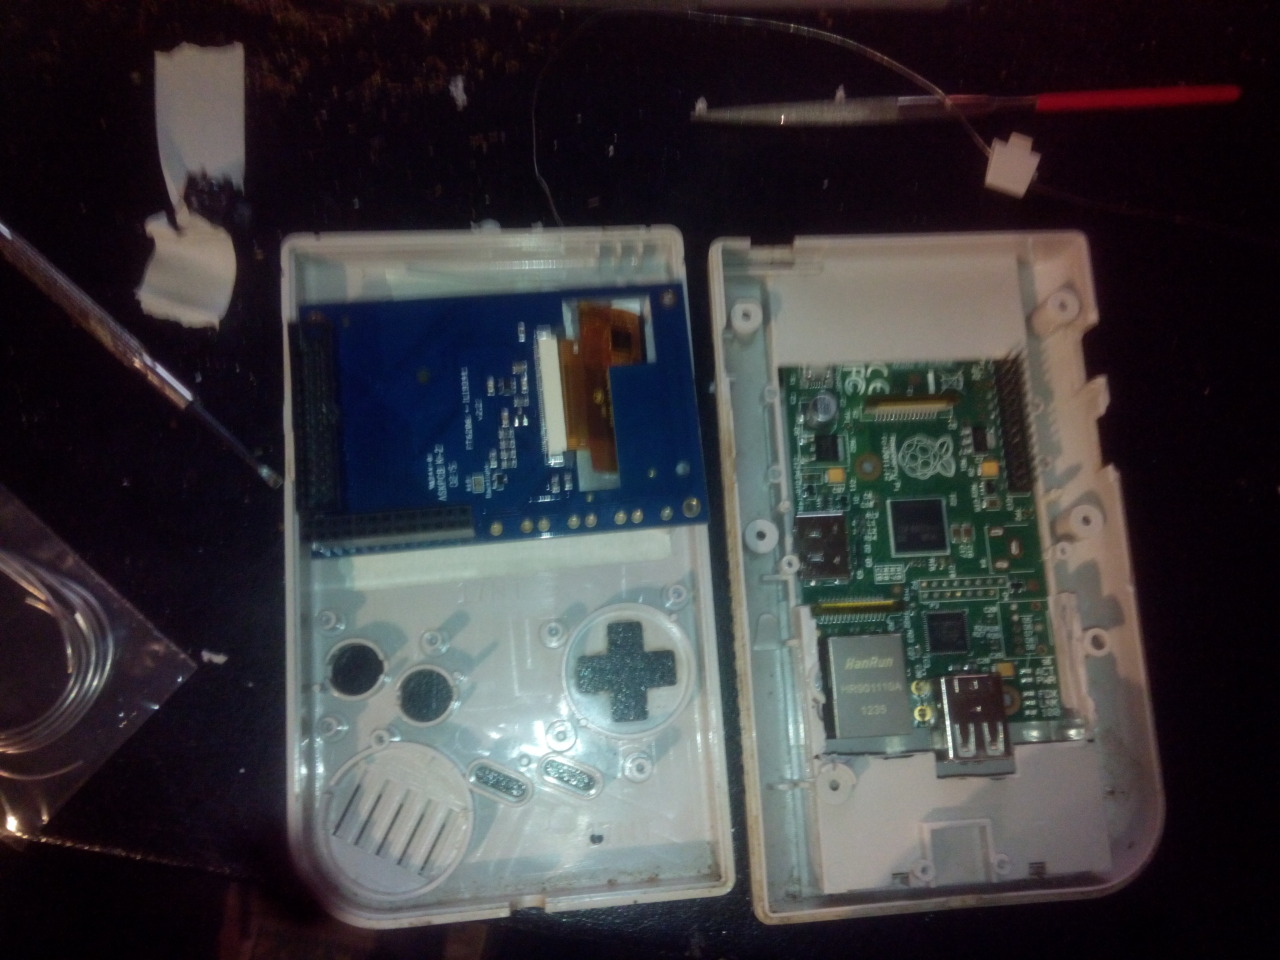
For awhile I have been trying to make a GAMEBOY and Raspberry Pi Mod.
My last post showing some real progress and installation of the software.
Today I will write a better guide for myself and others so they can learn from my mistakes.
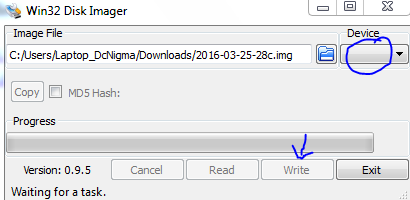
If you follow this guide for setting up your SD cart this progress will take about 1,5 h to complete.
(guide is below show and tell 🙂 )
Warning: I still have to remove a error that i getting but i din’t find a solution for this atm: ”At random times i get: alsa lib pcm.c 7843: (snd_pcm_recover) underrun occurred” not when playing a game only if i am in the front end and during boot….
Lets start with show and tell:
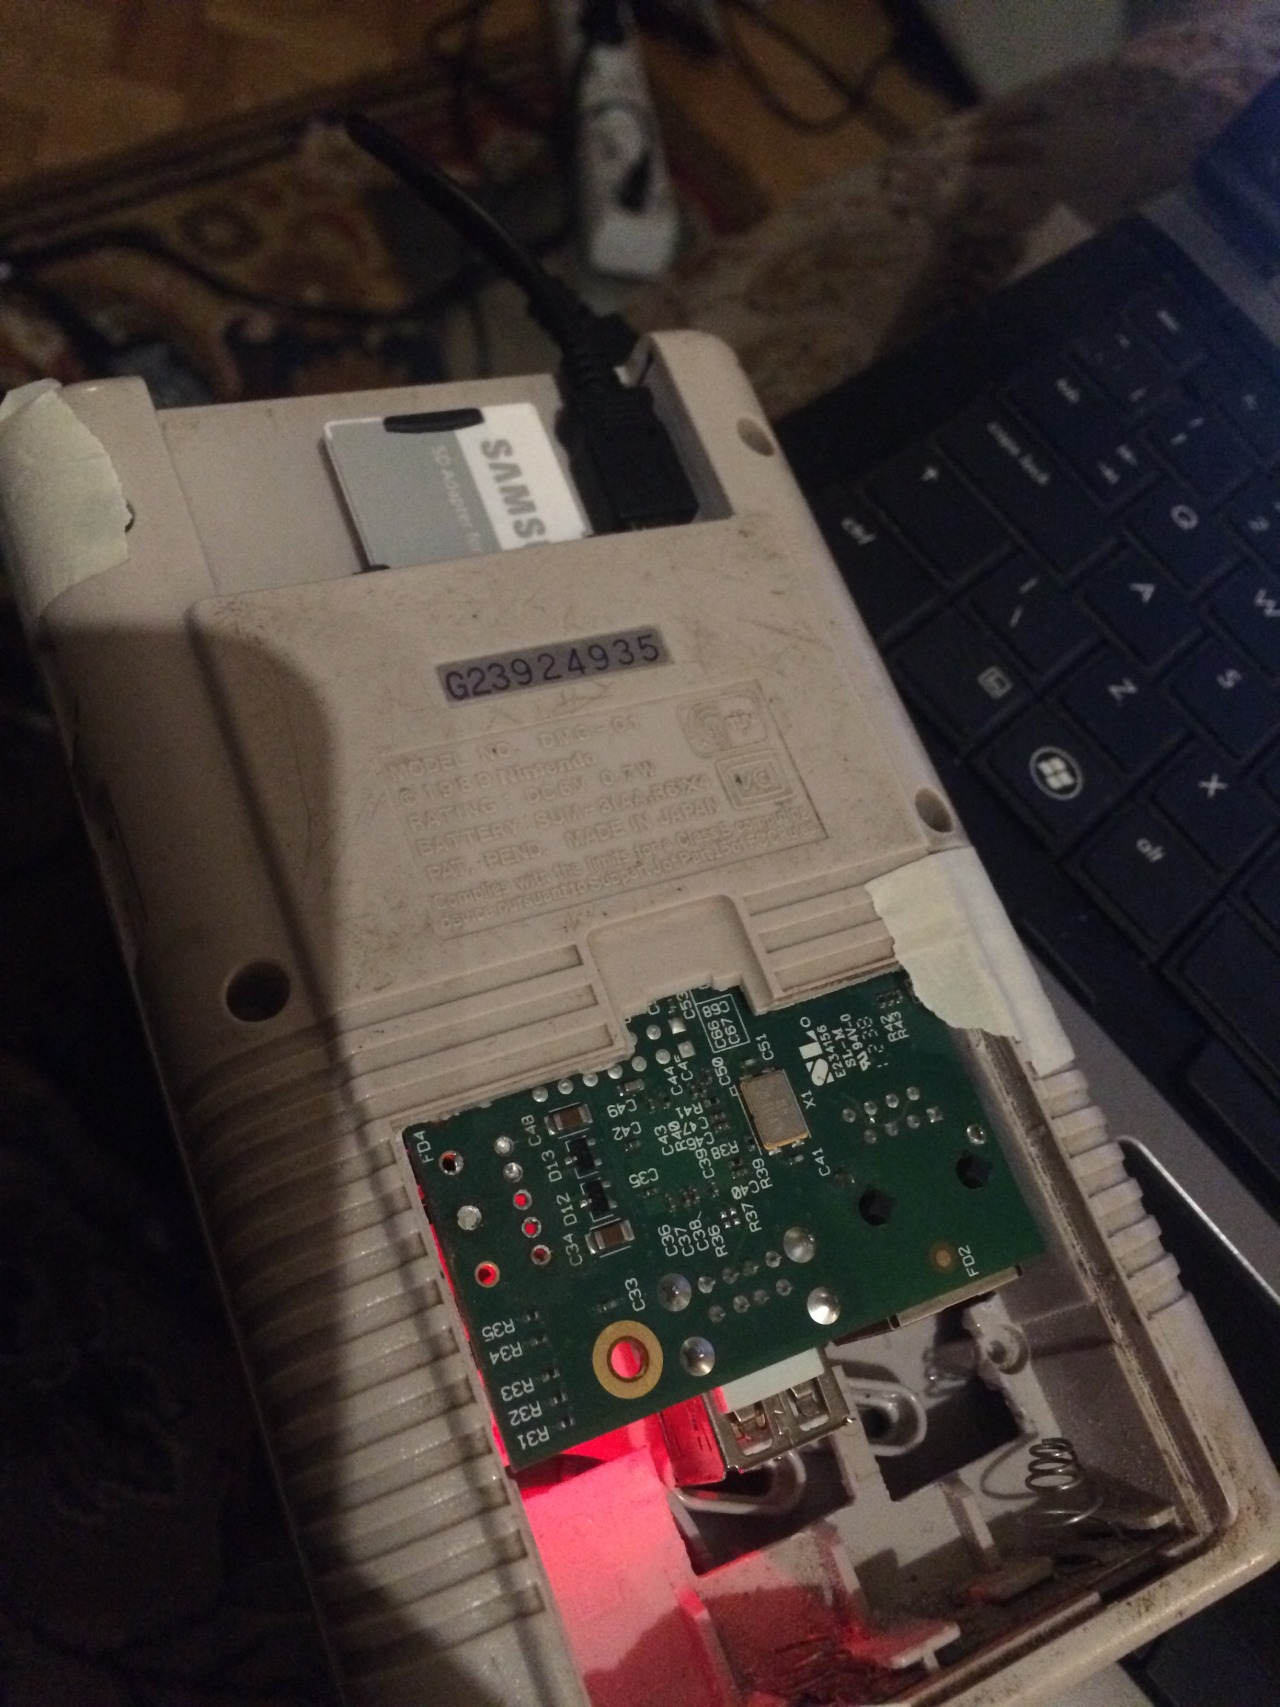
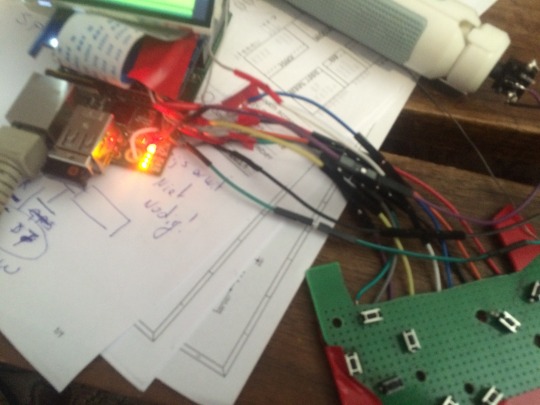
Hardware used:
Gameboy case, wires, tact switches, empty PCB, power bar, cheap speakers and a Dremel
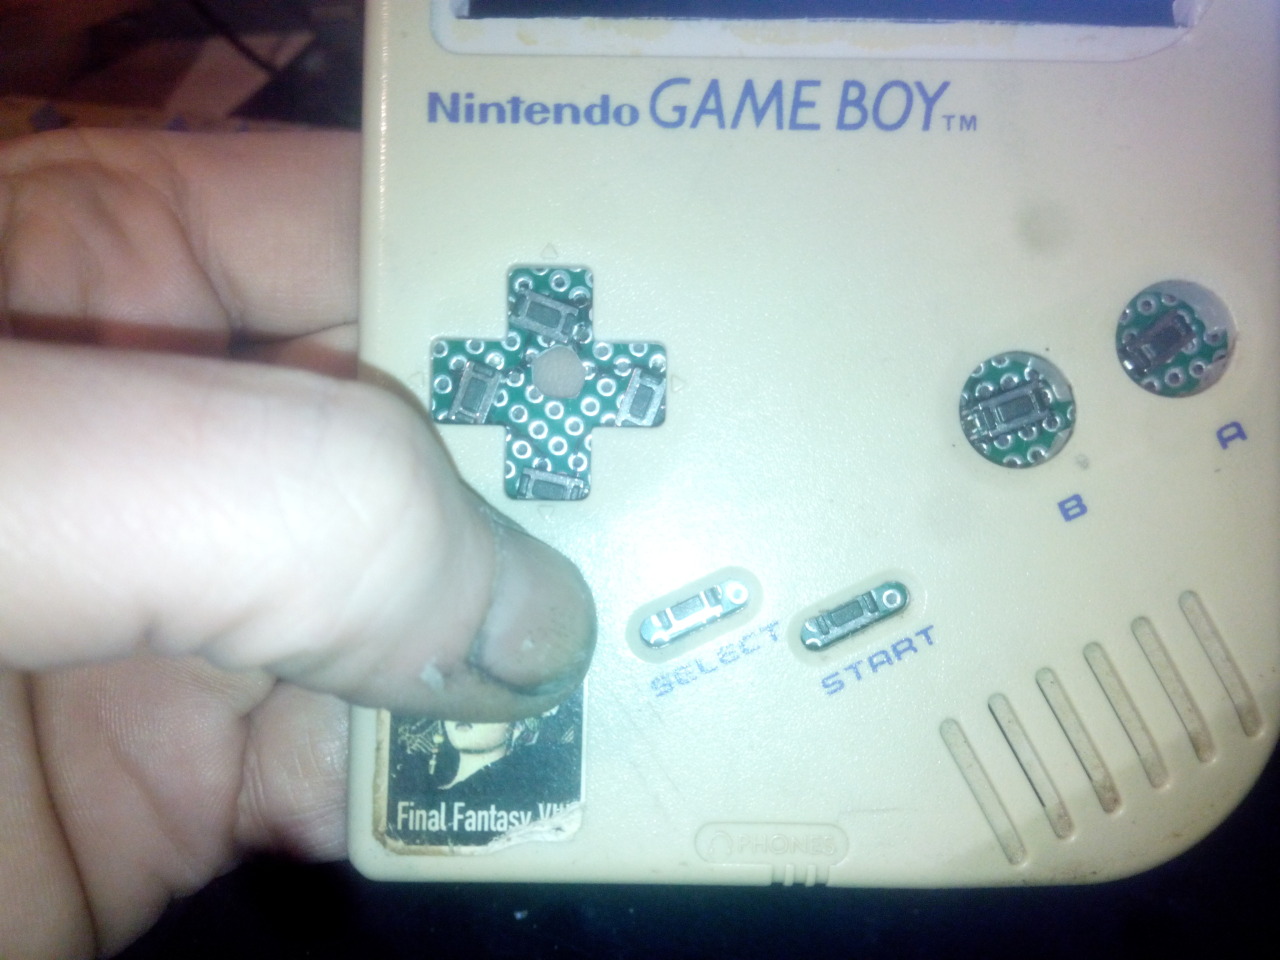
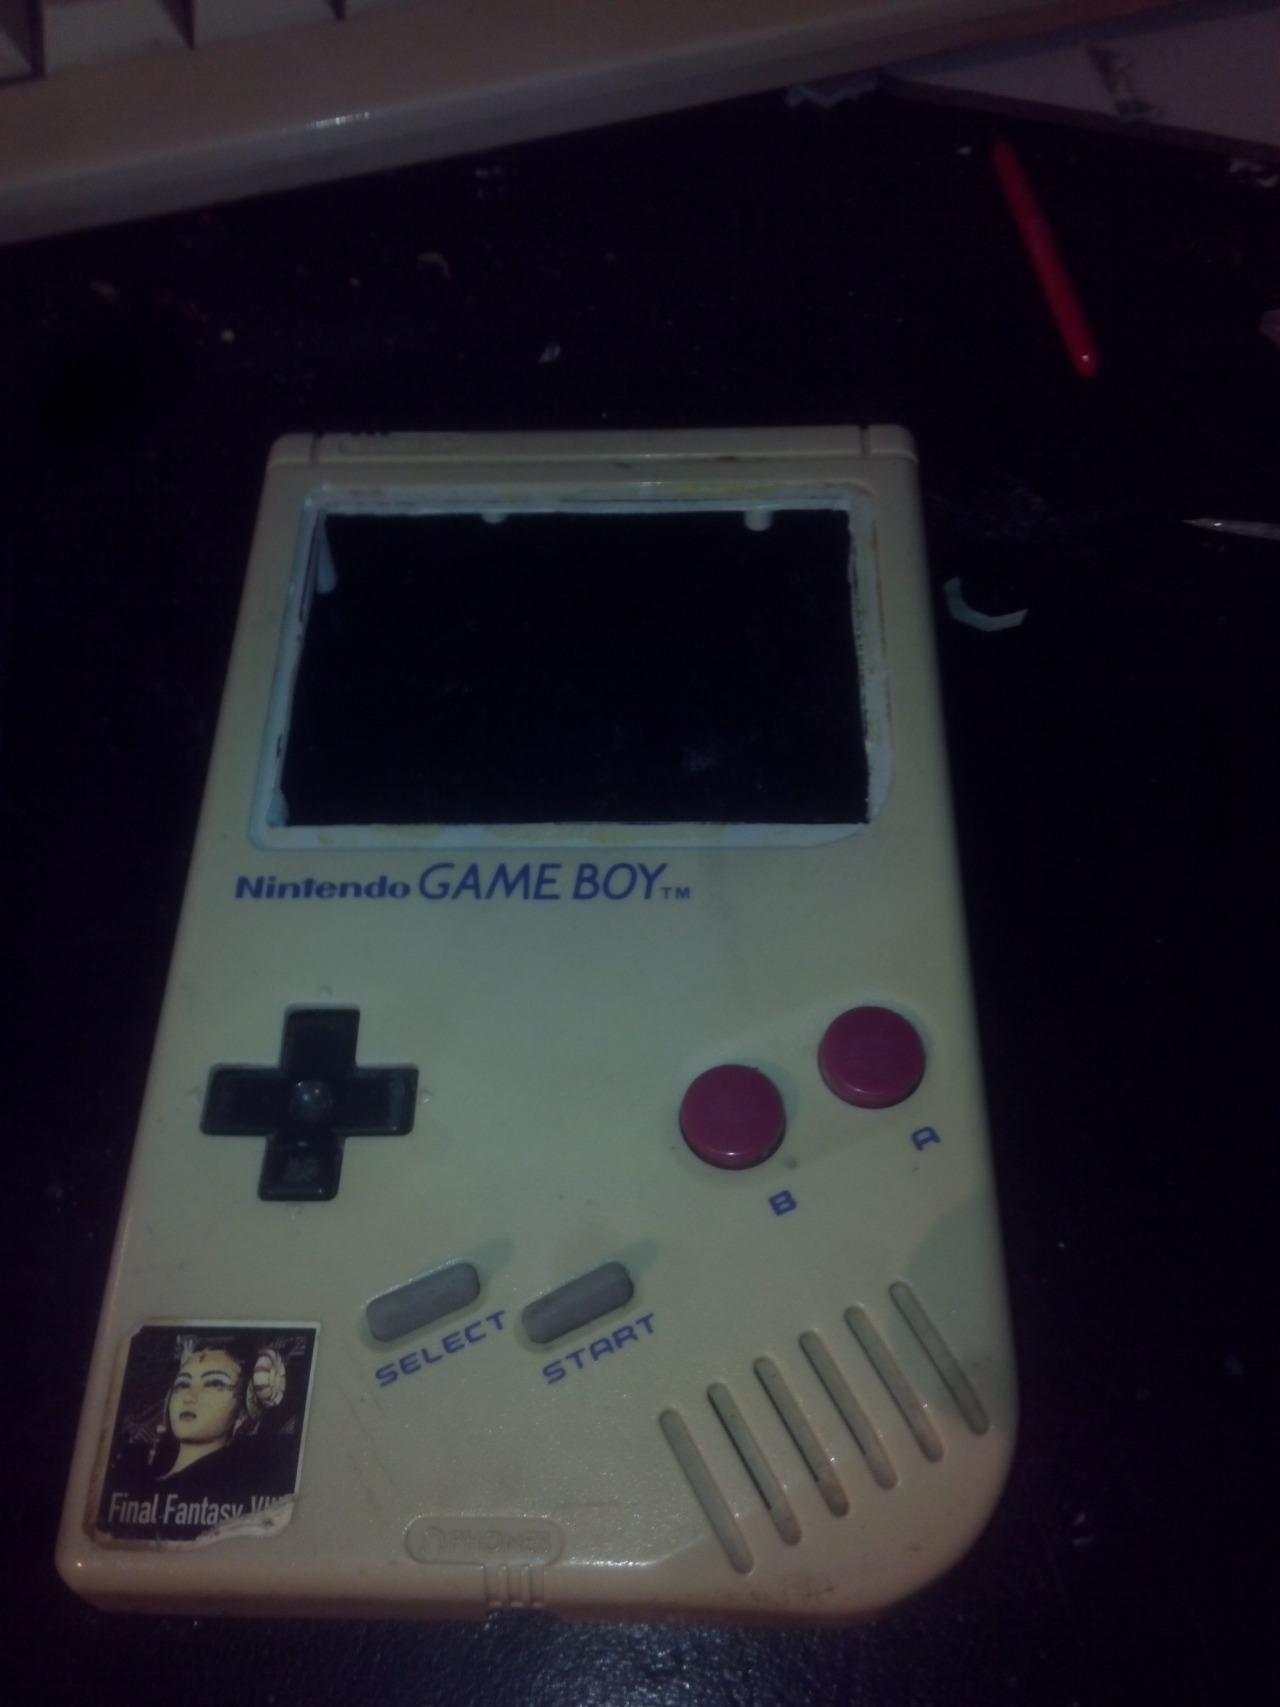
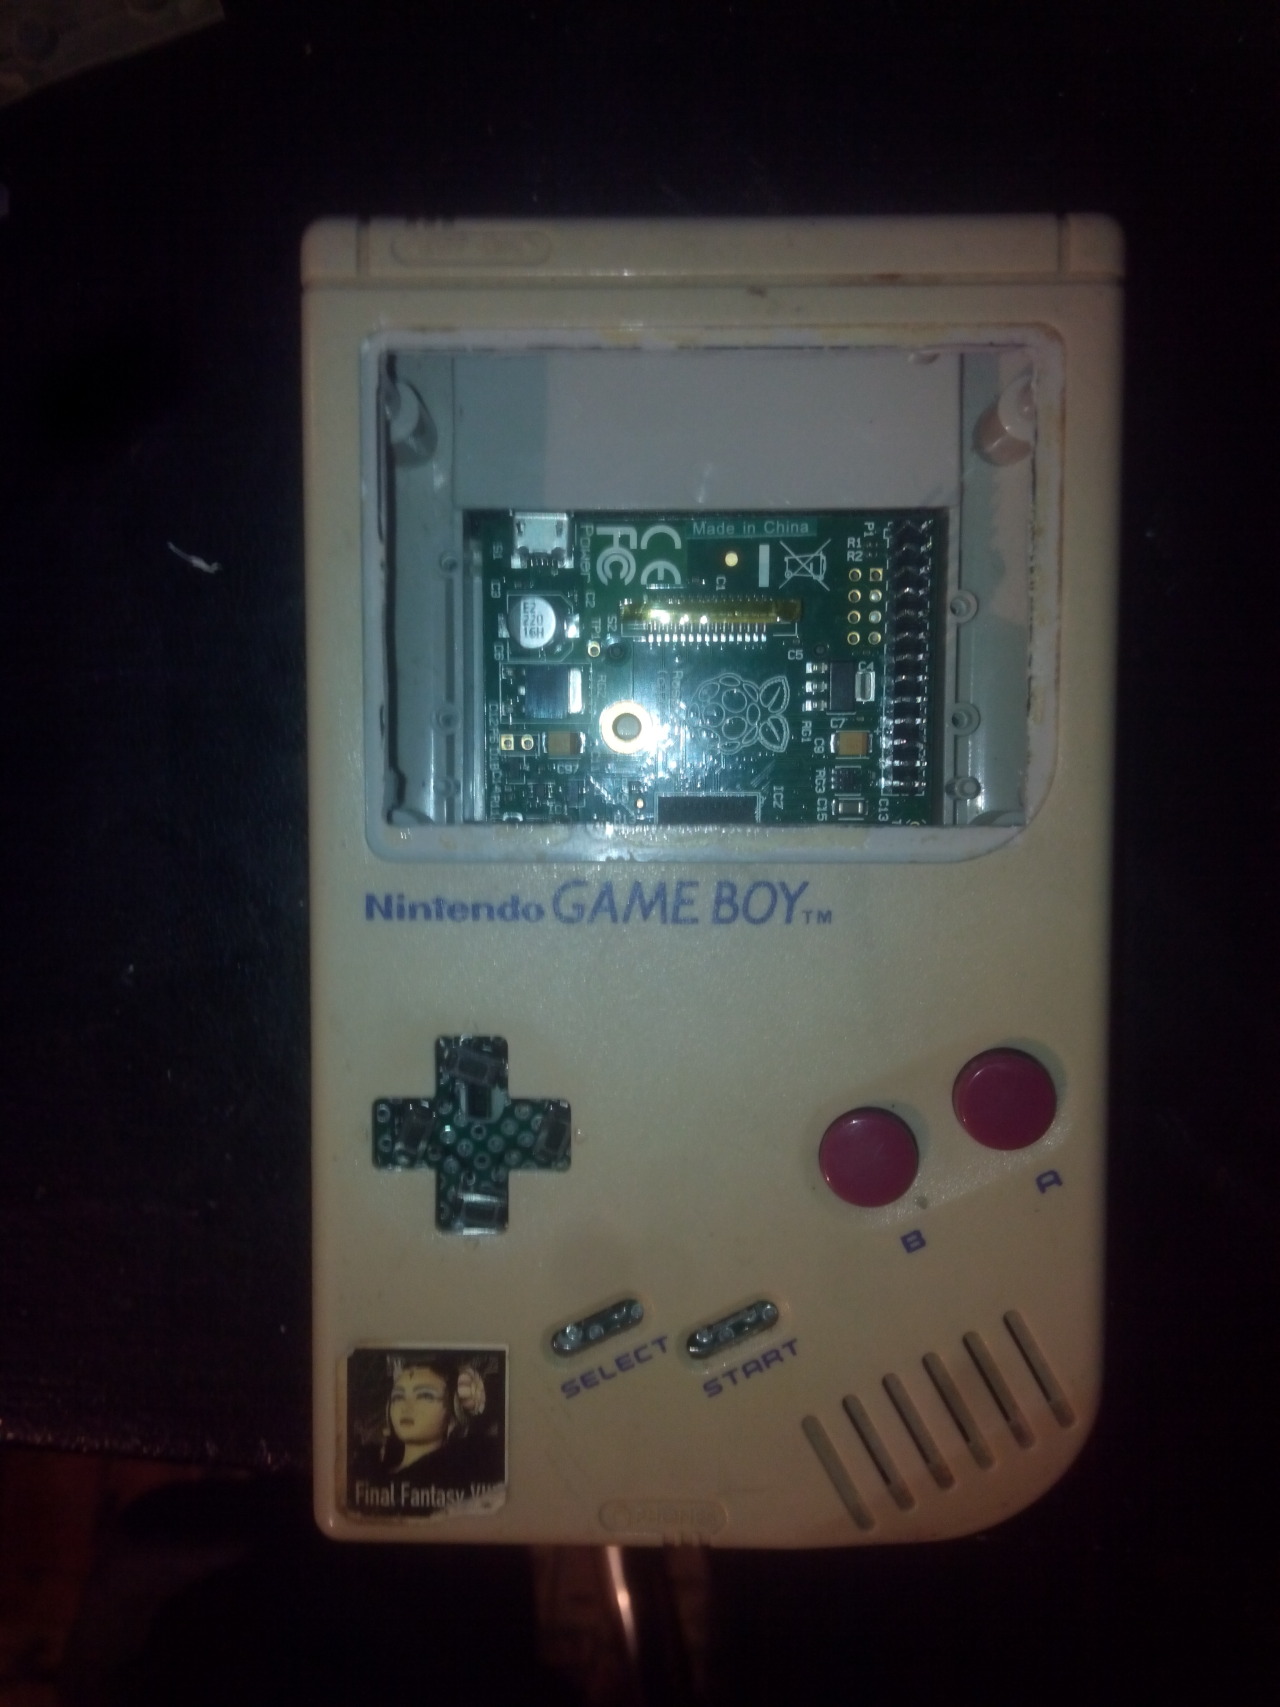
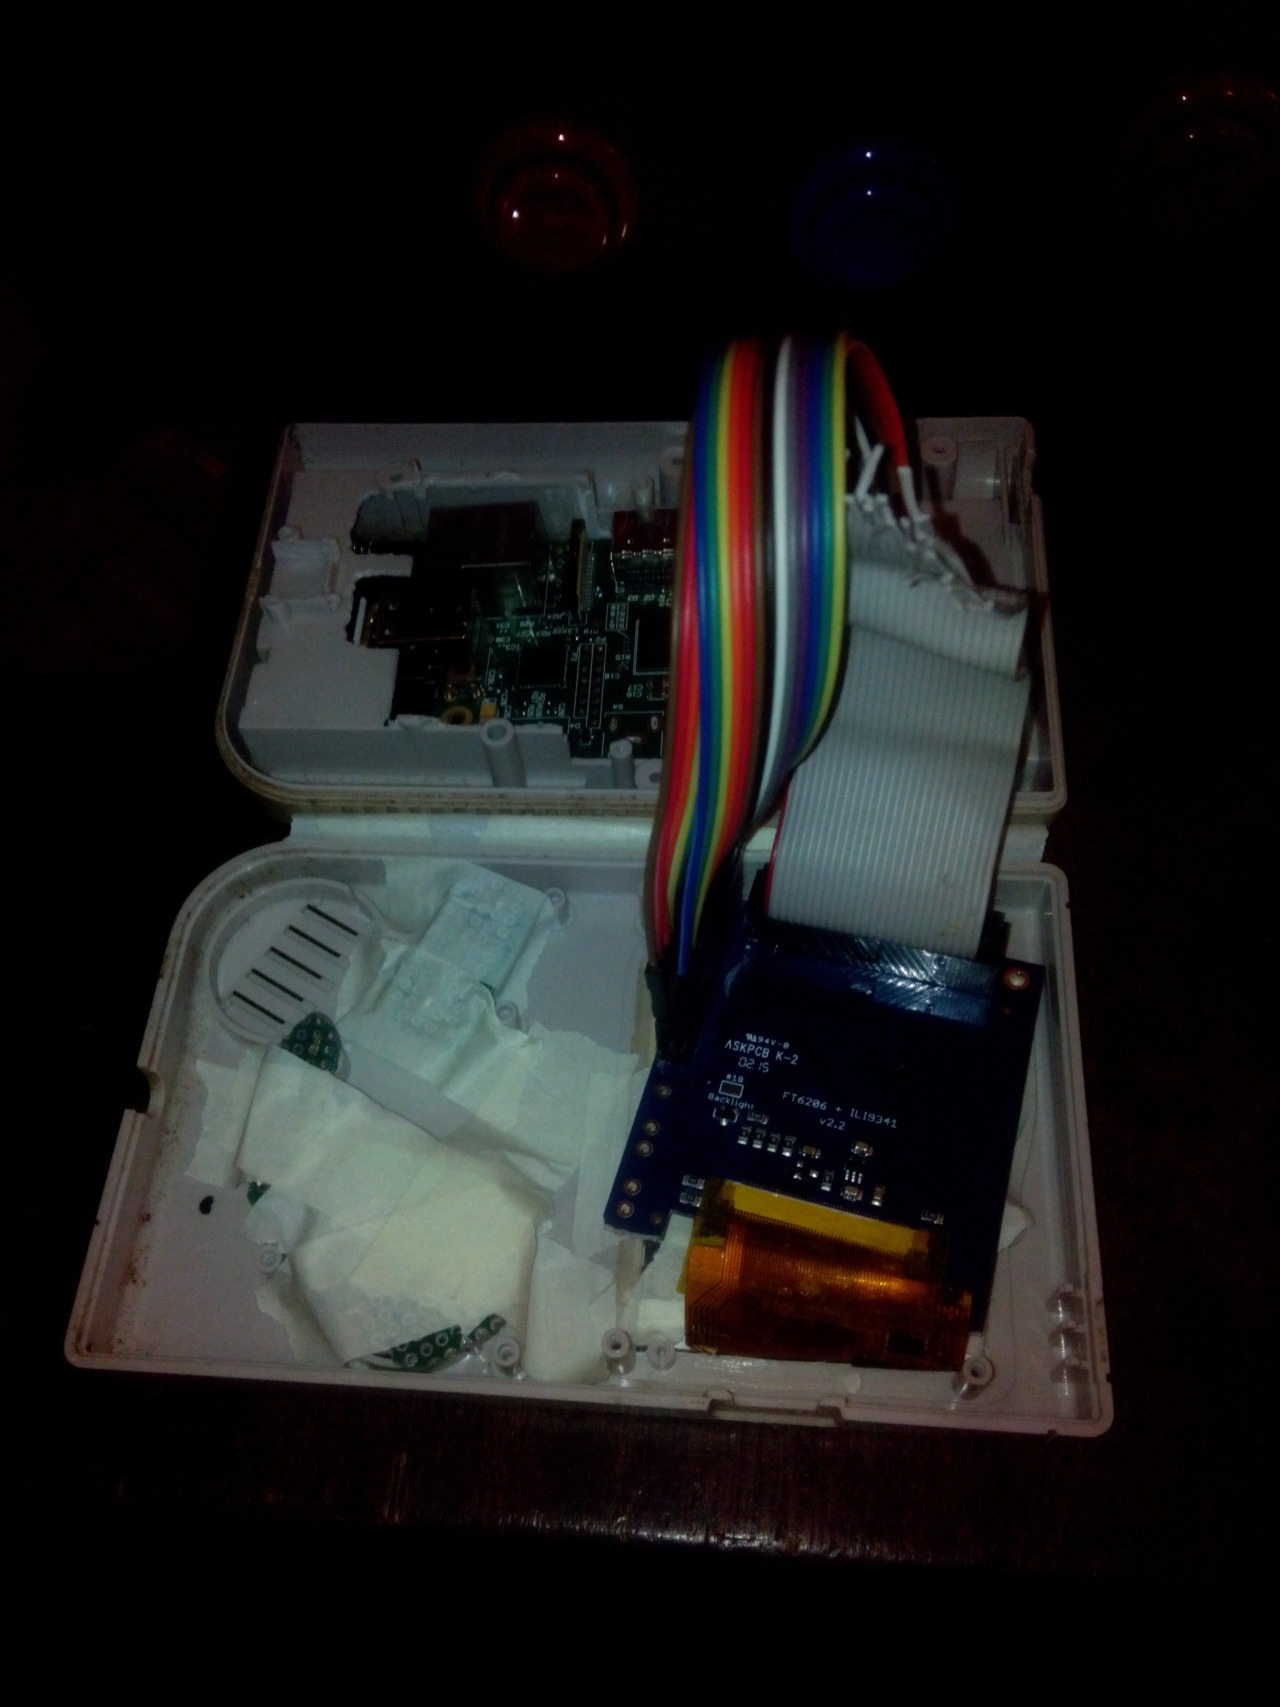
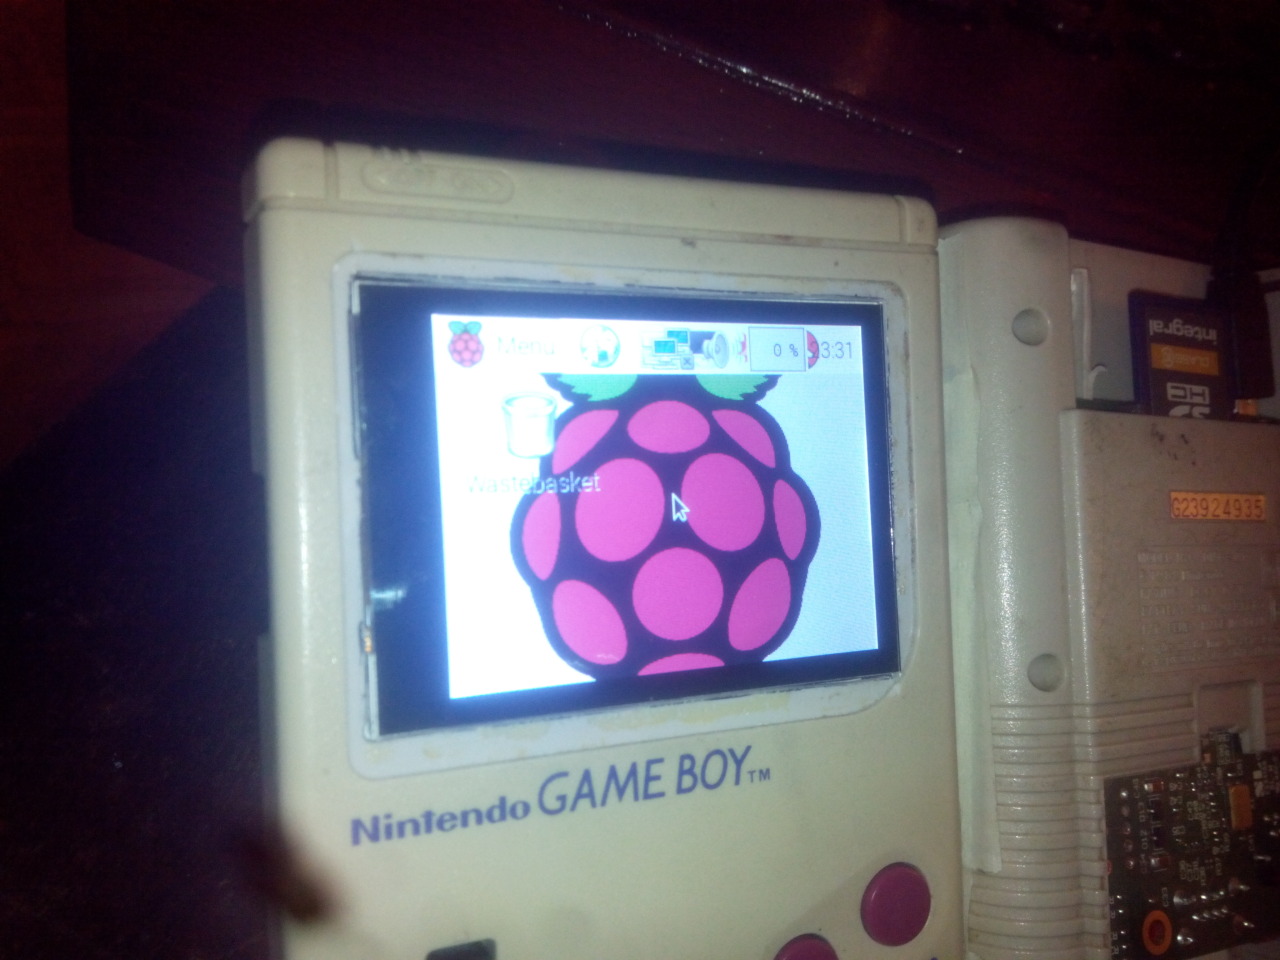
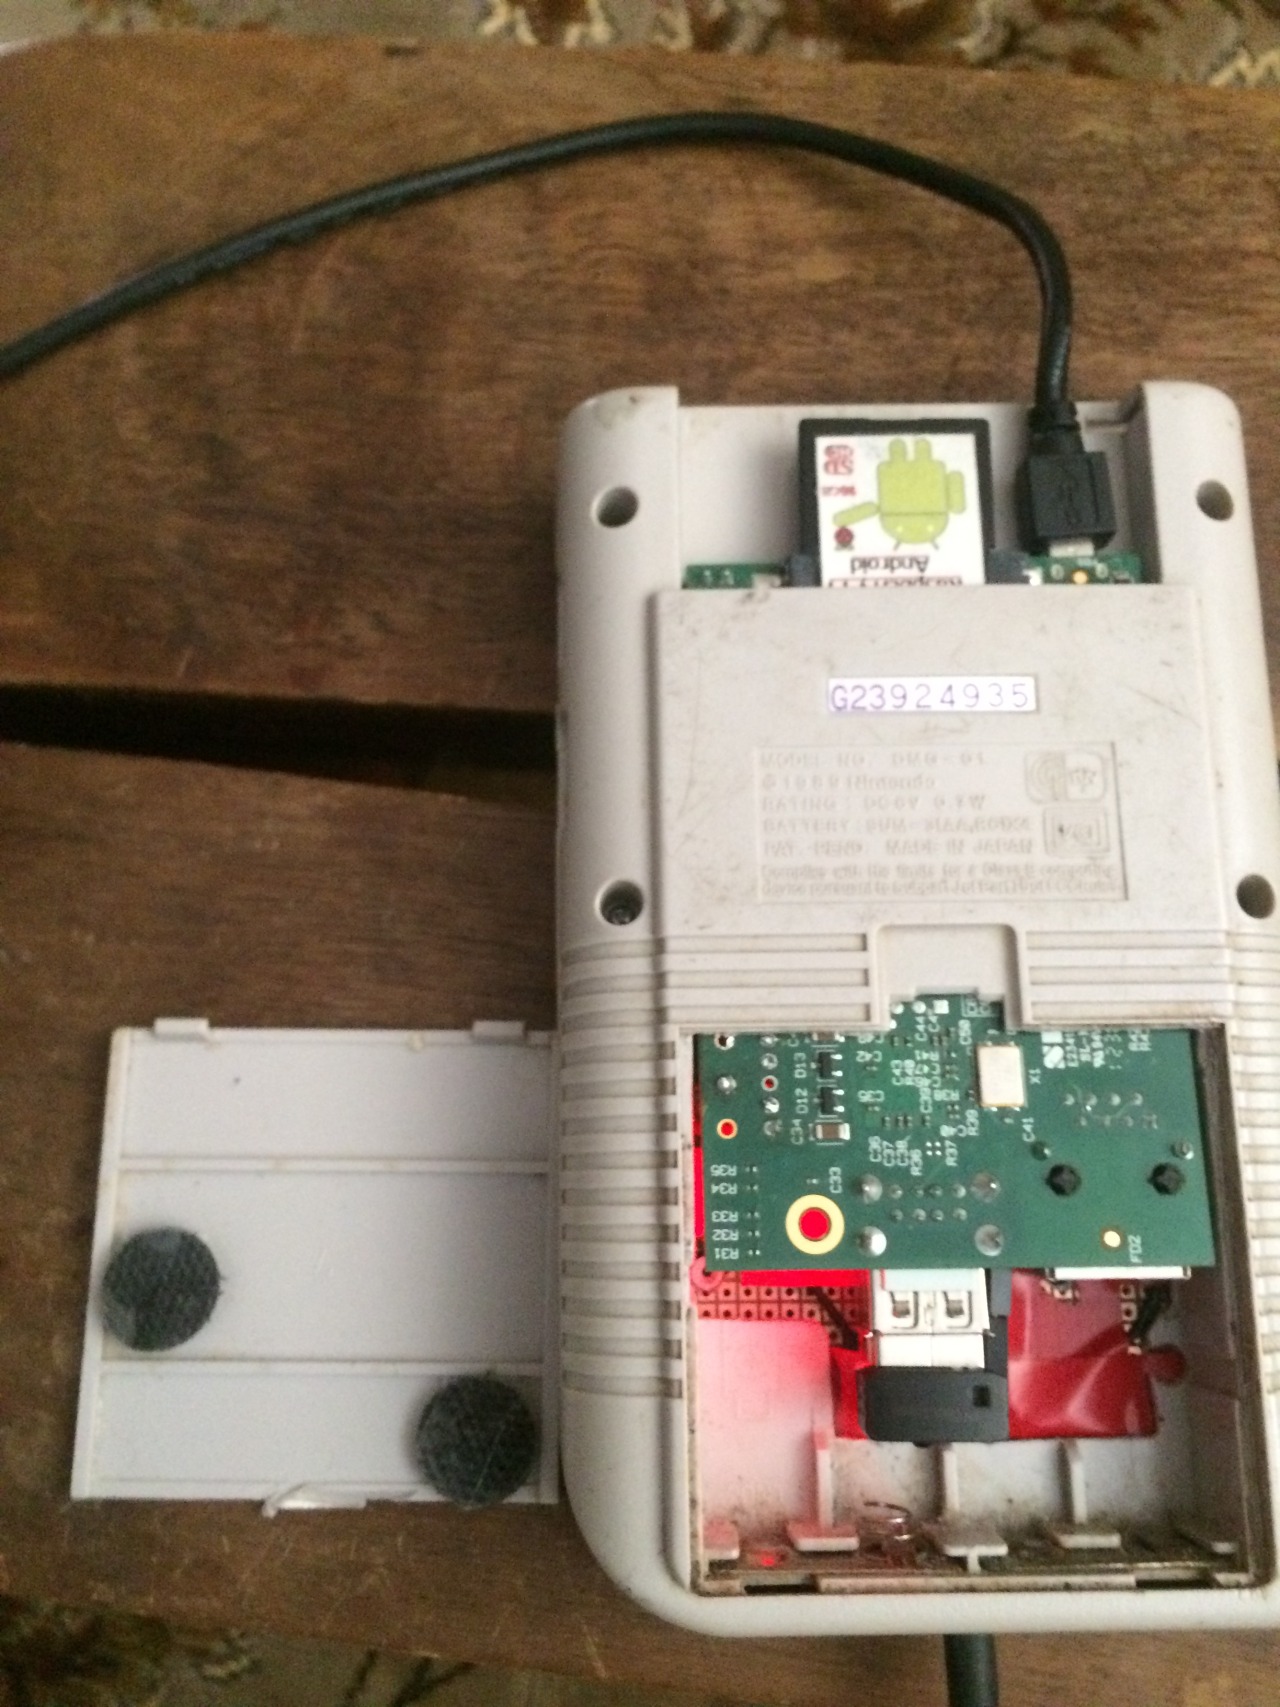
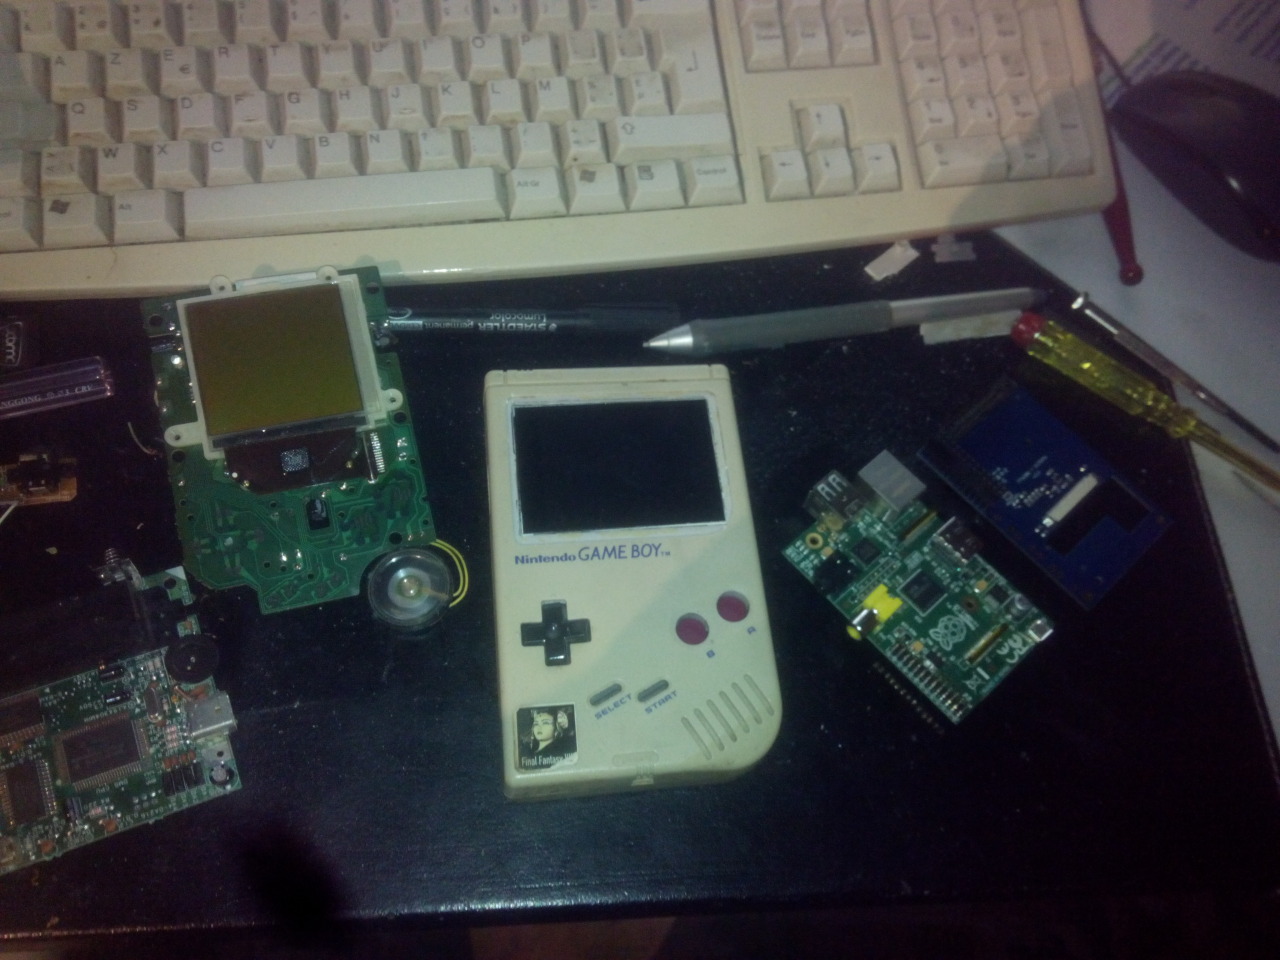
Below are some pictures of my GAMEBOY Pi that is mostly finished.
Things todo build in the speaker and power bar remove some plastic form d-pad because its fits to well…
But thinking of making a custom cartridge to slide in to the slot of the Gameboy.
(not my Picture just for show my version will have a power-bar also. How? wait and see )
Pictures:
How it looks now:
Build in Wifi and dongle for keyboard for now, in the future I gone extend one port to the side.
Ethernet is still available but don’t use a High-end cables, my own made utp cable works perfect 🙂
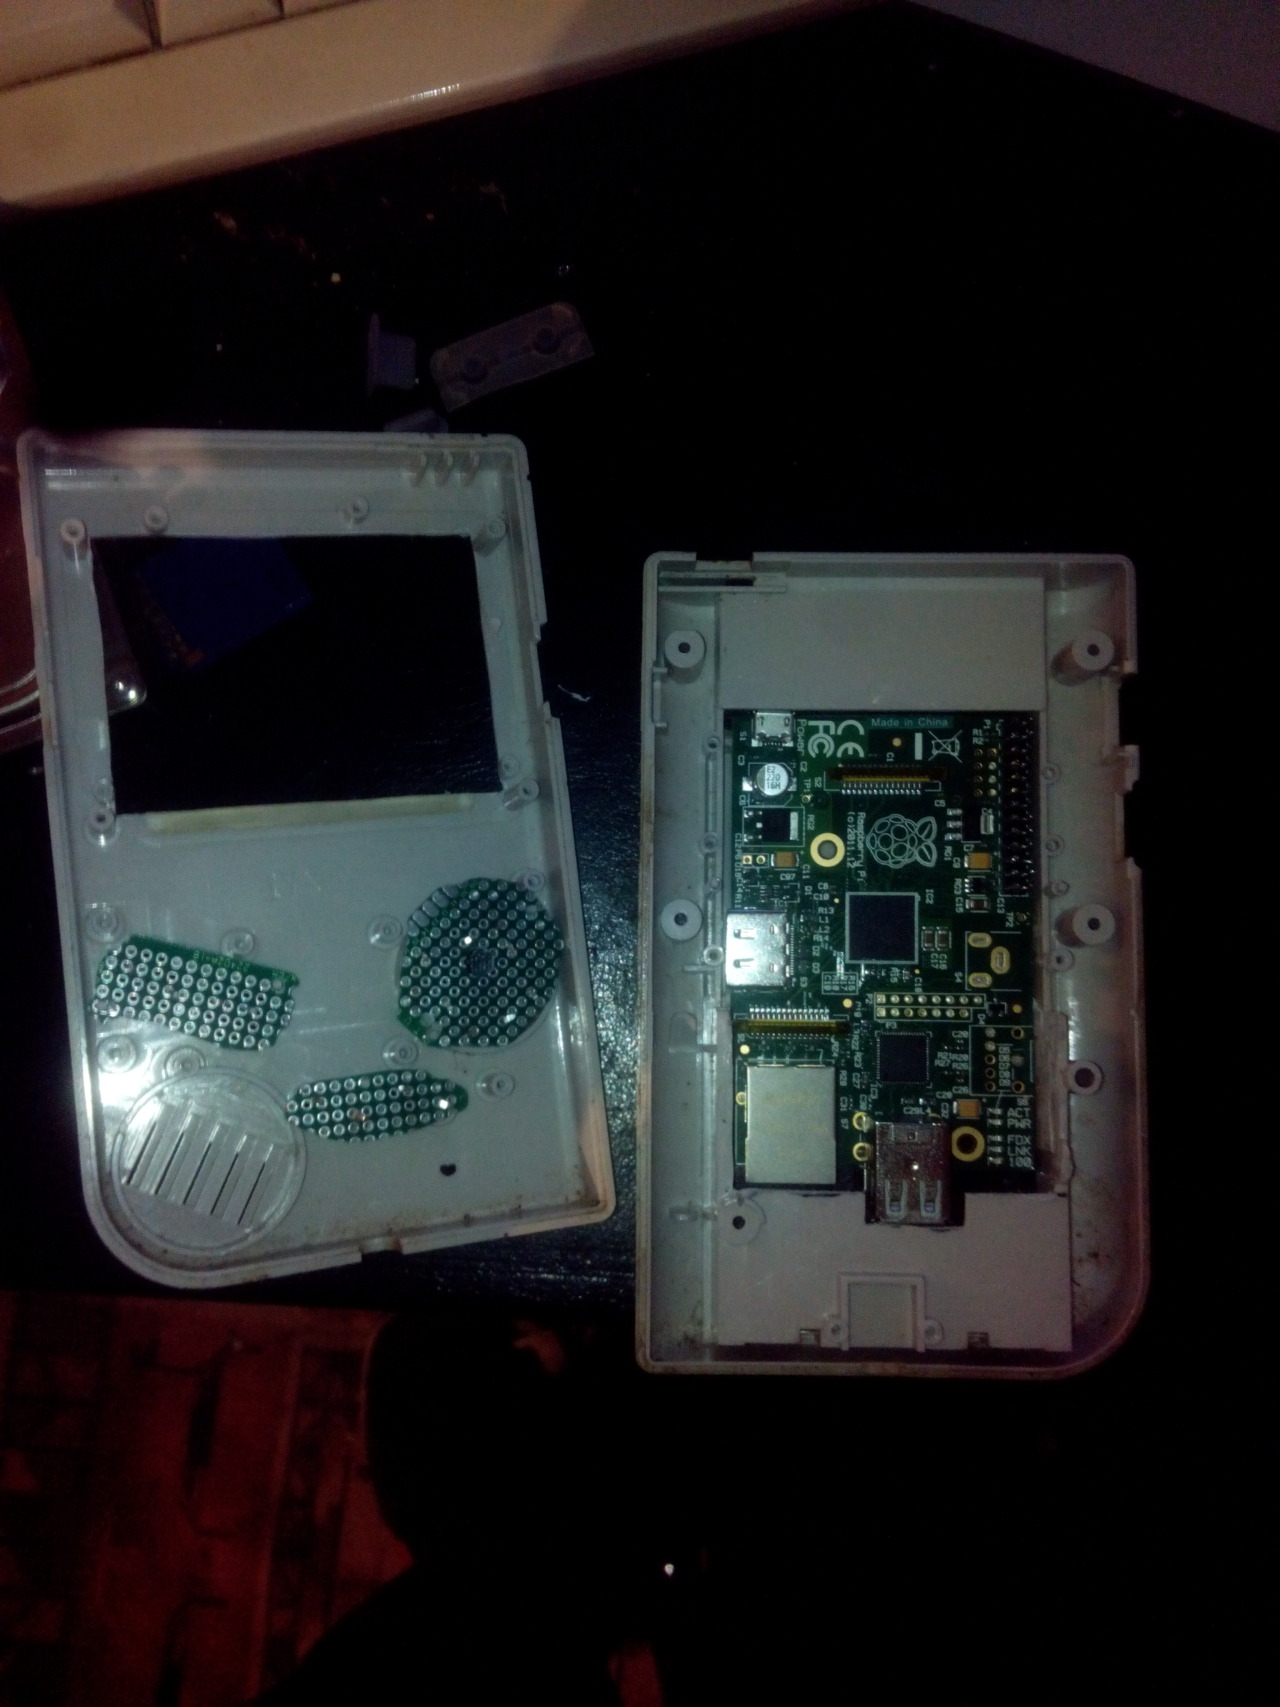
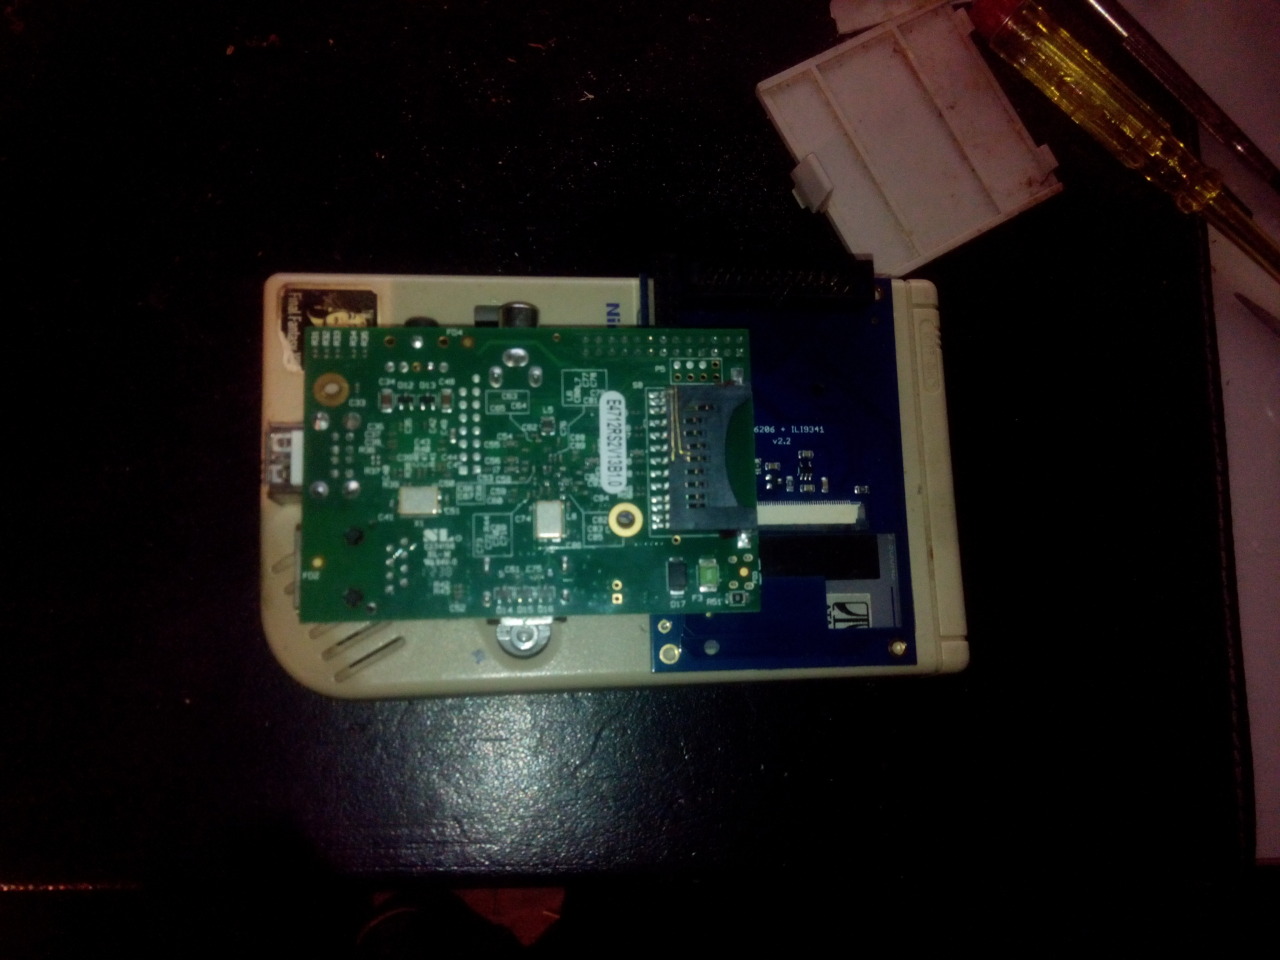
The mod of the case….
conversion:
The Layout
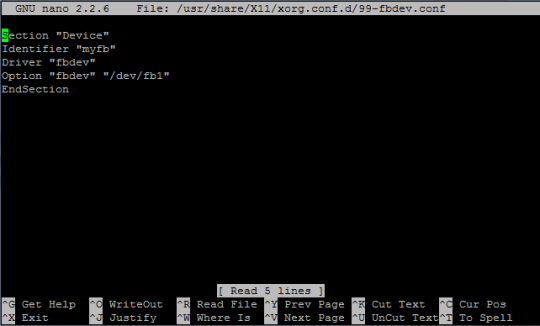
Fitting the LayoutBezel of Gameboy on top of screen (will lose touchscreen function so will be a sticker)
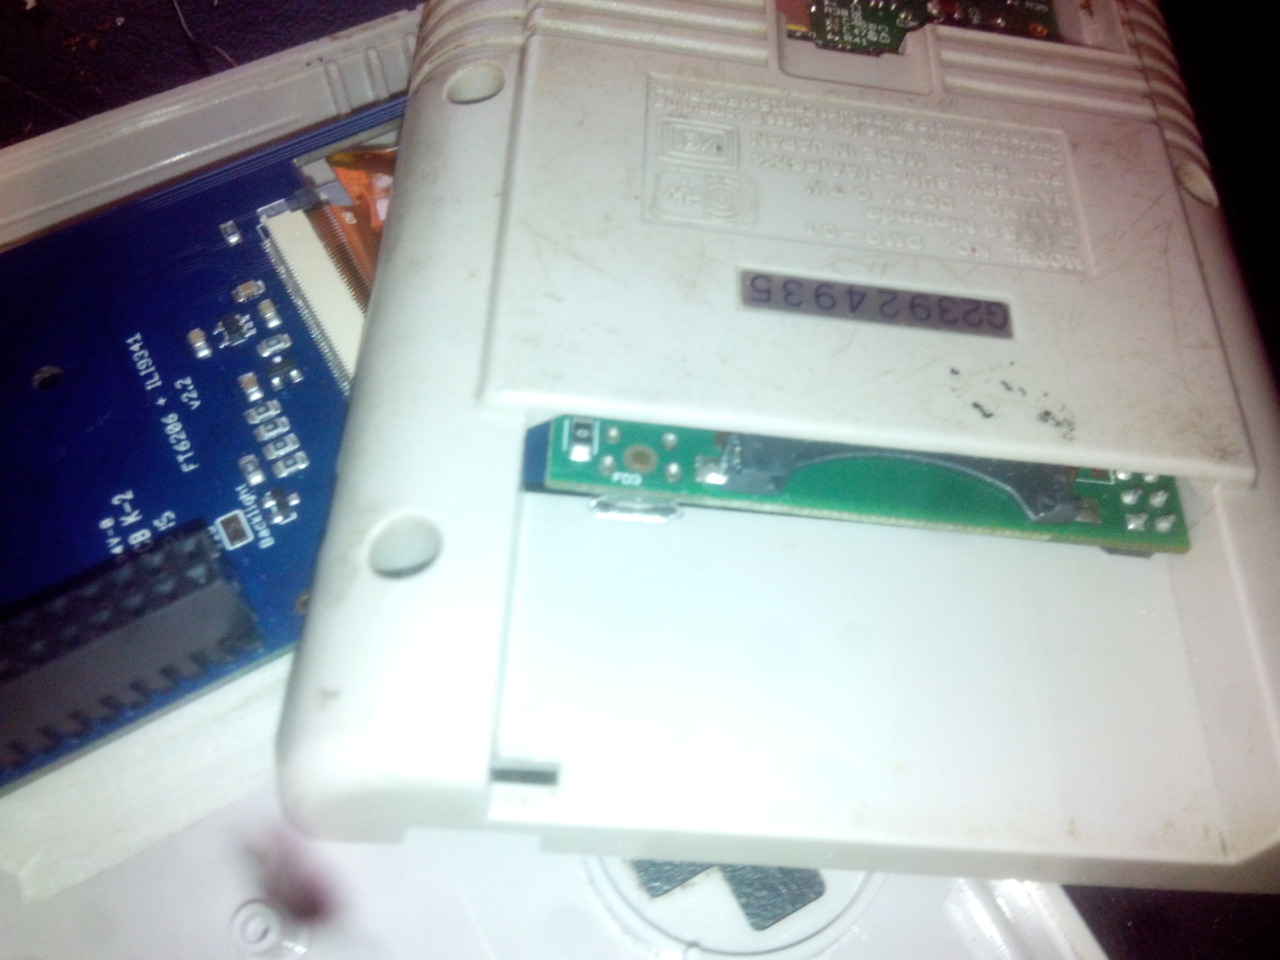
Problem Video out and speaker jack are on the wrong side. Need to de-solder them.
PiTFT pcb is to big for the Gameboy case need to chip it down.
Removed the hole left side (seen from picture above) until the FFC connector.
Lost the tact solder position but then again i would use them anyway.
First idea for custom joystick control but scraped this in the end.
(Do little things at the time don’t do everything at once grrr……. 🙂 )
The Screen fits the case
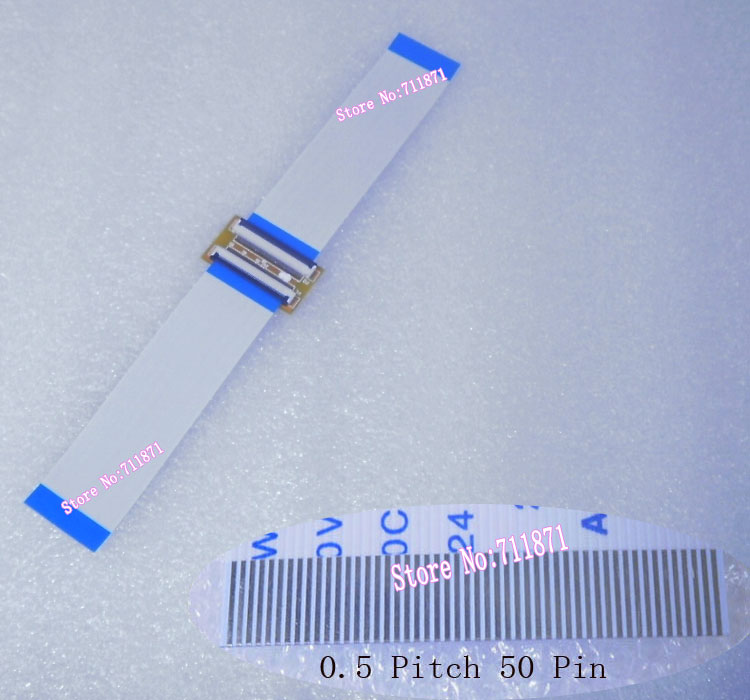
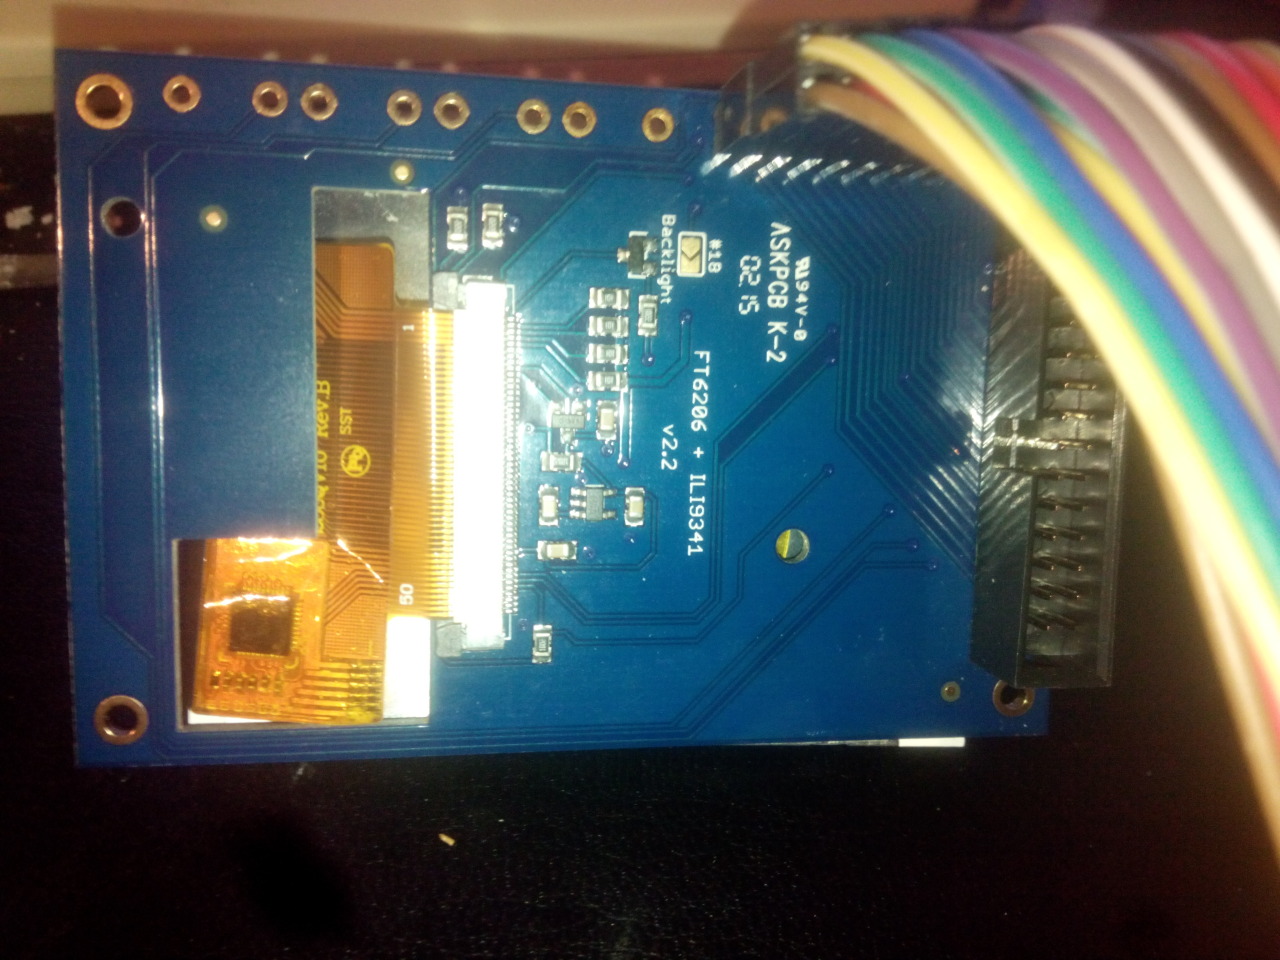
At first i wanted to solder all 26 pins to the pcb’s but then i ordered a FFC extender
This saved my so much time and cost 6 Euro 😛
These pictures showing the concept of the build.
I started this project awhile back so if you want to do this. Do little things, one thing at the time.
Don’t start doing lots of things at once because in the end you will need to change or rework it again…
(Tip from Ben Heck and now from me 😀 )
The Arivale of the FFC extender and extra Cable
After i got the ffc-cable to extend my PiTFT 2.8 inch from ada fruit.
Here are some progress pictures:
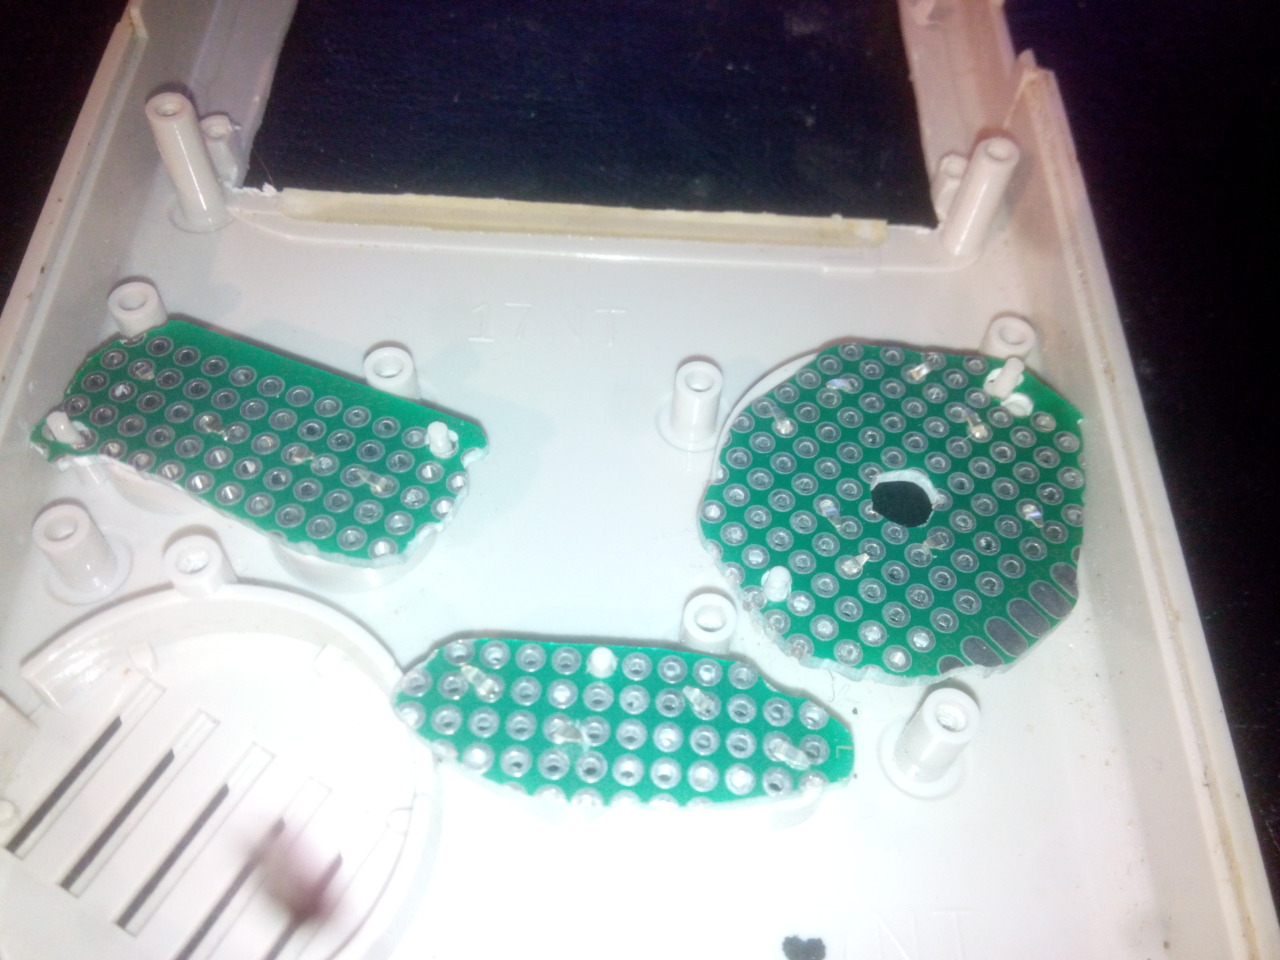
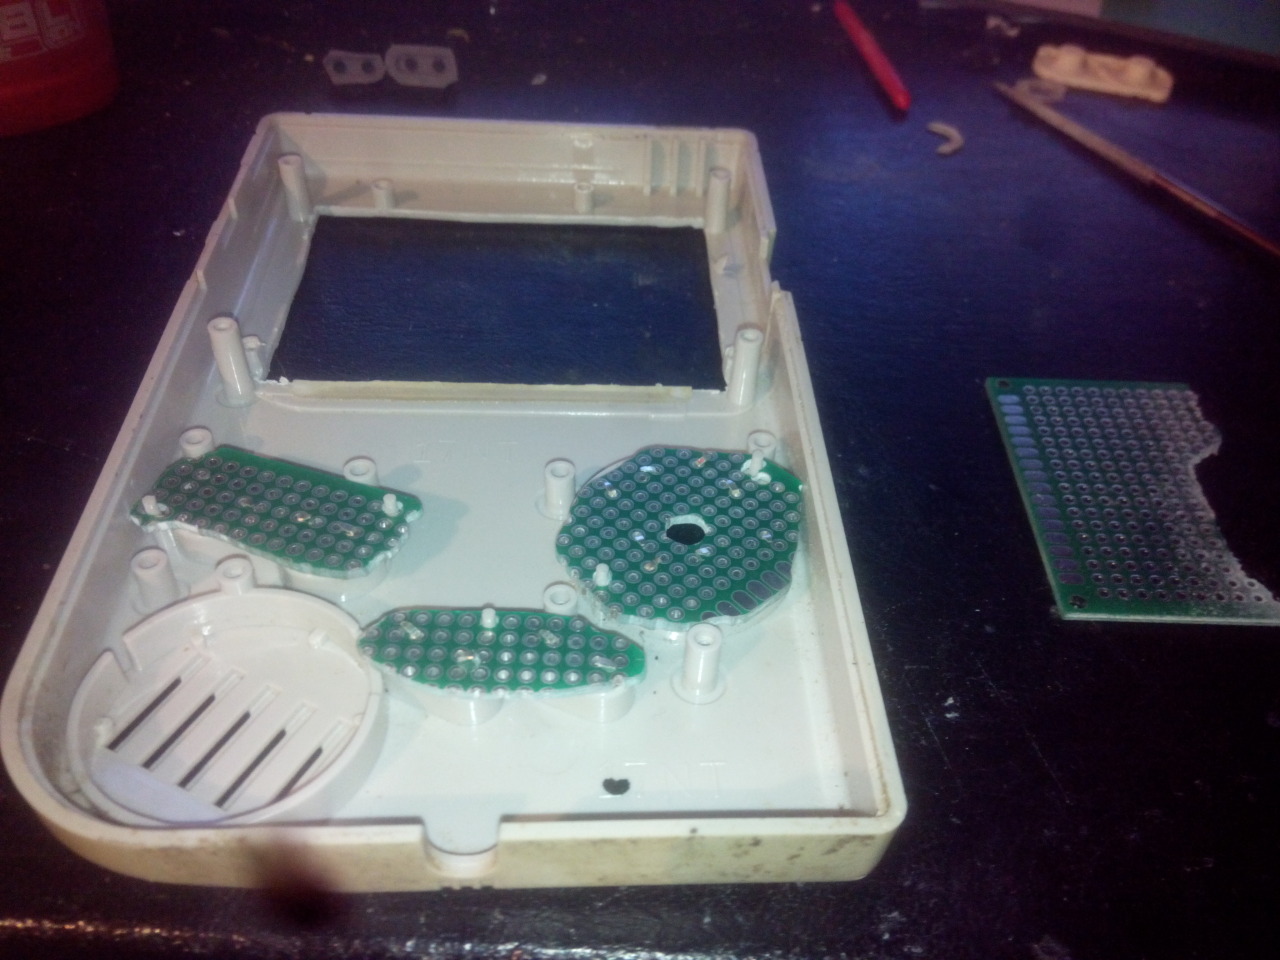
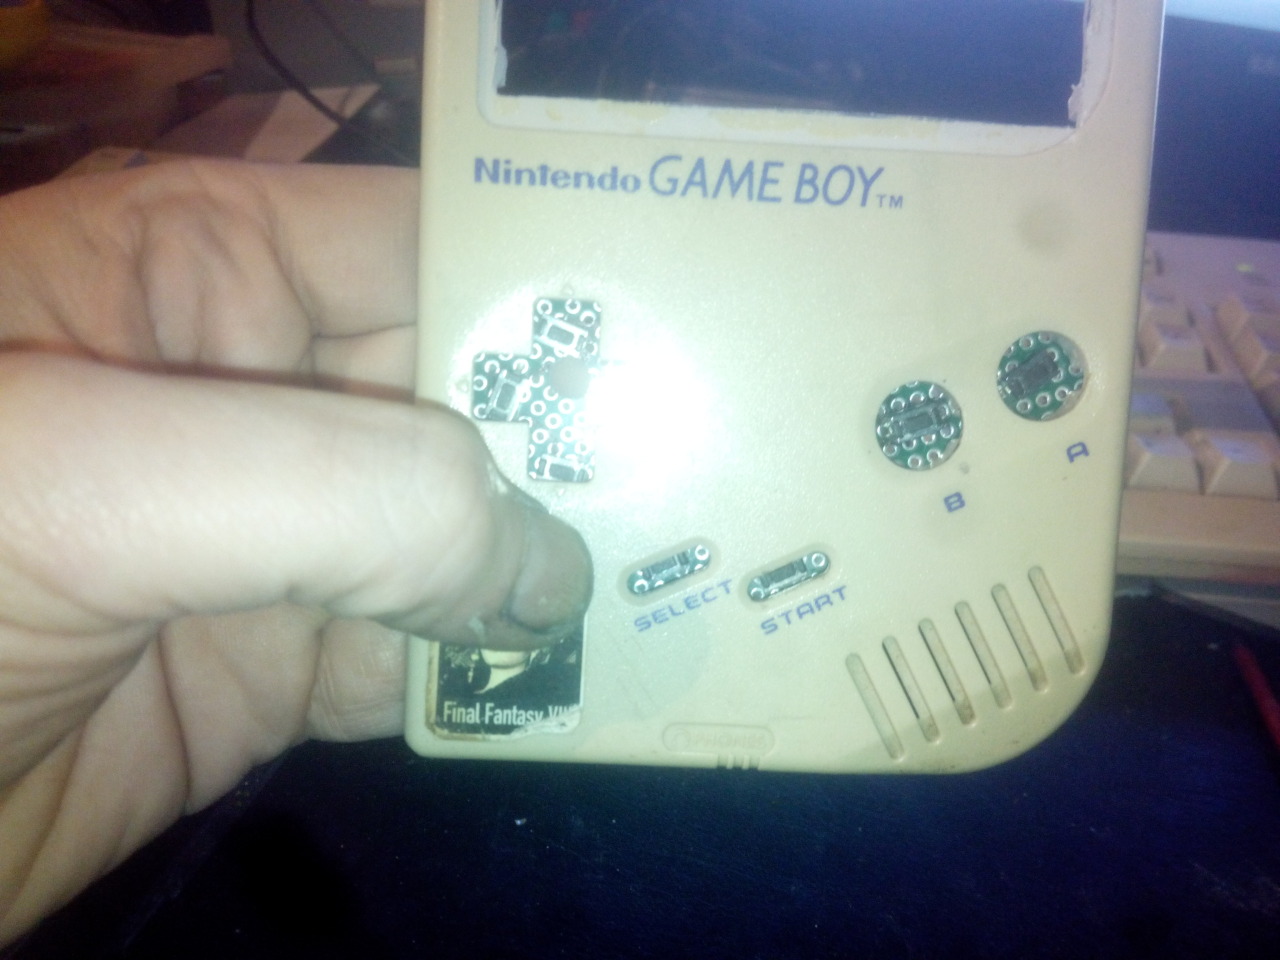
You need controls.
I have rebuild the pcb for the controls because this way its much stronger then before. And the board looks more like the original Gameboy PCB haha.
Also i made some video’s that show the different stages of the build :
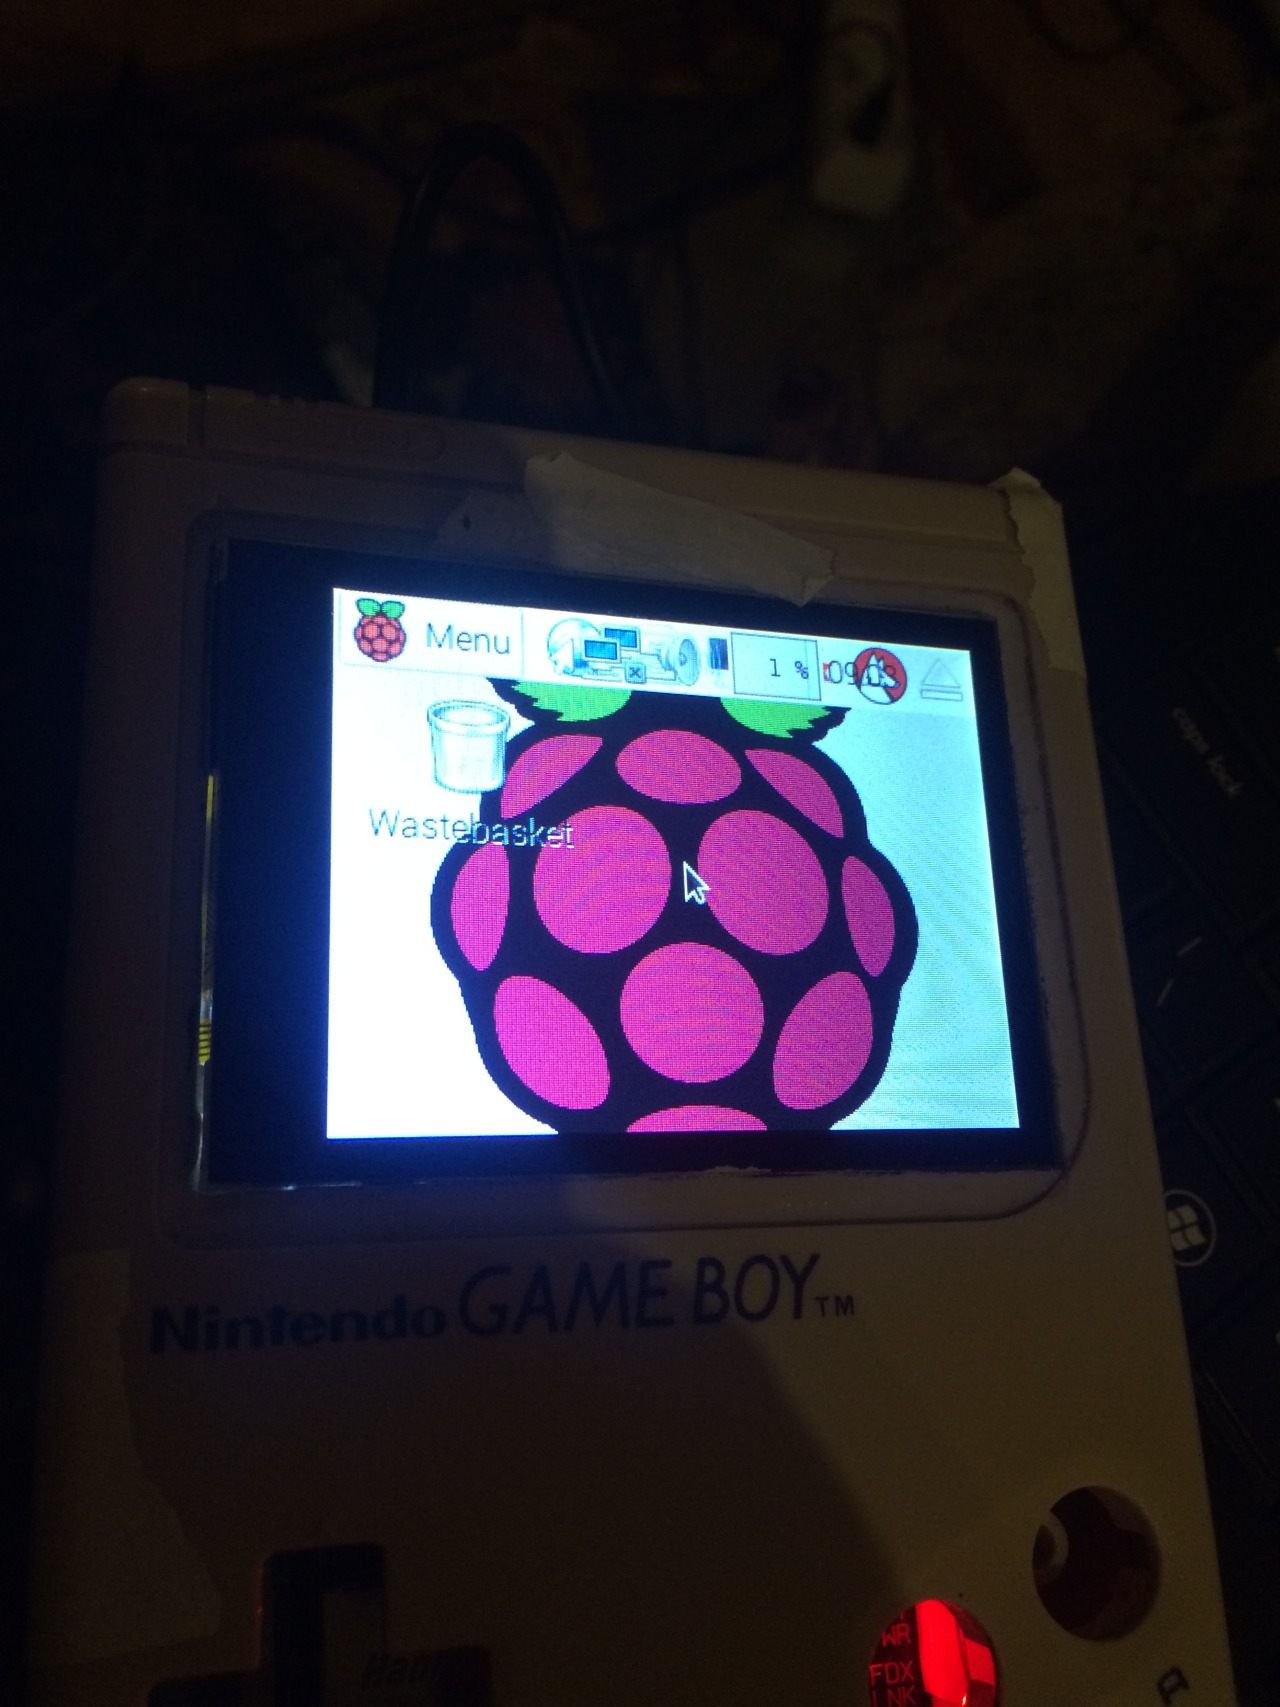
RetroPi and PiTFT from Ada fruit test!
(I have 4 Pi’s: two models B and one Model 2B+
RetroPi and PiTFT and DIY Joystick test!
Testing the tact switches…
RetroPi and PiTFT and DIY Joystick test 2!
More testing of the tact switches… 😀 Mario is fun hahaha.
For those how notice i have some strange glitching in my screen in the video’s above.
This is because at that time my raspberry pi setup was not perfect. Not that its now LOL.
But the screen glitching is gone…
GAMEBOY PI Semi complete Test!
This is my last video i made for now showing it closed (taped down) and using the original GAMEBOY buttons on my custom pcb using those 8 tact switches.
If I have time i will make a new video showing it closed with screws and without glitches in the screen.
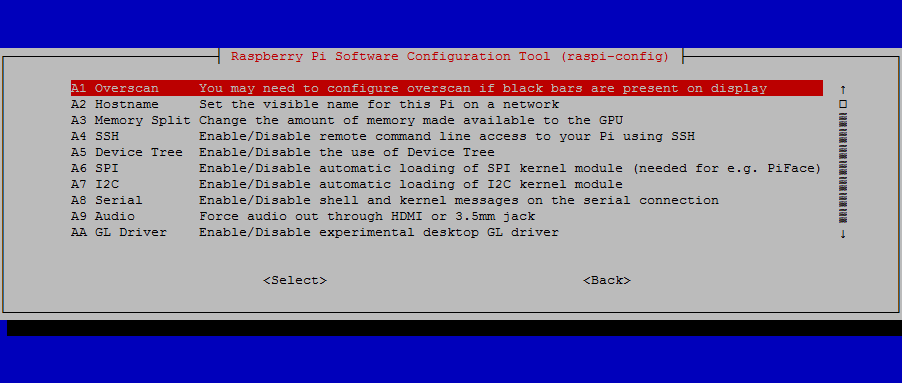
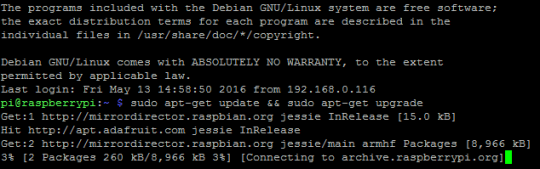
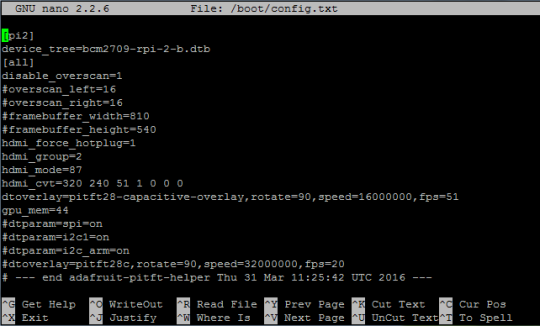
Boot in Raspberry pi, let it boot in to startx and then quit it to command line
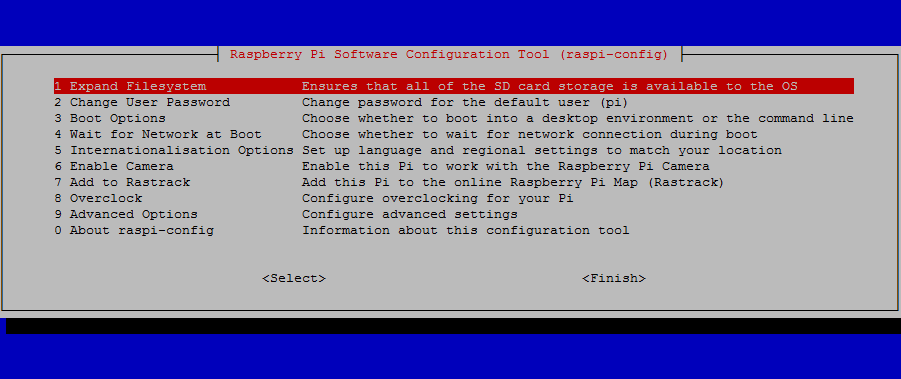
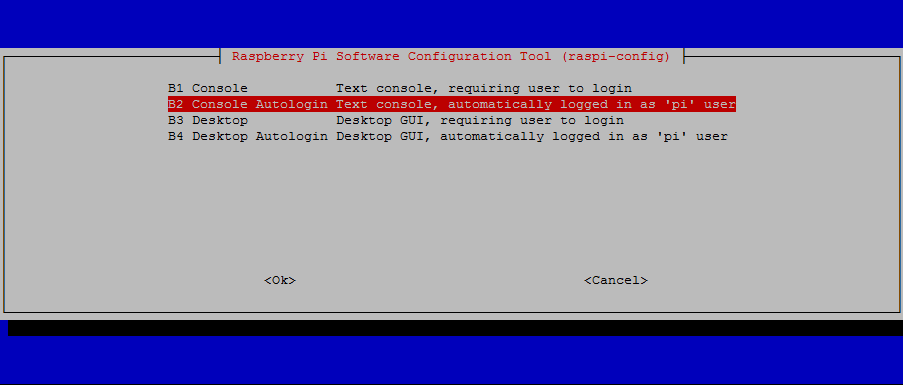
And launch Raspi-config: (sudo raspi-config)
Always start by expanding filesystem ( most builds do this but i recommend it anyway)
The choose 3 boot options and select console autologin.
Last things: 1 Overscan disable, 4 SSH Enable, 5 Device tree Enable, 6 SPI 7 I2C and 8 Serial disable, 9 Audio force 3.5mm headphone jack.
Side note for those how need Tochscreen: I disable 6, 7 and 8 to get more Gpio pins working
but this will disable touchscreen control. But this is not needed for this project anyway. And also you can make another SD card that can use the Touchscreen interface but you will lose the Gpio pins that use SPI, I2C and Serial.
And check if everything is still working if you want to add your own controls continue below
Adding Controls:
cd /~/ git clone https://github.com/adafruit/Adafruit-Retrogame cd Adafruit-Retrogame
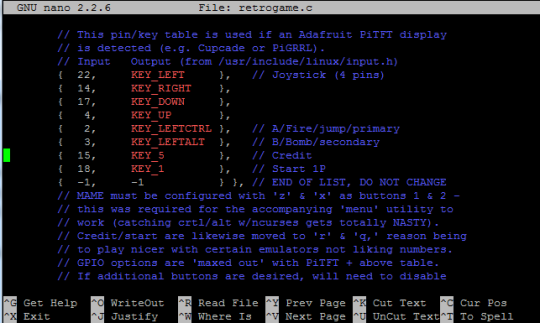
nano retrogame.c
Edit the file retrogame.c, looking for the table called ioStandard and the input.h table. Each line in brackets represents one pin on the GPIO header and a corresponding key code.
The full list of available keycodes can be found in /usr/include/linux/input.h
You’ll need to be careful in your GPIO pin selection…some are used by the PiTFT display, others have certain reserved functions. Any green GPIO pin is free to use…yellow pins may be okay with additional setup. If you’ve configured a tactile button on the PiTFT for shutdown, that pin is unavailable for game controls.
One wire from each button connects to a GPIO pin, while the other wire connects to an available ground pin (GND). The 2.8″ PiTFT boards have an extra header breakout for the first 26 pins…for the remaining pins, you’ll need to get clever with female jumper wires on the exposed part of the Raspberry Pi GPIO header.
That is why i disable I2C and Serial so i can use gpio 2, 3, 14 and 15. Made a mistake and was easier to use gpio 14 and 15 instead. otherwise i would only disable I2C…
After editing, compile and install the code with:
make retrogame sudo mv retrogame /usr/local/bin
Test fist before making something boot that is not working.
sudo /usr/local/bin/retrogame &
It works!
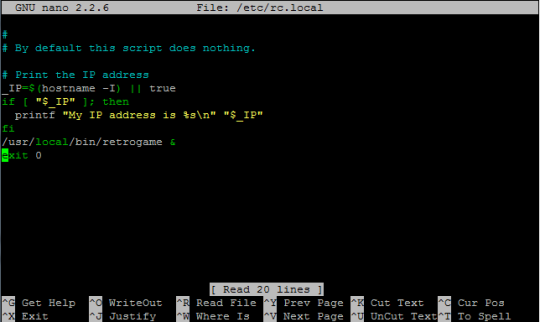
sudo nano /etc/rc.local
Reboot and you should now have “virtual” keys associated with GPIO buttons.
Or make it more fancy:
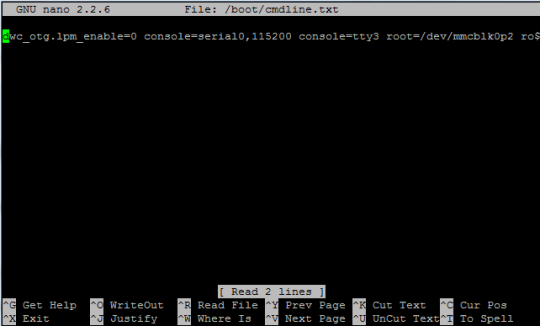
HOW TO HIDE BOOT TEXT:
sudo nano /boot/cmdline.txt
Add splach screen
Adding a splash screen can be done from in retropie so this is optional. but this way you know what is changed in retropie to show the splashscreen at start up, same method.
Custom Splash Screen for Raspberry Pi
This is a quick and dirty solution for an unanimated custom splash screen during boot.
First of all, you need to install fbi:
apt-get install fbi
Copy your custom splash image to /etc/ and name it “splash.png”
example code:
sudo mv splash.png /etc/init.d/
Next, create an init.d script called “asplashscreen” in “/etc/init.d/”.
sudo nano /etc/init.d/asplashscreen
I chose “asplashscreen” with an “a” at the beginning to be sure it starts first.
#! /bin/sh ### BEGIN INIT INFO # Provides: asplashscreen # Required-Start: # Required-Stop: # Should-Start: # Default-Start: S # Default-Stop: # Short-Description: Show custom splashscreen # Description: Show custom splashscreen ### END INIT INFO do_start () {
/usr/bin/fbi -T 1 -noverbose -a /home/pi/RetroPie/splashscreens/splash.png exit 0 }
If everything is correct you still boot in console but now is everything setup to start retropie
Start by typing:
emulationstation
After the startup you need to setup you fresh made controls by pressing one of the keys and then follow the onscreen text. Skipping by holding down one button.
After that your done and can start adding roms, you have 2 options for this by usb or by samba.
So you probably need to set that up 2 lucky for us you can do this from in emulationstation
choose retropie setup from the menu.
The let it boot directly in to emulationstation. Next Samba: Oleee
and if you did’t follow my splashscreen install you can choose it here:
For now i leave this project to rest, i am glad whit the progress that i made.
also after 6 months I can close the case 😀 hooray!!!
Recap of what to do:
-Fix asla error….
-Build power cartridge for power.
-Build in speaker
-Extend usb to connector port and replace it by usb.
Back in the hay days of the ps3RealPsDevContacted me to test his new ps3 tool.
Its a all in one tool for ps3 in a nice GUI.
He contacted me because i have been checking different build versions of eboot.bin files.
Results of scetool:
I shared a lot of info on forums like psx-scene.com ps3hax.com and i got his attention.
On twitter he asked me to beta test the final version of his tool.
I never beta tested a program my self and found it a great honor to do.
Over twitter i told him my results and he updated the bugs afterwards.
This was a great experions and found it very cool.
Below is the release info on psx-scene.com where you can download the tool your self.
He has also stated he plans on releasing the source code to his project at a later time, so others may continue the work he started. He has told me the reason he wishes to stop work on this project, is so that he can move on to develop other projects. Below you will find all 12 releases, all of which were released here at PSX-Scene first. Thanks PsDev!
It has been fun making this program, it has gone threw 12 awesome updates. I’m sad to stop working on it, but I’m happy to see what you guys can continue to make it into. I will release the source code, but not today, not in this thread. lets leave that for another time and focus on this release. This is also the most stable version, all features have been tested not only by me but other people too, (Dcnigma, Industerialcode) and all features work properly.
CHANGES:
scetool v0.28 added
New keys added to keyset
New script for EBOOT resigning
New file system layout
Removed do it button
Now everytime you select a option from one of the drop down menu it does that option right away
Removed SELF tool
Cleaner
Every option has its individual message box completion of operation
There is a new way that the file system works. There is a individual folder for all the tools (PUP Tools, scetool, Core_os Tool ect) And when you want to use the tool just place the file in the correct folder and use the GUI. This system is cleaner and allows me to not use as much code.
there is a script in the scetool folder called fix. This script is what can be edited to your standards for the EBOOT resigning. I did this so if you want to sign for 3.41 ect or change compression or anything just edit the script and run the GUI no need for new update, much more efficient
@echo off
FOR /F "tokens=1,2 delims= " %%A IN ('scetool.exe -i EBOOT.BIN') DO (
if [%%A]==[ContentID] set CID=%%B
)
scetool.exe --decrypt EBOOT.BIN EBOOT.ELF
rename EBOOT.BIN ORIGINAL_EBOOT.BIN > NUL
pause
scetool.exe --sce-type=SELF --compress-data=FALSE --skip-sections=TRUE --key-revision=0A --self-auth-id=1010000001000003 --self-add-shdrs=TRUE --self-vendor-id=01000002 --self-type=NPDRM --self-fw-version=0003005500000000 --np-license-type=FREE --np-content-id=%CID% --np-app-type=EXEC --np-real-fname=EBOOT.BIN --encrypt EBOOT.ELF EBOOT.BIN
pause
del /Q EBOOT.ELF > NUL
scetool -i EBOOT.BIN
pause
There is no more “Do It” button, since I change the way the files are modified I thought I will just make every option a button it self, si when you click the option you like from the drop down menu it will do the operation
Note* After click may take a sec for the operation to start be patient.
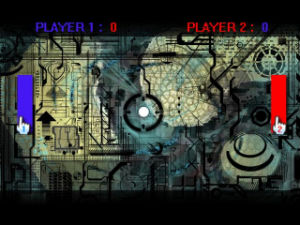
In 2010 i made a WiiPong game just to demonstrate that Wii Game Studio can have Multiplayer..
At that time Wii Game Studio was under heavy fire from developers. they said it was not really a good product…….
And that the creator can’t charge money for other peoples work…
It was a hole flame war, ok the creator
did’t credit any of the dev kit or other tools used for compiling Wii homebrew.
And it din’t came also include in the pack.. so at the time i found it no problem still not.
I found it easy to create simple games for my Wii without a extend knowledge of the WII Dev kit..
So for a graphic designer that wants to learn and create games for his wii its was a dream came true.
I payed for the gui and start making my first demo’s for my self..
Later on tehskeen.com wii game studio got such a bad name that i wanted to do something about it..
So i decided to make a game for it. to show that wii game studio can produce a good looking homebrew game and have multiplayer in a creative way..
Because Game studio only supported one wii controller you needed a good idea to map your controls for
two players on one controller..
so i thought to my self witch game use’s simple controls?
Pong!
So my WiiPong version of Pong will use only 1 controller.
There is no cpu play because the goal of this project was to show that 2 player games
where possible in Wii game studio you just needed to be creative to work it out..
How to play?
Left and Right for player 1
Plus and Minus for player 2


 Problem Video out and speaker jack are on the wrong side. Need to de-solder them.
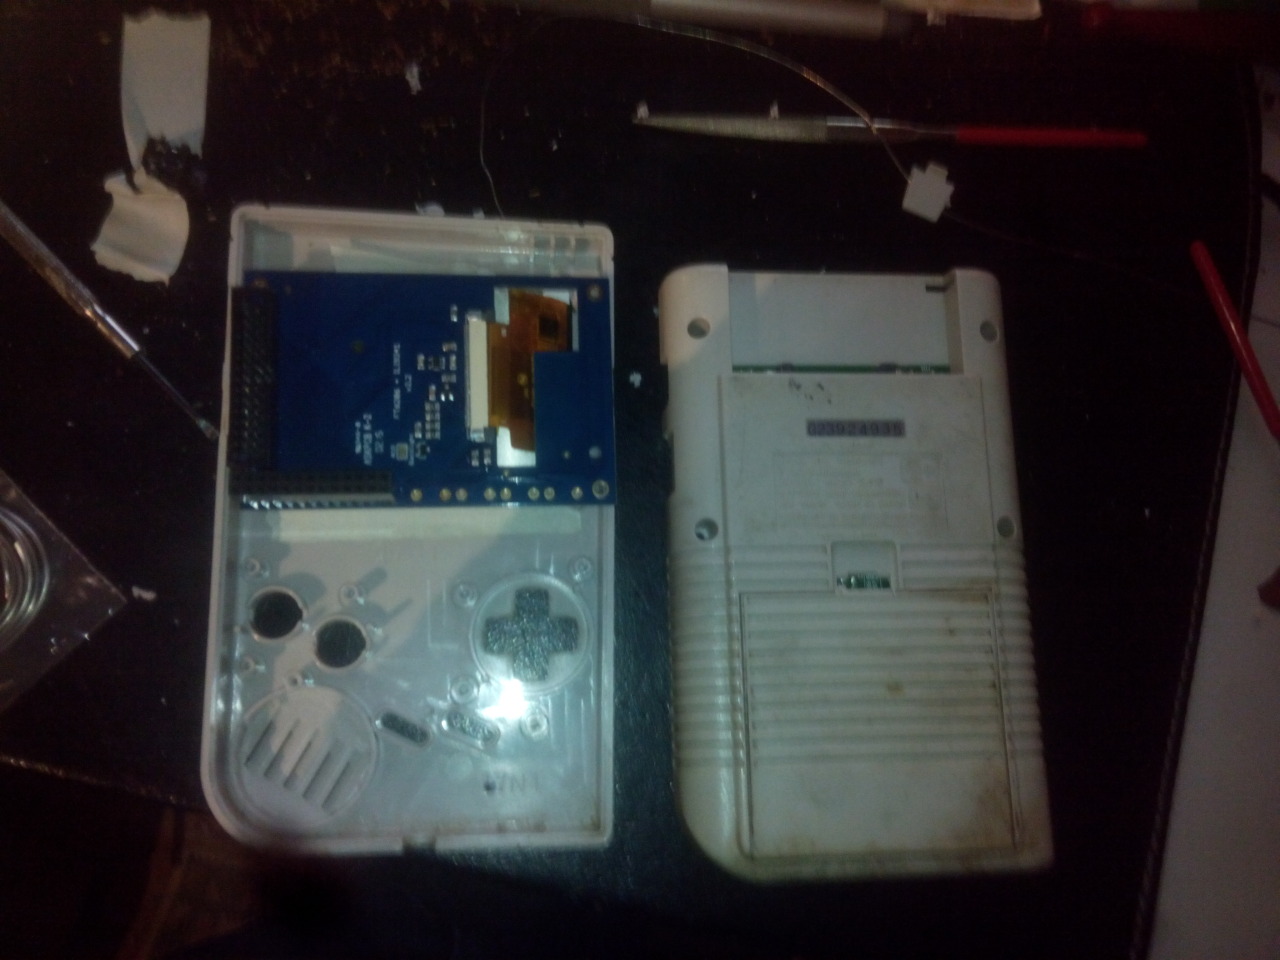

 PiTFT pcb is to big for the Gameboy case need to chip it down.